
Instruction Manual


Kompensator Installation
3 of 8
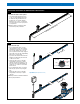
1 o’clock
Pipe
Heating
cable
11 o’clock
4 o’clock8 o’clock
Heating Cable Position
Straight Line Method
1 foot
Spiral Method (with optional enclosure)
1 foot
2
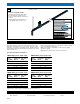
Apply cable to the pipe
• If your Kompensator cable set is the
same length as the pipe, run it straight
along the pipe in the 4 or 8 o'clock posi-
tion. For large diameter pipes you can
pitch or spiral the heater evenly along the
pipe length or run the cable longitudinally
at the 4 or 8 o'clock position.
• To provide extra heat at valves and other
fitting areas, simply wrap an extra 2 feet
of cable at these areas.
• Fasten the cable at one foot intervals
using quality electrical tape or plastic
cable ties. DO NOT over tighten or com-
press the heater as this will damage the
conductive core. If there is excess cable
double it back.
• If your Kompensator cable set is longer
than the pipe, spiral it evenly along the
pipe.
• Fasten the cable at one foot intervals
using quality electrical tape or plastic
cable ties.
Note: Pipes must be insulated for maximum
efficiency and performance.
Measure pipe to be heat traced
1
Determine the length of cable required
• For systems with pipe diameters up to
1 1/4" I.D. a single straight run should
be Sufficient using the KHL125 Series
Kompensator. For systems with pipe
diameters over 1 1/4" I.D. consult Heat-
Line Corporation to discuss your particu-
lar requirement.
Note: Pipes must be insulated for maxi-
mum efficiency and performance.
Installation Instructions for Kompensator Cables on Pipe