
Universal Remote User Manual


6
Hearth & Home Technologies • RCTS-MLT Instructions • 100-920 Rev. D • 10/10
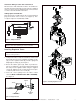
MATCHING SECURITY CODES
It may be necessary to program the remote receiver to the
security code of the transmitter upon initial use, if batteries
are replaced, or if a replacement transmitter is purchased
from your dealer. To program the remote receiver:
1. Set the slide button on the receiver to the REMOTE
position.
2. Push the LEARN button (one beep will be heard) on the
top of the remote receiver.
3. Then press the MODE button on the transmitter. Several
beeps indicate the transmitter’s code has been pro-
grammed into the receiver. When an existing receiver is
matched to a new transmitter, the new security code will
overwrite the old one. NOTE: When the LEARN button
is depressed, “beeping” sounds should be heard. If no
“beeping” is heard check to see that the receiver has
110-120VAC power to it.
If you are unsuccessful in matching the security code on
the fi rst attempt, wait 1-2 minutes before trying again.
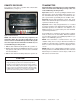
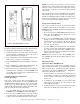
Figure 8. Transmitter LCD Display Screen
1. LOW - Battery power low. Replace batteries within two weeks.
2. TIMER - Indicates time remaining before system shuts off, when timer-programmed, 9 - hour
maximum setting.
3. MODE - Indicates operation MODE of system. ON indicates the system is on, either
manually or thermostatically. THERMO indicates the system will automatically cycle
ON/OFF, depending on programmed SET temperature. OFF indicates the entire system
is turned off.
4. SET - Indicates desired SET room temperature for THERMO operation.
5. FLAME - Single or double Flame/Hi icon indicates burner/valve
operational.
6. CLOCK - Indicates the current time in AM/PM.
7. ROOM - Indicates CURRENT room temperature.
8.
O
F - Indicates degrees Fahrenheit (ºC indicates degrees Celsius).
9. FAN - Indicates fan is on or programmed to come on. Three speed
settings are available.
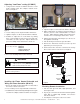
Transmitter Settings
Flip open the plastic cover on the front of the transmitter
to expose the “SET” buttons.
NOTE: Flashing numbers on the display indicate the sys-
tem is waiting for input, such as using the UP and DOWN
buttons to program a new setting. If no change is made to
fl ashing digits within 15 seconds, the system will complete
the procedure last programmed and reset the display to
its normal state.
Setting the Clock
1. Press and hold the TIMER/TIME button on the trans-
mitter for more than two seconds. The hour digit(s) will
begin fl ashing (see Figure 8, Location #6).
2. Press the UP or DOWN button until the desired hour is
displayed in AM or PM.
3. After setting the desired hour, press and release the
TIMER/TIME button again to set the minutes; the minute
digits will begin fl ashing.
4. Press the UP or DOWN button until the desired minutes
are displayed.
5. Press and hold the TIMER/TIME button again for more
than two seconds. The time digits will cease fl ashing,
indicating the clock has been successfully set. You may
also press the SET button on the transmitter to stop the
time digits from fl ashing and set the time.
OPERATING INSTRUCTIONS
To operate the system, press the MODE button (Figure
7) on the transmitter to select the operational MODE de-
sired.
• ON indicates the system is on, either manually, timed or
thermostatically.
• THERMO indicates the system will automatically cycle
ON/OFF, depending on programmed set temperature.
• OFF indicates the entire system is turned off.
MODE
SET
DOWN
FLAME
FAN
UP
TIMER
TIME