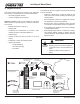
R Isle Royale Non-Catalytic, Top-load, Wood Heater Owner’s Manual Installation and Operation Tested and Listed by Models: Portland Oregon USA O-T L US C OMNI-Test Laboratories, Inc. 823-0170 - MBK 823-0290 - PMH CAUTION T O N RD O A D SC I D DO NOT DISCARD THIS MANUAL • Important operating and maintenance instructions included. • Read, understand and follow these instructions for safe installation and operation. • Leave this manual with party responsible for use and operation.
R Isle Royale Wood Stove and Welcome to the Quadra-Fire Family! of our stoves, inserts and fireplaces. And yet we are oldfashioned when it comes to craftsmanship. Each unit is meticulously fabricated and gold and nickel surfaces are hand-finished for lasting beauty and enjoyment. Our pledge to quality is completed as each model undergoes a quality control inspection.
R Isle Royale Wood Stove Safety Alert Key: • DANGER! Indicates a hazardous situation which, if not avoided will result in death or serious injury. • WARNING! Indicates a hazardous situation which, if not avoided could result in death or serious injury. • CAUTION! Indicates a hazardous situation which, if not avoided, could result in minor or moderate injury. • NOTICE: Indicates practices which may cause damage to the fireplace or to property.
R Isle Royale Wood Stove 1 Listing and Code Approvals D. BTU & Efficiency Specifications A. Appliance Certification Model: Isle Royale EPA Certified: 2.9 grams per hour OMNI Test Laboratories, Inc. Report No & Date: 061-S-18-2 Efficiency: 76.5% BTU Output: 11,500 to 46,000 Type: Listed Room Heater, Solid Fuel Type Heating Capacity: Standard: UL1482, UL737, ULC S627-93 and (UM) 84-HUD, Mobile Home Approved.
R Isle Royale Wood Stove 2 Getting Started A. Design, Installation & Location Considerations Consideration must be given to: • • • • Safety Convenience Traffic flow Chimney and chimney connector required It is a good idea to plan your installation on paper, using exact measurements for clearances and floor protection, before actually beginning the installation.
R Isle Royale Wood Stove C. Negative Pressure Draft is the pressure difference needed to vent appliances successfully. Considerations for successful draft include: • Preventing negative pressure • Location of appliance and chimney Negative pressure results from the imbalance of air available for the stove to operate properly. Causes for this imbalance include: • Exhaust fans (kitchen, bath) etc.
R Isle Royale Wood Stove D. Flue Draft Considerations F. Tools And Supplies Needed Location of the appliance and chimney will affect performance. As shown in Figure 6.1 on page 6 the chimney should: Before beginning the installation be sure that the following tools and building supplies are available. • Be installed through the warm space enclosed by the building envelope. This helps to produce more draft, especially during lighting and die down of the fire. • Penetrate the highest part of the roof.
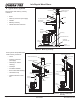
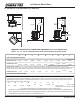
R Isle Royale Wood Stove H. Typical Stove Systems Spark Arrestor Cap Fireclay Flue Liner With Air Space Concrete Cap Stove system with masonry chimney consists of: Rafter • Stove Flashing • Chimney Connector (stove pipe) 1 in (25mm) Clearance With Firestop • Thimble Ceiling Joist • Masonry Chimney • Hearth Pad Floor Protection Eave Combustible Wall Thimble, 12 in (305mm) Of Brick Sheathing Outside Air Rear Vent Outside Air Termination Cap Floor Protector Airtight Cleanout Door Figure 8.
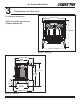
R Isle Royale Wood Stove 3 Dimensions and Clearances A. Appliance Dimensions 29" (737mm) NOTE: Flue Collar size is 6 inch (152mm) diameter (ID) 30" (762mm) 28-3/4" (730mm) Figure 9.1 - Front View 22-3/4" (578mm) 16-3/4" (425mm) CL 30" (762mm) 26-7/16" (570mm) 8-1/4" (210mm) 16-1/2" (419mm) 24-5/8" (625mm) Figure 9.
R Isle Royale Wood Stove B. Clearances To Combustibles (UL And ULC) C A B H 8 in. max D J Ceiling G J* CL E I F 26-7/16 in. (672mm) I** F E MINIMUM CLEARANCES TO COMBUSTIBLE MATERIALS In Inches & (Millimeters) NOTE: “A”, “C” and “F” Dimensions are to the inside diameter of the flue collar.
R Isle Royale Wood Stove 4 Installation Considerations A. Hearth Protection Requirements FLOOR PROTECTION: Floor protector must be noncombustible material, extending beneath heater and to the front, sides and rear as indicated. The floor must be noncombustible or otherwise adequately protected from radiant heat given off by the unit and from sparks and falling embers. A layer of thin brick or ceramic tile over a combustible floor is not sufficient.
R Isle Royale Wood Stove B. Reversible Flue Collar The flue collar is reversible for either a top or rear venting installation. The unit is shipped with the flue collar in the top vent position. Converting Collar For Rear Vent Installation 1. Remove 5 Phillips head screws from the rear shield, lift shield up and set aside. 2. Remove bolts from each side of the flue transition (2 total). (Place your free hand in flue opening to locate and retrieve nuts attached to bolts.) 3.
R Isle Royale Wood Stove C. Outside Air Kit Installation D. Installation Of Optional Blower Included in Kit: 1 flex flange; 2 cable ties; oustide air termination cap; mounting screws (Discard the remaining parts). Items Needed for Installation: 4 inch (102mm) diameter flex pipe in the length as required for your installation; Phillips screwdriver; Silicone sealant; Drills and saws necessary for cutting holes through the wall or flooring in your home.
R Isle Royale Wood Stove 5 Chimney Requirements A. Venting Components B. Chimney Systems Chimney Connector: Prefabricated Metal Chimney It is also known as flue pipe or stove pipe. The chimney connector joins the stove to the chimney. It must be a 6 inch (152mm) minimum diameter 24 gauge mild steel black or 26 gauge blued steel, or an approved air-insulated double wall venting pipe. • Must be minimum 6 inch (152mm) diameter (ID) high temperature chimney listed to UL 103 HT (2100oF) or ULC S629M.
R Isle Royale Wood Stove Thimble C L Site constructed for masonry chimney installation: ceiling Components • A minimum length of 12 inches [305mm] (longer for thicker walls) of solid insulated factory-built chimney length constructed to UL 103 Type HT 6 inch (152mm) inside diameter. Chimney needs to extend a minimum of 2 inches (51mm) from the interior wall and a minimum of 1 inch (25mm) from the exterior wall. • Wall spacer, trim collar and wall band to fit solid pack chimney selected.
R Isle Royale Wood Stove Min. Chimney Clearance to Wall Spacer and Combustibles - 2 inch (51mm) Masonry Chimney Liner Min. Clearance 2 inch (51mm) For optimal performance, masonry chimneys used to vent this appliance should be: 1 inch (25mm) Air Space to Chimney Section Chimney Flue Liner Fireclay Liner or Equivalent 1. Lined with a 6 inch (152mm) stainless steel liner.
R Isle Royale Wood Stove Masonry Chimney Liner (Cont'd) C. Installing Chimney Components Chimney Connector Wood Stud 2 in. (51mm) Clearance from chimney wall Single wall connector or stove pipe. Fireclay liner 5/8 in. (16mm) Minimum or Equivalent. Header This must be at least 24 gauge mild steel or 26 gauge blue steel. The sections must be attached to the appliance and to each other with the crimped (male) end pointing toward the stove.
R Isle Royale Wood Stove D. Chimney Termination Requirements NOTE: • Chimney performance may vary. • Trees, buildings, roof lines and wind conditions affect performance. • Chimney height may need adjustment if smoking or overdraft occurs. Follow manufacturer’s instructions for clearance, securing flashing and terminating the chimney.
R Isle Royale Wood Stove 6 Mobile Home Installation You must use a Quadra-Fire Outside Air Kit Part 831-1780 for installation in a mobile home. 1. An outside air inlet must be provided for combustion See page 13 for installation information. 2. Appliance must be secured to the mobile home structure by bolting the pedestal through hearth pad and into floor. 3. Appliance must be grounded with #8 solid copper grounding wire or equivalent and terminated at each end with N.E.C. approved grounding device. 4.
R Isle Royale Wood Stove 7 Appliance Set-Up B. Adjusting The Blower Speed Control A. Door Handle Assembly If Necessary Included in Kit: 1 locknut, 1 porcelain handle, 1 screw adapter, 1 gold or nickle handle, 1 square key, 4 spacing washers, 1 cam latch NOTE: Tools Needed: 9/16 box end wrench, flat head screwdriver. Latch Cam When the speed control is turned clockwise, it will click on to high speed. Turn the speed control clockwise to decrease the speed.
R Isle Royale Wood Stove 8 Operating Instructions B. Wood Selection and Storage A. Over-Firing Your Appliance WARNING WARNING FIRE RISK. Fire Risk • DO NOT BURN GARBAGE OR FLAMMABLE FLUIDS SUCH AS GASOLINE, NAPTHA OR ENGINE OIL. Do not over-fire. Over-firing may ignite creosote or will damage the stove and chimney. • DO NOT USE CHEMICALS OR FLUIDS TO START A FIRE. • Do NOT burn treated wood or wood with salt (driftwood). • May generate carbon monooxide if burn material other than wood.
R Isle Royale Wood Stove Moisture C. Burning Process The majority of the problems appliance owners experience are caused by trying to burn wet, unseasoned wood. • Wet, unseasoned wood requires energy to evaporate the water instead of heating your home, and • Causes evaporating moisture which cools your chimney, accelerating formation of creosote. WARNING In recent years there has been an increasing concern about air quality.
R Isle Royale Wood Stove The Primary Air Slide Control located under the ashlip adjusts the burn rates. Figure 23.1. 3. Final Stage The final stage of burning is the charcoal stage. This occurs when the flammable gases have been mostly burned and only charcoal remains. This is a naturally clean portion of the burn. The coals burn with hot blue flames.
R Isle Royale Wood Stove G. Heat Output Settings F. Operating The Top Loading Option NOTICE: SHIPPING BOLTS MUST BE REMOVED PRIOR TO REMOVING GRIDDLE. NOTE: There are 3 fiber door handles for this appliance. They are for the door, baffle by-pass handle and the top-loading griddle slot. 1. Using a 7/16 wrench, remove the 2 shipping bolts underneath the griddle before lifting the griddle off of stove. 2. Open by-pass door by moving the side handle towards rear of stove.
R Isle Royale Wood Stove I. Building A Fire WARNING Before lighting your first fire make certain that the baffle is correctly positioned. It should be resting against the rear support. Fire Risk. • DO NOT BURN GARBAGE OR FLAMMABLE FLUIDS SUCH AS GASOLINE, NAPTHA OR ENGINE OIl. • Do NOT burn treated wood or wood with salt (driftwood). • May generate carbon monoxide if burn material other than wood. May result in illness or possible death. There are many ways to build a fire.
R Isle Royale Wood Stove J. Optional Blower Operating Instructions M. Clear Space • 1. Initial (cold) start-up: Leave blower off until your stove is hot and a good coalbed is established. The blower may be turned on approximately 30 minutes after a good coalbed is established. 2. High burn setting: The blower may be left on throughout the burn at your desired setting. 3. Medium burn settings: The blower should be left off until a good burn is established, then turned on at your desired setting. 4.
R Isle Royale Wood Stove 9 Maintaining & Servicing Your Appliance 2. Ash Removal System (ARS) Operating and Cleaning A. General Maintenance • Frequency: Weekly when in constant operation or as needed. By: Homeowner 1. Creosote (Chimney) Cleaning • • • Frequency: Every 2 months during heating season or as recommended by a certified chimney sweep; more frequently if chimney exceeds or is under 12-14 ft. (measured from base of appliance) Injury Risk.
R Isle Royale Wood Stove 3. Disposal of Ashes 5. Glass Cleaning • • • • Frequency: When ash is within 1-3/4 in. (44mm) of firebox lip By: Homeowner Frequency: As desired By: Homeowner Clean glass with a non-abrasive glass cleaner. Abrasive cleaners may scratch and cause glass to crack. If the deposits on the glass are not very heavy, normal glass cleaners work well. Heavier deposits may be removed by using a damp cloth dipped in wood ashes or by using a commercially available oven cleaner.
R Isle Royale Wood Stove D. Glass Replacement B. Appliance Inspection - Routine • Frequency: Every 2 months at the same time the chimney and chimney connector are inspected. • By: Homeowner 1. Ensure that the fire is out and the appliance is cool to the touch. Protect a table or counter top with padding or towels. Protect your hands and wear gloves to prevent injury. Remove the door with the broken glass by lifting the door up and off of the hinges.
R Isle Royale Wood Stove E. Quick Reference Maintenance Guide CAUTION! Allow the appliance to completely cool down before performing any cleaning or maintenance. Baffle Baffle Optional Blower Chimney System Start the first inspection after the first 2 months of use, or if performance changes, and adjust your schedule accordingly. Maintenance is required for safe operation and must be performed to maintain your warranty.
R Isle Royale Wood Stove 10 Troubleshooting Guide With proper installation, operation, and maintenance your woodstove will provide years of trouble-free service. If you do experience a problem, this troubleshooting guide will assist you or a qualified service person in the diagnosis of a problem and the corrective action to be taken.
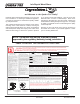
Isle Royale Service Parts Non-Catalytic, Top-Load, Wood Stove 823-0170 (Matte Black) Beginning Manufacturing Date: Sept.
Isle Royale Service Parts Beginning Manufacturing Date: Sept. 2000 Ending Manufacturing Date: Active B. Service Parts and Accessories IMPORTANT: THIS IS DATED INFORMATION. When requesting service or replacement parts for your appliance please provide model number and serial number. All parts listed in this manual may be ordered from an authorized dealer.
Isle Royale Service Parts Beginning Manufacturing Date: Sept. 2000 Ending Manufacturing Date: Active IMPORTANT: THIS IS DATED INFORMATION. When requesting service or replacement parts for your appliance please provide model number and serial number. All parts listed in this manual may be ordered from an authorized dealer. ITEM DESCRIPTION COMMENTS Stocked at Depot PART NUMBER #13 Door Assembly 13.9 13.8 13.1 13.2 13.7 13.4 13.3 13.5 13.6 13.
Isle Royale Service Parts Beginning Manufacturing Date: Sept. 2000 Ending Manufacturing Date: Active IMPORTANT: THIS IS DATED INFORMATION. When requesting service or replacement parts for your appliance please provide model number and serial number. All parts listed in this manual may be ordered from an authorized dealer. ITEM DESCRIPTION COMMENTS Stocked at Depot PART NUMBER #19 Brick Assembly 19.4 19.4 19.5 1-1/16" 19.5 19.1 8-3/8" Ø 1-1/2" 19.3 3-3/4" 19.3 19.1 19.3 19.5 4-1/2" 9" 19.
Isle Royale Service Parts Beginning Manufacturing Date: Sept. 2000 Ending Manufacturing Date: Active IMPORTANT: THIS IS DATED INFORMATION. When requesting service or replacement parts for your appliance please provide model number and serial number. All parts listed in this manual may be ordered from an authorized dealer.
R Isle Royale Wood Stove C.
R Isle Royale Wood Stove D.
R Isle Royale Wood Stove November 22, 2011 250-5763E Page 39
R CONTACT INFORMATION: Hearth & Home Technologies 1445 North Highway Colville, WA 99114 Division of HNI INDUSTRIES www.quadrafire.com Please contact your Quadra-Fire dealer with any questions or concerns. For the number of your nearest Quadra-Fire dealer, call 1-800-926-4356 or log on to www.quadrafire.com CAUTION • Important operating and maintenance instructions included. • Read, understand and follow these instructions for safe installation and operation.