R 7100FP EPA CERTIFIED WOODBURNING FIREPLACE Owner’s Manual Installation and Operation Model: 7100FP-BK-B 7100FP-GD-B 7100FP-NL-B Tested and Listed by Portland Oregon USA O-T L US C OMNI-Test Laboratories, Inc. CAUTION D DI O N SC O AR T D DO NOT DISCARD THIS MANUAL • Important operating and maintenance instructions included. • Read, understand and follow these instructions for safe installation and operation. • Leave this manual with party responsible for use and operation.
R 7100FP EPA Woodburning Fireplace and Welcome to the Quadra-Fire Family! Hearth & Home Technologies welcomes you to our tradition of excellence! In choosing a Quadra-Fire appliance, you have our assurance of commitment to quality, durability, and performance. This commitment begins with our research of the market, including ‘Voice of the Customer’ contacts, ensuring we make products that will satisfy your needs.
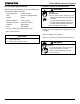
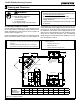
TABLE OF CONTENTS Section 8: Finishing Section 1: Listing and Code Approvals A. B. C. D. A. B. C. D. E. F. Appliance Certification . . . . . . . . . . . . . . . . . . . .4 Mobile Home Approved . . . . . . . . . . . . . . . . . . . .4 Glass Specifications . . . . . . . . . . . . . . . . . . . . . .5 BTU & Efficiency Specifications . . . . . . . . . . . . .5 Section 2: Getting Started A. B. C. D. E. F. Design and Installation Considerations . . . . . . . .6 Fire Safety . . . . . . . . . . . . . . . . . . . .
R 7100FP EPA Woodburning Fireplace 1 Listing and Code Approvals A. Appliance Certification Model: 7100FP EPA Certified Woodburning Fireplace Laboratory: OMNI Test Laboratories, Inc. Report No: 061-S-41-2 Type: Wood Fireplace Standard: UL127 and ULC-S610-M87 and (UM) 84-HUD, Mobile Home Approved. 2. The fireplace is to be secured to the mobile home structure. Use same holes that attached the fireplace to the pallet to secure it to the floor using 1/4 in. x 2 in.
R 7100FP EPA Woodburning Fireplace C. Glass Specifications This fireplace is equipped with 5mm ceramic glass. Replace glass only with 5mm ceramic glass. Please contact your dealer for replacement glass. D. BTU & Efficiency Specifications EPA # and Original Date: #571 4-1-03 EPA Certified: 3.1 grams per hour Efficiency: up to 77% BTU Output with EPA test fuel: with cord wood: 58,500/ hr.
R 7100FP EPA Woodburning Fireplace 2 Getting Started A. Design and Installation Considerations WARNING When planning a fireplace installation, it is necessary to determine the following information before installing: Fire Risk. • Where the fireplace is to be installed. See Sections 3 and 4. • The vent system configuration to be used. See Sections 5 and 6. • Electrical wiring. See Section 3. • Framing and finishing details. See Sections 3, 6 and 8. • • Whether optional accessories are desired.
R 7100FP EPA Woodburning Fireplace To minimize the effects of negative air pressure, the following must be considered: • Install the outside air kit. • Ensure adequate outdoor air is supplied for combustion appliances and exhaust equipment. • Ensure furnace and air conditioning return vents are not located in the immediate vicinity of the fireplace. • Avoid installing the fireplace near doors, walkways or small isolated spaces.
R 7100FP EPA Woodburning Fireplace D. Typical Fireplace System The Quadra-Fire fireplace system consists of the following: • • • • • • Fireplace Firebrick Chimney termination cap Chimney system Hearth extension Outside air Required components include: • Chimney Air Kit (with SL 300 Series Pipe) NOTE: Illustrations used throughout these instructions reflect “typical installations” and are for design purposes only. Actual installation may vary slightly due to individual design preferences.
R 7100FP EPA Woodburning Fireplace E. Tools and Supplies Needed F. Inspect Fireplace and Components WARNING Before beginning the installation be sure the following tools and building supplies are available: Reciprocating saw Framing material Pliers High temp caulking material Hammer Gloves Phillips screwdriver Framing square Flat blade screwdriver Electric drill and bits Plumb line Safety glasses Level Tape measure 1/2-3/4 in.
R 7100FP EPA Woodburning Fireplace 3 Framing and Clearances WARNING Note: • Illustrations and photos reflect typical installations and are FOR DESIGN PURPOSES ONLY. • Illustrations/diagrams are not drawn to scale. • Actual installation/appearance may vary due to individual design preference. • Hearth & Home Technologies reserves the right to alter its products. Fire Risk Provide adequate clearances. • Around air openings • To combustibles • For service access. Locate fireplace away from traffic areas. A.
R 7100FP EPA Woodburning Fireplace B. Clearances WARNING Fire Risk • Comply with all minimum clearances to combustibles as specified. • Framing or finishing material used on the front of, or in front of, the appliance closer than the minimums listed, must be constructed entirely of non-combustible materials (i.e., steel studs, concrete board, etc.). Failure to comply may cause fire. Storm Collar of) (ro Roof Flashing 2 in. (51 mm) min. 2 in. min.
R 7100FP EPA Woodburning Fireplace Minimum Clearances to Combustibles WARNING WITHIN ENCLOSURE AREA Appliance to backwall 1/2 in. (13 mm) Appliance to sidewall 1 in. (25 mm) Duct boots to framing 0 in. (0 mm) Top standoffs to header 0 in. (0 mm) Door opening to sidewall 22-7/8 in. (581 mm) EXPOSED SURFACES Faceplate to sidewall 16 in. (406 mm) Heat zone air grills to ceiling 12 in.
R 7100FP EPA Woodburning Fireplace Suggestions: WARNING 1. Insulate chase. Fire Risk 2. Finish chase walls with dry wall 5/8 in. (16mm) Type X face tape. Do not apply combustible finishing materials over any part of the front of this fireplace. 3. All dimensions are to finished walls and ceilings. • The metal fireplace face may only be covered with noncombustible materials such as ceramic tile, brick, or stone. • Do not cover or block any cooling air slots.
R 7100FP EPA Woodburning Fireplace E. Construct the Chase A chase is a vertical boxlike structure built to enclose the fireplace and/or its vent system. Vertical chimneys that run on the outside of a building must be installed inside a chase. Round Termination Cap In cold climates, it is recommended that the chase be well insulated using batt type insulation between the joists. Construction of the chase may vary with the type of building.
R 7100FP EPA Woodburning Fireplace 4 Installation of Fireplace 1. Cut a 6 in. (152 mm) hole in outside wall to accommodate air piping. The outside air is located on top, auxiliary convection air intake is located on the bottom. See Figure 15.1. CAUTION Sharp Edges • Wear protective gloves and safety glasses during installation. 2. Use 6 in. (152 mm) metal flex or rigid piping (not supplied) to directly connect outside air to fireplace intake. Insulate the pipe to prevent frost condensation. 3.
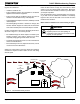
R 7100FP EPA Woodburning Fireplace WARNING Fire Risk Asphyxiation Risk Do not draw outside combustion air from: • Wall, floor or ceiling cavity. • Enclosed space such as an attic or garage. • Close proximity to exhaust vents or chimneys. Fumes or odor may result. Handle Left - Closed Handle Right - Open CAUTION Risk of Smoke Spillage Outside air inlet must be located to prevent blockage from: • Leaves • Snow/ice • Other debris Blockage may cause combustion air starvation.
R 7100FP EPA Woodburning Fireplace NO NO Attic space Garage or combustible liquids storage NO NO Outlet blocked by snow, leaves, etc. Outlet placed higher than 3 ft below the termination cap Use only duct materials specified by manufacturer Figure 17.1 Outside Convection Air Placement B. Auxiliary Convection Air System Both the Outside Air and Auxiliary Air kits are installed on the right hand side of the fireplace.
R 7100FP EPA Woodburning Fireplace The auxiliary convection lever allows you to choose where the convection air is coming from. You can either use room air from the same room where the fireplace is installed (all the way to the left) or from duct work which can be run to another room in the house or to the exterior of the home to use outside air (all the way to the right).
R 7100FP EPA Woodburning Fireplace D. Secure the Fireplace • • Level the Fireplace Position the Fireplace Level the fireplace side-to-side and front-to-back. Shim with noncombustible material, such as sheet metal, as necessary. Secure the fireplace (using the pallet mounting brackets located on either side of the fireplace) to the subfloor. This fireplace may be placed on either a combustible or non-combustible continuous flat surface. Follow the instructions for framing in Section 3.C.
R 7100FP EPA Woodburning Fireplace 5 Chimney Assembly Termination Cap Chimney must extend beyond combustible roof structure Additional support for tall chimneys Maintain minimum height of chimney above roof Storm Collar Install roof flashing according to minimum requirements Maintain minimum clearances to combustibles as specified Offsets/returns may not exceed 30° from vertical Support straps for offsets/ returns must be secured to adequate framing Ceiling firestops are required where chimney
R 7100FP EPA Woodburning Fireplace A. Chimney Requirements B. Chimney Termination Requirements Vertical distances are measured from the base of the fireplace as shown in Figure 21.1. To determine the chimney components needed to complete your particular installation, follow the steps below: Minimum overall straight height • 13 ft 3.96 m 14.5 ft 4.42 m Double offset/return minimum height 20 ft 6.1 m Maximum height 50 ft 15.24 m Maximum chimney length between an offset and return 20 ft 6.
R 7100FP EPA Woodburning Fireplace C. Using Offsets/Returns • Measure how far the chimney needs to be shifted to enable it to avoid the overhead obstacle. See Figure 22.2. Use dimension “A” to determine chimney section required to achieve the needed shift. • After determining the offset dimension, refer to Table 22.1 and find the “A” dimension closest to but not less than the distance of shift needed for your installation.
R 7100FP EPA Woodburning Fireplace D. Assemble the Chimney Sections Attach either a straight chimney section or an offset to the top of the fireplace (depending on your installation requirement). Chimney sections are locked together by pushing downward until the top section meets the stop bead on the lower section. E. Assembling Chimney Sections for the SL300 Series NOTE: Chimney Air Kit, Part CAK4A is REQUIRED when using the SL-300 Pipe Series. Detailed instructions are supplied with the kit.
R 7100FP EPA Woodburning Fireplace WARNING Fire Risk • The flex hose must never be compressed or deformed! Restricting the airflow inside the flex pipe may increase flue pipe temperatures causing a chase fire. Note: The ceiling firestop MUST be nailed to the bottom of the ceiling joists EXCEPT when the space above is uninsulated and the attic insulation shield is not being used (see Figure 24.2).
R 7100FP EPA Woodburning Fireplace G. Install the Attic Insulation Shield H. Double-check the Chimney Assembly An insulation shield must be installed when there is a possibility of insulation coming into contact with the factory built chimney system. Continue assembling the chimney sections up through the ceiling firestops as needed. While doing so, be aware of the height and unsupported chimney length limitations given under Section 5.A. Chimney Requirements.
R 7100FP EPA Woodburning Fireplace 6 Complete the Enclosure A. Chimney Termination (2-10-03 Rule) Chimney Termination Requirements (See Figures 26.1 and 26.2) • • • • Must have a cap approved and listed for this fireplace system Must not be located where it will become plugged by snow or other material Must terminate at least 3 ft (914 mm) above the roof and at least 2 ft (610 mm) above any portion of the roof within 10 ft (3.
R 7100FP EPA Woodburning Fireplace NOTE: Wiring for blowers must be done before framed enclosure is completed. If using a Heat Zone kit, it also must be installed before enclosure is complete. • Mark the Exit Point of the Roof Locate the point where the chimney will exit the roof by plumbing down to the center of the chimney. Drive a nail up through the roof to mark the center. See Figure 27.1. • Cut Out the Hole in the Roof Measure to either side of the nail and mark the 14-1/2 in. x 14-1/2 in.
R 7100FP EPA Woodburning Fireplace B. SL-300 Series Ceiling/Roof Thimble NOTE: REQUIRED for manufactured homes with vaulted ceilings. CHIMNEY FLASHING 1. Locate the point where the chimney will exit the roof by plumbing down to the center of the chimney. Lay out, cut and frame a 14-1/2 in. (368 mm) square opening (measured on the horizontal) through the ceiling and roof structure. Consult local codes for framing details. FLASHING PLATE THIMBLE EXTENSION SCREW NAIL 2.
R 7100FP EPA Woodburning Fireplace C. Chase Top WARNING A metal chase top is required to seal the top of the chase around the chimney pipe. The top should include a turndown and drip edge to prevent water from seeping into the chase. Provide a 1/8 in. (3 mm) gap around the flue pipe and slope the top downward away from the penetration. See Figure 29.1. • • • All seams must be caulked to prevent leaks. A chase installation must use a chase top.
R 7100FP EPA Woodburning Fireplace • For installations utilizing a Round Telescoping Termination Cap, the uppermost chimney section must be below the top of the chase top, but not more than 14-1/2 in. (368 mm) below the top of the chase top. Minimum overlap of chimney and termination cap must be 1-1/2 in. (38 mm). See Figure 30.1. Flashing Collar 2 in. (51 mm) min. Storm Collar 1-1/2 in. (38 mm) min. overlap 2 in. (51 mm) min. Flashing Collar 14-1/2 in. (368mm) max. Top of Pipe Top of Pipe 3 in.
R 7100FP EPA Woodburning Fireplace 7 Replacement Parts A. Blower Replacement Blower Cord Location The 7100FP Fireplace comes standard equipped with two blowers, installed at the factory with electric access on the right side of fireplace (as you face it). Unplug wire harness before removing fan CAUTION Shock Risk Disconnect power by turning off circuit breaker BEFORE servicing. Figure 31.2 Blower Motor 3. Connect new blower wires to wire harness. Blower Replacement Instructions 1.
R 7100FP EPA Woodburning Fireplace B. Baffle Removal and Installation 1. Remove all ash from firebox, and extinguish all hot embers before disposal into a metal container. 2. Remove the baffle protection channel by turning it down and pulling it out of the firebox. See Figure 32.1. Figure 32.3 Removing Baffle (shown without ceramic blanket) C. Door and Door Gasket Periodically check the door gasket for proper seal.
R 7100FP EPA Woodburning Fireplace D. Heat Zone Kit DUCT RUN REQUIREMENTS This kit is tested and safe when installed in accordance with this installation manual. It is your responsibility to read all instructions before starting installation and to follow these instructions carefully during installations. Installation of this kit MUST by performed by a qualified service technician. The Heat-Zone-Wood kit is carefully engineered and must be installed only as specified.
R 7100FP EPA Woodburning Fireplace INSTALLATION 1. Remove the knockout or cover plate from the top of the fireplace and discard it. See Figure 34.1. 2. Cut a 3 in. (76mm) hole in the insulation board as per the dimensions shown in Figure 34.1. 3-13/16 in. (97mm) 3-1/8 in. (79mm) CL Adapter Figure 34.3 Mounting Plate 6. Slide the starter pipe into the fireplace, matching the holes in the plate to the holes in the fireplace. Starter Pipe 7. Place the Adapter on the Mounting Plate lining up holes.
R 7100FP EPA Woodburning Fireplace NOTE: Secure the duct so that clearance to the fireplace outer wrap is maintained. Tape all seams with aluminum tape 1-1/4 in. (32mm) minimum width or as specified by local codes.) 2 x 4 Wall Fan Housing 10. Seal all the way around the inside of the Return Air Grille to prevent hot air being drawn back into the venting system using gasketing supplied with the kit. Leave 1/4 in. (6mm) clearance from all 4 outer edges. Trim excess gasketing. See Figure 35.3.
R 7100FP EPA Woodburning Fireplace E. Timer Assembly Replacement 4. You will need to disconnect air chamber cover from timer assembly before installing in the fireplace. Set screws aside for later use. Figure 36.4. CAUTION Shock Risk Disconnect power by turning off circuit breaker BEFORE servicing. Remove 2 screws 1. Remove both doors, fascia and brick. 2. Remove 2 Phillips head screws and pry open access door in the bottom of the fireplace with a flat head screwdriver. Figure 36.1.
R 7100FP EPA Woodburning Fireplace Firebox Bottom Timer Plate Air Chamber Cover Attach with 1/4-20 bolts Figure 37.1 7. Figure 37.4 Place your hand into the access door in the floor of the fireplace. Let the timer assembly and plate drop down and rotate it up through the access door. You will be looking at the back side of the assembly. Figures 37.2 & 37.3. 9. Insert the new timer assembly into the access door with the back side towards you.
R 7100FP EPA Woodburning Fireplace 8 Finishing A. Hearth Extension A hearth extension must be installed with all fireplaces to protect the combustible floor in front of the fireplace from both radiant heat and sparks. See Figures 38.1 below, and Figures 39.1 and 39.2 on page 39. Tile, stone or other non-combustible material Floor constructed of wood or other combustible material Converting k to R: Divide 1 by k and multiply the results times the thickness in inches of the material.
R 7100FP EPA Woodburning Fireplace WARNING WARNING Fire Risk • Metal hearth strips MUST be installed. Sparks or embers may ignite flooring. Fire Risk • Hearth extensions must be installed exactly as specified. High temperatures or hot embers may ignite concealed combustibles. 1in. (25mm) OVERLAP 8 in. (203mm) from each side of fuel loading door Metal strips 2 in. (51mm) under edge of Fireplace and Hearth Extension and 2 in. (51mm) on both side of fireplace opening. Nail or screw metal strips in place.
R 7100FP EPA Woodburning Fireplace Fascia ........... Outer Can Flange Tile or Marble Combustible Floor Minimum 20 in. (508mm) in front and 8 in. (203mm) on sides to fuel loading doors ....................................... ....................................... Ember Strip (Seal gap with High temp, noncombustible sealant able to withstand 300°) Minimum 2-1/4 in. (57mm) Cement Board or equivalent, (or two 1/2 in. pieces) and "k" value = 0.49. Micore 300 Tile or Marble Figure 40.
R 7100FP EPA Woodburning Fireplace C. Position the Hearth Extension D. Finishing Material Position and secure the hearth extension over the protective metal strips that have been placed partially under the fireplace front. These strips should be protruding approximately 2 in. (51 mm) from under the fireplace front and 2 in. (51 mm) on both sides of the fireplace opening. See Figure 19.1 on page 19. Seal the crack between the hearth extension and fireplace with a bead of non-combustible sealant.
R 7100FP EPA Woodburning Fireplace E. Non-Combustible Facing Material Installation Top Board WARNING Risk of Fire. • Follow these instructions exactly. Side Board Apply bead of Super Calstick to edge here • Facing materials must be installed properly to prevent fire. • No materials may be substituted without authorization by Hearth & Home Technologies. Bottom Board Side Board TOOLS NEEDED: Powered drill with #2 Phillips head bit; caulking gun. 1.
R 7100FP EPA Woodburning Fireplace F. Mantel A combustible mantel may be positioned no lower than 60 in. (1524mm) from the base of the fireplace. The combustible mantel may have a maximum depth of 12 in. (305mm). Combustible trim pieces that project no more than 3/4 in. (19mm) from the face of the fireplace can be placed no closer than 6 in. (152mm) from the side of the decorative front. See Figure 43.1.
R 7100FP EPA Woodburning Fireplace 9 Operating Instructions A. Over-Firing Your Appliance B. Clear Space Near the Fireplace Combustible materials must not be stored on the hearth extension. Room furnishings such as drapes, curtains, chairs or other combustibles must be at least 4 ft (1219mm) from the open front of the fireplace. WARNING Fire Risk Do not over-fire. Over-firing may ignite creosote or will damage the stove and chimney.
R 7100FP EPA Woodburning Fireplace C. General Information Fireplaces, as well as other woodburning appliances, have been used safely for many years. It has been our experience that most problems are caused by improper installation and operation of the fireplace. Make certain that installation and operation of the fireplace system is in accordance with these instructions. It is extremely important that the fire be supervised whenever the fireplace is in use.
R 7100FP EPA Woodburning Fireplace D. Wood Fuel Hardwood vs. Softwood to be about two-thirds seasoned, if cut at the dry time of the year. Your fireplace’s performance depends a great deal on the quality of the firewood you use. Contrary to popular belief, one species of wood varies very little to the other in terms of energy content. All seasoned wood, regardless of species, contains about 8,000 BTU’s per pound. The important factor is that hardwoods have a greater density than softwoods.
R 7100FP EPA Woodburning Fireplace E. Burning Process Storing Wood Fire requires 3 things to burn: fuel, air and heat. If heat is robbed from the fireplace during the drying stage, the new load of wood has reduced the chances for a good clean burn. For this reason, it is always best to burn dry, seasoned firewood. We do not advise burning unseasoned wood, however if it happens, you must open the Slide Air Control and burn the fireplace at a high burn setting for a longer time to start it burning.
R 7100FP EPA Woodburning Fireplace G. Burning Guidelines F. Automatic Combustion Control (ACC) Typically, when you build a fire, you need to open the controls to give the fire more air so the wood will start burning. You would then have to physically watch the fire and shut down the air controls so the fireplace does not overfire and burn up your wood too quickly. With the Automatic Combustion Control (ACC) system, you do not have to physically watch the fire.
R 7100FP EPA Woodburning Fireplace I. Starting a Fire Before lighting your first fire in the fireplace, make certain that the baffle and the ceramic blanket are correctly positioned. It should be resting against the rear support. Also refer to care and cleaning of plated surfaces on page 60 before lighting your first fire. Note: The first three or four fires should be of moderate size to allow the oils and binders to be burned from the fireplace and the refractory and paint to cure.
R 7100FP EPA Woodburning Fireplace J. Correct Baffle & Blanket Placement INCORRECT POSITIONS WARNING Fire Risk Firebox damage due to improper baffle placement is not covered by warranty. Operate the wood burning appliance with the baffle in the correct position only. Not doing so could result in: • Reduced efficiency • Overheating the chimney • Overheating the rear of the firebox Ceramic Blanket and Baffle Board are NOT in contact with the back of the firebox.
R 7100FP EPA Woodburning Fireplace K. Outside Air L. Firescreen A source of air (oxygen) is required in order for combustion to take place. Whatever air is consumed by the fire must be replaced through cracks around windows, under doors, etc. Most newly constructed houses or existing homes fitted with tightly sealed doors and windows are relatively air tight. In this case, an outside air source must be made available to feed combustion air from outside the home. A firescreen is optional to control sparks.
R 7100FP EPA Woodburning Fireplace N. Blower Operation CAUTION Instructions with Blower Override Switch in manual position. ALL wiring should be done by a qualified electrician and shall be in compliance with local codes and with the National Electric Code NFPA/NEC No. 70-current (in the United States), or with the current CSC22.1 Canadian Electric Code (in Canada). 1.
R 7100FP EPA Woodburning Fireplace 10 Troubleshooting This fireplace will operate correctly only if adequate ventilation is provided to allow proper draft to the fireplace system.
R 7100FP EPA Woodburning Fireplace nd y te chimne ati rmin ? on Bird's nest or leaves in termination cap? ds ar ou Overhanging tree? in gw Stron Structural changes in chimney area? Another appliance in home also exhausting air (furnace, fan, Unsealed dryer, etc.)? can lights? Overhead fan operating? Creosote buildup in flue? Air register from furnace near fireplace? Doors opening and closing? Window closed for start-up? Combustion air control Outside air closed? Figure 54.
R 7100FP EPA Woodburning Fireplace C. Diagnostics and Problem Solving 1.
R 7100FP EPA Woodburning Fireplace 4. I don’t get enough/any heat.
R 7100FP EPA Woodburning Fireplace 11 Maintenance and Servicing the Fireplace Remove screws, lift top cover. WARNING Top Cover Asphyxiation Risk Fire Risk Annual inspection by qualified technician recommended.
R 7100FP EPA Woodburning Fireplace B. Glass Replacement WARNING Fire Risk. • Do not use chimney cleaners or flame colorants in your appliance. Will corrode pipe. 2. Disposal of Ashes • • • Frequency: As necessary By: Homeowner Task: See the following instructions. Ashes should be placed in a metal container with a tight fitting lid. The closed container of ashes should be placed on a non-combustible floor or on the ground, well away from all combustible materials, pending final disposal.
R 7100FP EPA Woodburning Fireplace C. Brick Replacement The firebox of your fireplace is lined with high quality firebrick, which has exceptional insulating properties. There is no need to use a grate; simply build a fire on the firebox floor. Do not operate the fireplace without firebrick. 5 5 IMPORTANT: The bricks are very similar in size. Be certain you have the proper brick in the correct location. Measure the brick size for accuracy.
R 7100FP EPA Woodburning Fireplace D. Care and Cleaning of Plated Surfaces Clean-plated surfaces with vinegar or a glass cleaner before lighting your first fire to prevent permanent staining. CAUTION Clean all the fingerprints and oils from the surface before firing the appliance for the first time. • Use a glass cleaner or vinegar and towel to remove the oils. • Oils can cause permanent markings on plating, if not removed. • After plating is cured, oils will not affect the finish.
R 7100FP EPA Woodburning Fireplace F.
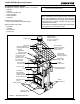
R 7100FP EPA Woodburning Fireplace 12 Reference Materials A. Fireplace Dimensions FRONT VIEW SIDE VIEW A N F B E I M D J L C Blower Electric Access (right side of fireplace) K TOP VIEW C L G H 7100FP A B in 3-1/2 32-1/2 mm 89 826 H I in. 13-3/16 mm 335 C D E F G 38 40 42-5/16 45-13/16 23-7/16 965 1016 1075 1148 595 J K L M N 10-13/16 4-5/16 13-3/4 9-7/16 6 1 259 109 349 240 152 25 Figure 62.
R 7100FP EPA Woodburning Fireplace B. Chimney Components The following drawings show the SL-300 Series chimney and fireplace components which may be safely used with this fireplace. Catalog No. Description Catalog No. Description CAK4A Chimney Air Kit CB876 Chimney Bracket ID4 Insulated Duct / Outside Air RF370 Roof Flashing - Flat to 6/12 Pitch UD4 Uninsulated Duct / Outside Air RF371 Roof Flashing - 6/12 to 12/12 Pitch SL306 Chimney Section - 6 in.
R 7100FP EPA Woodburning Fireplace 10-1/2 in (267 mm) 20-3/4 in. (527 mm) 24 in. 2 in. Inside Diameter 8 in. (610 mm (51 mm (203 mm) 10-1/2 in. (267 mm) Outside Diameter 10-1/2 in. AS8 Straight Attic Insulation Shield JB877 Joint Band CB876 Chimney Bracket (267mm) SL3 - Chimney Stabilizer 24-5/8 in. (625 mm) 29 in. 16-5/8 in. (737 mm) 12966A Mobile Home Thimble Inside Diameter 8 in. 16-5/8 in. (422 mm) (422 mm) (203 mm) Outside Diameter 10-1/2 in.
R 7100FP EPA Woodburning Fireplace C. Components Diagrams and Schematics Item 7 42 6 5 41 40 39 30 31 32 2 33 4 34 35 3 36 37 38 Glass Size: 12-3/50” w x 15” h Description SKU 2 Door Handle, Left 433-2030 3 Handle, Fiber 7000-403 4 Door Handle, Right 433-0770 5 Glass Assembly 433-5750 6 Glass Frame, Bottom 433-1620 7 Glass Frame, Top 433-1610 30 Screw, 6-32 x 1/4 available only in assy. 31 Door, Cast, Left available only in assy.
R 7100FP EPA Woodburning Fireplace D. Fireplace Diagram 11 12 10 18 17 13 9 16 15 8 14 19 20 27 25 26 7 23 21 6 24 5 4 2 1 22 3 Item # 1 2 3 4 5 6 7 8 9 Description Fascia, Valley Forge Door Handle, Left Handle, Fiber Door Handle, Right Glass Assembly Glass Frame, Bottom Glass Frame, Top Brick, Set Manifold Tube(s) Item # 10 11 12 13 14 15 16 17 18 Description Unit Collar Starter Plate Assembly Blanket, Ceramic Baffle, Fiberboard Clamp, Cable 3/8-1/2 in.
R 7100FP EPA Woodburning Fireplace E. Service Parts IMPORTANT: THIS IS DATED INFORMATION. The most current information is located on the Quadra-Fire web site at www. quadrafire.com. When ordering, supply serial and model numbers to ensure correct part.
R 7100FP EPA Woodburning Fireplace IMPORTANT: THIS IS DATED INFORMATION. The most current information is located on the Quadra-Fire web site at www. quadrafire.com. When ordering, supply serial and model numbers to ensure correct part. Item # 19 Part Description Alphabetical Order SKU Outer Can Cover Plate 480-1300 Outer Can Lower Flange 433-0970 Outside Air Hood, 6 in. 480-5170 Outside Air Termination Cap, 6 in.
R 7100FP EPA Woodburning Fireplace G. Warranty Policy Hearth & Home Technologies LIMITED WARRANTY Hearth & Home Technologies (“HHT”) and its respective brands extends the following warranty for HHT gas, wood, pellet and electric appliances purchased from an authorized HHT dealer and installed in the United States of America or Canada. Warranty starts with date of purchase by the original owner (End User) except as noted for replacement parts.
R 7100FP EPA Woodburning Fireplace mental conditions, inadequate ventilation or drafting caused by tight sealing construction of the structure or handling devices such as exhaust fans or forced air furnaces or other such causes; (5) use of fuels other than those specified in the operating instructions; (6) installation or use of components not supplied with the appliance or any other components not expressly authorized and approved by HHT; and/or (7) modification of the appliance not expressly authorized and
R 7100FP EPA Woodburning Fireplace This page intentionally left blank.
H. Contact Information R CONTACT INFORMATION: Hearth & Home Technologies 1445 North Highway Colville, WA 99114 Division of HNI INDUSTRIES Please contact your Quadra-Fire dealer with any questions or concerns. For the number of your nearest Quadra-Fire dealer, visit our web site at www.quadrafire.com CAUTION Do NOT discard this manual. • Important operating and maintenance instructions included. • Read, understand and follow these instructions for safe installation and operation.