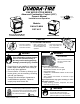
R 3100 WOOD STOVE SERIES Advanced Combustion Control (ACC) Owner’s Manual Tested and Listed by Installation and Operation O-T L C Portland Oregon USA US OMNI-Test Laboratories, Inc. Models: 31M-ACC-MBK 31ST-ACC Step Top Uni-Body Model (Pedestal Model Shown) Millennium Model • Important operating and maintenance instructions included. • Read, understand and follow these instructions for safe installation and operation.
R 3100 Wood Stove Series (ACC) and Welcome to the Quadra-Fire Family! Hearth & Home Technologies welcomes you to our tradition of excellence! In choosing a Quadra-Fire appliance, you have our assurance of commitment to quality, durability, and performance. our stoves, inserts and fireplaces. And yet we are old-fashioned when it comes to craftsmanship. Each unit is meticulously fabricated and surfaces are hand-finished for lasting beauty and enjoyment.
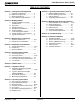
100 Wood Stove Series (ACC) R TABLE OF CONTENTS Section 1: Listing and Code Approvals Section 8: Operating Instructions (Cont’d) Section 2: Getting Started Section 9: Maintaining & Servicing Appliance A. B. C. D. A. B. C. D. E. F. G. H. Appliance Certifications.......................4 Mobile Home Approved.......................4 Glass Specifications.............................4 BTU & Efficiency Specifications...........4 H. I. J. K. Design, Installation & Location Considerations.............
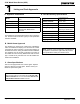
1 R 3100 Wood Stove Series (ACC) Listing and Code Approvals D. BTU & Efficiency Specifications A. Appliance Certification Model: 3100 Millennium & Step Top Uni-Body (ACC) Laboratory: OMNI Test Laboratories, Inc. Report No & Date: 061-S-66-6 Type: Listed Room Heater, Solid Fuel Type Standard: UL1482 and ULC S627-00 and (UM) 84-HUD, Mobile Home Approved. The Quadra-Fire 3100 Series Wood Stove (ACC) meets the U.S. Environmental Protection Agency’s 1990 particulate emission standards.
2 3100 Wood Stove Series (ACC) R Getting Started A. Design, Installation & Location Considerations B. Fire Safety Consideration must be given to: To provide reasonable fire safety, the following should be given serious consideration: • • • • Safety Convenience Traffic flow Chimney and chimney connector required It is a good idea to plan your installation on paper, using exact measurements for clearances and floor protection, before actually beginning the installation.
R 3100 Wood Stove Series (ACC) C. Negative Pressure Draft is the pressure difference needed to vent appliances successfully. Considerations for successful draft include: • Preventing negative pressure • Location of appliance and chimney To minimize the affects of negative air pressure the following must be considered: Negative pressure results from the imbalance of air available for the stove to operate properly. Causes for this imbalance include: • Exhaust fans (kitchen, bath) etc.
3100 Wood Stove Series (ACC) R D. Flue Draft Considerations F. Tools And Supplies Needed Location of the appliance and chimney will affect performance. As shown in Figure 6.1 on page 6 the chimney should: Before beginning the installation be sure that the following tools and building supplies are available. • Be installed through the warm space enclosed by the building envelope. This helps to produce more draft, especially during lighting and die down of the fire.
R 3100 Wood Stove Series (ACC) Spark Arrestor Cap H.
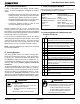
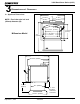
3100 Wood Stove Series (ACC) R 3 Dimensions and Clearances A. Appliance Dimensions 25 in. (6 5mm) CL 9-15/16 in. (2 7mm) NOTE: Flue Collar size is 6 inch (152mm) diameter (ID) 12-1/2 in. ( 18mm) 10-15/16 in. 15-1/16 in. (271mm) ( 8 mm) Millennium Model 14-15/16 in. ( 7 mm) 18-15/16 in. (475mm) 0 in. (762mm) Figure 9.1 Front View 26-11/16 in. (668mm) 24-5/16 in. (618mm) 6-11/16 in. (170mm) CL 11-1/2 in. (292mm) 16 in. (406mm) CL 20- /4 in.
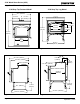
R 3100 Wood Stove Series (ACC) Appliance Dimensions (Cont’d) 3100 Step Top Pedestal Model 3100 Step Top Leg Model 25 in. (6 5mm) 9-5/16 in. (2 7mm) CL 12-1/2 in. ( 18mm) 14-15/16 in. ( 79mm) 19-1/16 in. (484mm) -1/8 in. (841mm) 10-15/16 in. (278mm) 15-1/16 in. ( 8 mm) 4-1/4 in. (870mm) 18 in. (457mm) 2 -7/8 in. (606mm) Figure 10.1 Figure 10.3 26-11/16 in.(678mm) 6-11/16 in. (170mm) 24-5/16 in. (618mm) 15- /8 in. ( 91mm) CL 3-11/16 in. (94mm) -1/2 in.
3100 Wood Stove Series (ACC) R B.
4 R 3100 Wood Stove Series (ACC) Installation A. Hearth Protection Requirements FLOOR PROTECTION: Floor protector must be non-combustible material, extending beneath heater and to the front, sides and rear as indicated. The floor must be non-combustible or otherwise adequately protected from radiant heat given off by the unit and from sparks and falling embers. A layer of thin brick or ceramic tile over a combustible floor is not sufficient.
3100 Wood Stove Series (ACC) R Step-Top Uni-Body Model For the Step Top Pedestal Model In US installations, it is necessary to install a floor protector of a minimum of 3/8 inch (9.5mm) thick metal clad millboard or equivalent a minimum of 16 inches (406mm) in front of glass and 8 inches (203mm) to both sides of the fuel loading door. Open the door and measure 8 inches (203mm) from the side edge of the opening in the face of the appliance.
R 3100 Wood Stove Series (ACC) B. Outside Air Kit Installation A source of air (oxygen) is necessary in order for combustion to take place. Whatever combustion air is consumed by the fire must be replaced. Air is replaced via air leakage around windows and under doors. In homes that have tightly sealed doors and windows, an outside air source is needed. An optional Outside Air Kit is available. WARNING Fire Risk. Asphyxiation Risk.
Do not remove. 3100 Wood Stove Series (ACC) R C. Blower (Optional) Caution 1. Remove the 3 bolts (1/4”-20 Phillips head) on the outer skin at the bottom rear of appliance. Shock Risk. • Do NOT remove grounding prong from plug. • Plug directly into properly grounded 3 prong receptacle. • Route cord away from appliance. • Do NOT route cord under or in front of appliance. 2. Align holes in mounting flange of blower with bolt holes in appliance.
5 R 3100 Wood Stove Series (ACC) Chimney Requirements A. Venting Components B. Chimney Systems Chimney Connector: Prefabricated Metal Chimney It is also known as flue pipe or stove pipe. The chimney connector joins the stove to the chimney. It must be a 6 inch (152mm) minimum diameter 24 gauge mild steel black or 26 gauge blued steel, or an approved air-insulated double wall venting pipe.
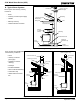
3100 Wood Stove Series (ACC) R Thimble C L Site constructed for masonry chimney installation: ceiling Components • A minimum length of 12 inches [305mm] (longer for thicker walls) of solid insulated factory-built chimney length constructed to UL 103 Type HT 6 inch (152mm) inside diameter. Chimney needs to extend a minimum of 2 inches (51mm) from the interior wall and a minimum of 1 inch (25mm) from the exterior wall. • Wall spacer, trim collar and wall band to fit solid pack chimney selected.
R 3100 Wood Stove Series (ACC) Solid Pack Chimney with Metal Supports as a Thimble (Cont’d) Min. Chimney Clearance to Wall Spacer and Combustibles - 2 inch (51mm) C. Installing Chimney Components Chimney Connector Single wall connector or stove pipe. This must be at least 24 gauge mild steel or 26 gauge blue steel. The sections must be attached to the appliance and to each other with the crimped (male) end pointing toward the stove.
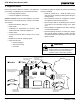
3100 Wood Stove Series (ACC) R D. Chimney Termination Requirements Follow manufacturers instructions for clearance, securing, flashing and terminating the chimney. • Must have an approved and listed cap • Must not be located where it will become plugged by snow or other material • Must terminate at least 3 feet (91cm) above the roof and at least 2 feet (61cm) above any portion of the roof within 10 feet (305cm).
R 3100 Wood Stove Series (ACC) 6 Mobile Home Installation You must use a Quadra-Fire Outside Air Kit Part OAK-ACC and (depending on floor installation, Part SRV7033-041) for installation in a mobile home. SparkArestor Cap 1. An outside air inlet must be provided for combustion See page 14 for installation information. Storm Collar 2. Appliance must be secured to the mobile home structure by bolting the pedestal through hearth pad and into floor. Roof Flashing 3.
3100 Wood Stove Series (ACC) R 7 Appliance Set Up A. Pedestal Assembly and Ash Removal System (ARS) Installation for Step Top Uni-body NOTE: The Ash Removal System, must be installed first before installing the pedestal. Included in Kit: Door assembly, door handle & magnet, ash drawer, fastener package. A cover plate that is required for a floor outside air installation on a pedestal model is also included, If not needed, discard.
R 3100 Wood Stove Series (ACC) Pedestal and Ash Removal System (Cont’d) Installing Pedestal Assembly 1. Remove screws on adapter and slide pedestal over adapter on bottom of stove. Figure 22.1. 2. Line up holes in sides of pedestal with holes in adapter. Grate 3. Securely tighten pedestal into place. 4. Carefully stand stove up and place in desired location. ARS Channel 5. Slip wooden decorative strips onto pedestal edges. Finishing the ARS Installation 1.
3100 Wood Stove Series (ACC) R B. Leg Kit and Ash Removal Installation (ARS) for Step Top Uni-Body NOTE: The Ash Removal System, must be installed first before installing the legs. Installing Leg Kit 1. Remove leg mounting brackets packaged inside firebox. Lay stove flat on its back on protective padding or pallet 2. Attach the 2 bottom screws of the mounting brackets to the bottom of the stove with 1/4”-20 Phillips head screws. These screws are located in the component pack .
R 3100 Wood Stove Series (ACC) D. Adjusting The Blower Speed Control C. Door Handle Assembly The blower speed control for this unit is adjusted at the factory, and normally does not require further adjustment. 1. Install washer on door handle shaft. 2. Slide door handle through door. 3. Install second washer(s) as shown. 4. Install key in groove. 5. Align groove in latch cam with key; slide latch cam over shaft 6. Install locknut but do not overtighten as the door handle needs to move smoothly. 7.
8 3100 Wood Stove Series (ACC) R Operating Instructions B. Wood Selection & Storage (Cont’d) A. Over-Firing Your Appliance wood out - about one hour. It is a waste of energy to burn unseasoned wood of any kind. WARNING Fire Risk Do not over-fire. Over-firing may ignite creosote or will damage the stove and chimney. To prevent over-firing your stove, DO NOT: • Use flammable liquids • Overload with wood • Burn trash or large amounts of scrap lumber • Permit too much air to the fire 1.
R 3100 Wood Stove Series (ACC) 2. Second Stage The next stage of burning, the secondary stage, is the period when the wood gives off flammable gases which burn above the fuel with bright flames. During this stage of burning it is very important that the flames be maintained and not allowed to go out. This will ensure the cleanest possible fire. If the flames tend to go out, it is set too low for your burning conditions.
3100 Wood Stove Series (ACC) R 2. Burn Rate Air Control 4. Medium-Low Burn Rate - 10,000 to 15,000 BTU/hr This air supply enters at the upper front of the firebox, near the top of the glass door. This preheated air supplies the necessary fresh oxygen to mix with the unburned gases, helping to create second, third and fourth combustions. This air is regulated by the Burn Rate Air Control. There are four settings High, Medium-High, Medium-Low and Low.
R 3100 Wood Stove Series (ACC) G. Building A Fire Baffle Board even with front tube & resting on all tubes Before lighting your first fire in the stove: 1. Confirm the baffle is correctly positioned. It should be even with the front tube and resting on all tubes. Figure 28.1. 2. Follow instructions on page 32 for cleaning plated surfaces, if applicable. 3. Burn Rate Air Control Remove all labels from glass. Start-Up Air Control There are many ways to build a fire.
3100 Wood Stove Series (ACC) R INCORRECT POSITIONS H. Correct Baffle & Blanket Placement WARNING Fire Risk Firebox damage due to improper baffle placement is not covered by warranty. Operate the wood burning appliance with the baffle in the correct position only. Not doing so could result in: • Reduced efficiency • Overheating the chimney • Overheating the rear of the firebox Ceramic Blanket and Baffle Board are NOT in contact with the back of the firebox.
R 3100 Wood Stove Series (ACC) J. Opacity (Smoke) I. Blower Operating Instructions NOTE: If your Quadra-Fire wood stove is equipped with an optional blower, you should follow these guidelines: 1. Initial (cold) start-up and all Burn Settings The blower can be plugged in and turned on right away. The blower fan is turned on and off by a snap disc. When your stove has reached a certain temperature the blower will turn on and when your stove has cooled down to a certain temperature it will turn off.
00 Wood Stove Series (ACC) R 9 Maintaining & Servicing Your Appliance 2. Ash Removal System (ARS) Operating and Cleaning A. General Maintenance 1. Creosote (Chimney) Cleaning • Frequency: Every 2 months during heating season or as recommended by a certified chimney sweep; more frequently if chimney exceeds or is under 14-16 ft. (measured from bottom of appliance) • By: Certified Chimney Sweep Remove all ash from the firebox and extinguish all hot embers before disposal.
R 3100 Wood Stove Series (ACC) 3. Disposal of Ashes 5. Glass Cleaning • • • • Frequency: When ash is within 1-3/4 in. (44mm) of firebox lip By: Homeowner Clean glass with a non-abrasive glass cleaner. Abrasive cleaners may scratch and cause glass to crack. If the deposits on the glass are not very heavy, normal glass cleaners work well. Heavier deposits may be removed by using a damp cloth dipped in wood ashes or by using a commercially available oven cleaner.
3100 Wood Stove Series (ACC) R B. Glass Replacement 1. Ensure that the fire is out and the appliance is cool to the touch. 2. Protect a table or counter top with padding or towels. Protect your hands and wear gloves to prevent injury. 3. Remove the door with the broken glass by lifting the door up and off of the hinges. 4. Lay door face down on a table or counter making sure the handle hangs over the edge so the door lays flat, on a soft surface. 5.
R 3100 Wood Stove Series (ACC) C. Firebrick Replacement Replace the firebrick if they become crumbly and/or if there is a 1/4 inch (6.35mm) gap between the bricks. 1 1 Inspect the firebrick after each ash removal. 1 The firebox is lined with high quality firebrick, which has exceptional insulating properties. There is no need to use a grate; simply build a fire on the firebox floor. Do not operate appliance without firebrick. 1 1 1 4 1 1.
3100 Wood Stove Series (ACC) R E. Snap Disc Replacement D. Baffle Removal 1. Remove all ash from the firebox, and extinguish all hot embers before disposal into a metal container. 1. Locate the snap disc bracket assembly at the bottom left rear corner of the stove. Figure 35. 3 2. The baffle board has 2 pieces. With the ceramic blanket 2. A magnet holds the bracket to the stove. Pull the bracket down away from the stove to expose the snap disc.
R 3100 Wood Stove Series (ACC) F. Tube Channel Assembly Replacement NOTE: Service Space Removing Tube Channel Assembly 1. Remove the right side shield by removing 2 screws in the back using a Phillips head screw driver. 2. Remove 4 screws from channel access cover and remove cover. In order to replace the tube channel assembly a clearance of 19 inches (483mm) is required on the right side of stove in order to remove the tubes with the stove in place.
3100 Wood Stove Series (ACC) R 10 Troubleshooting Start Fire Problems Can’t get fire started Excessive smoke or spillage Burns too slowly Smolders, sizzles With proper installation, operation, and maintenance your woodstove will provide years of trouble-free service. If you do experience a problem, this troubleshooting guide will assist a qualified service person in the diagnosis of a problem and the corrective action to be taken.
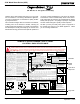
R 3100 Wood Stove Series (ACC) 11 Reference Materials A. Exploded view Item 48 30 1 30 47 46 45 Description Hinge Pins 31 Door, Cast not sold sep.
3100 Wood Stove Series (ACC) R 26 22 23 24 25 21 27 12 1 10 14 9 20 19 28 29 18 7 30 6 49 4 1 34 5 16 32 3 33 17 2 1 SIZES (#33) Baffle Board: 9-1/2” w x 13-3/4” h, each (#29) Ceramic Blanket: 19” w x 13-3/4” h, 1/2” thick Millennium Model Figure 39.
R 3100 Wood Stove Series (ACC) 25 21 39 22 23 26 50 13 51 14 10 12 9 28 20 19 18 29 5 30 4 49 6 7 16 34 31 17 33 32 37 52 1 SIZES 36 (#33) Baffle Board: 9-1/2” w x 13-3/4” h, each (#29) Ceramic Blanket: 19” w x 13-3/4” h, 1/2” thick 35 Step-Top Uni-Body Model Figure 40.
3100 Wood Stove Series (ACC) R B. Service Parts & Accessories IMPORTANT: THIS IS DATED INFORMATION. When requesting a part for your appliance, please supply serial number and model name/number to ensure correct service parts. All parts may be ordered from an authorized dealer. ITEM # ACCESSORIES PART NO.
R 3100 Wood Stove Series (ACC) ITEM # SERVICE PARTS PART NO.
3100 Wood Stove Series (ACC) R ITEM # SERVICE PARTS PART NO.
R 3100 Wood Stove Series (ACC) C.
3100 Wood Stove Series (ACC) R D.
R 3100 Wood Stove Series (ACC) E. Warranty Policy Hearth & Home Technologies LIMITED WARRANTY Hearth & Home Technologies (“HHT”) and its respective brands extends the following warranty for HHT gas, wood, pellet and electric appliances purchased from an authorized HHT dealer and installed in the United States of America or Canada. Warranty starts with date of purchase by the original owner (End User) except as noted for replacement parts.
3100 Wood Stove Series (ACC) R Hearth & Home Technologies LIMITED WARRANTY (Cont’d) HHT’s obligation under this warranty does not extend to damages resulting from: (1) installation, operation or maintenance of the appliance not in accordance with the installation instructions; operating instructions and the listing agent identification label furnished with the appliance; (2) installation which does not comply with local building codes; (3) shipping, improper handling, improper operation, abuse, misuse,
R CONTACT INFORMATION: Hearth & Home Technologies 1445 North Highway Colville, WA 99114 Division of HNI INDUSTRIES Please contact your Quadra-Fire dealer with any questions or concerns. For the number of your nearest Quadra-Fire dealer, log onto www.quadrafire.com CAUTION Do NOT discard this manual. • Important operating and maintenance instructions included. • Read, understand and follow these instructions for safe installation and operation.