
User Guide
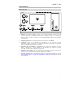
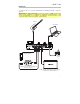
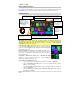
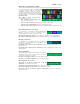
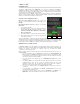
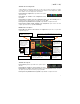
Table Of Contents
- User Guide (English)
- Guía del usuario (Español)
- Guide d’utilisation (Français)
- Guida per l’uso (Italiano)
- Benutzerhandbuch (Deutsch)
- Appendix (English)

21
7. After the drive has been ejected, tap Sync on
your HeadRush MX5 to "commit" any
changes you made to the contents of the
HeadRush drive. An additional prompt will
appear to confirm you have ejected the drive.
Tap Proceed to continue or Cancel to
continue accessing files on your computer.
As the HeadRush MX5 analyzes and imports
the files, a meter on the display will indicate
its progress. The normal Global Settings
screen will reappear when the process is
finished. Do not disconnect or power off
HeadRush MX5 during the sync process.
Firmware Update Instructions
1. Connect the USB port on your HeadRush device to your computer, and ensure HeadRush
device and your computer are powered on.
2. On your HeadRush device, tap the ••• icon in the upper-right corner, and tap Global
Settings.
3. In the Global Settings screen, tap the ••• icon in the upper-right corner again, and tap
Firmware Update. In the screen that appears, tap OK to continue. After restarting, the
screen will show Update at the bottom edge.
4. Open the HeadRush Updater application for your operating system—Windows or macOS.
(You can download the latest updater application from
headrushfx.com)
5. When the updater window appears, click Update HeadRush. Do not disconnect or power
off the HeadRush device or your computer until the update is completed.
6. When the update is completed, the updater window will display Done, and your HeadRush
device will restart. Click Done to close the updater window.
7. Confirm your Headrush device is using the latest firmware—tap the ••• icon in the upper-
right corner, and tap Global Settings. The firmware version will appear at the bottom of the
screen.