
User Guide

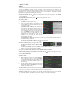

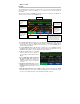

Table Of Contents
- User Guide (English)
- Guía del usuario (Español)
- Guide d’utilisation (Français)
- Guida per l’uso (Italiano)
- Benutzerhandbuch (Deutsch)
- Appendix (English)

20
Level: This setting determines if/how much the outputs’ audio signal level is boosted or
cut. This value is applied the level set by the Master knob.
Low Band & High Band: These settings determine what type of equalization is applied to
the lowest-frequency band (Low Band) and to the highest-frequency band (High Band):
Shelf or Cut.
Low, Low Mid, High & High Mid: The three settings for each of these four frequency
bands determine the shape of the equalization:
The first setting (Hz) determines the center frequency of the low-frequency band,
low-mid-frequency band, high-frequency band, or high-mid-frequency band.
The second setting (dB) determines how much the equalizer boosts or cuts the
signal at the corresponding frequency band.
The third setting (Q) determines the width of the frequency band. The higher the
setting, the wider the band will be around the center frequency (the first setting). This
setting is applied whether Low Band or High Band is set to Shelf or Cut.
Transferring Files & Settings
Over a USB connection, you can transfer rig, setlist,
model preset, loop, and/or impulse response (IR)
files between your computer and the HeadRush
MX5.
We recommend creating a backup copy of your files
to your computer before you make any changes.
Important:
Do not disconnect or power off the HeadRush MX5
during the process.
Any unsupported files will be ignored.
You cannot transfer a folder or .zip/archive folder
to/from HeadRush MX5. Instead, transfer any
supported files directly.
We recommend organizing the file structure of your
rigs, setlists, model presets, and/or impulse
response files on your computer so that it’s identical
to the file structure as shown on the HeadRush MX5
“drive.”
To transfer files between the HeadRush MX5 and your computer:
1. Connect your computer to the HeadRush MX5’s USB port using a standard USB cable.
2. With your computer powered on, power on the HeadRush MX5 using the power switch.
3. Tap the button in the upper-right corner of the screen and then tap Global Settings.
4. In the Global Settings screen, tap the button in the upper-right corner of the screen, and
tap USB Transfer. On your computer, the HeadRush MX5 will appear as a mass-storage
device called HeadRush.
Windows users: If this is the first time you’ve connected it to this computer, you may need
to wait a minute while it installs the class-compliant drivers.
5. Open the HeadRush drive. You can now freely click and drag contents between
HeadRush and your computer. Note that any changes you make to the contents of your
HeadRush are immediate and cannot be cancelled.
6. IMPORTANT: When you are finished transferring contents, you must unmount/eject the
HeadRush drive from your computer. File corruption may occur if the drive is not properly
ejected before continuing.