
User Guide
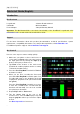
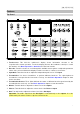
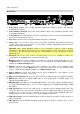
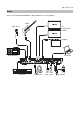

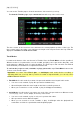
Table Of Contents
- Quickstart Guide (English)
- Guía de inicio rápido (Español)
- Guide d’utilisation rapide (Français)
- Guida rapida (Italiano)
- Schnellstart-Anleitung (Deutsch)
- Appendix (English)

4
Rear Panel
1
2
3
4
5555
6
7
8
9
10 11 12
13
14
15
1. Power Input (19 VDC, 3.42 A, center-positive): Connect this input to a power outlet using the
included power adapter.
2. Power Adapter Restraint: Secure the power adapter cable to this restraint to prevent it from
accidentally unplugging.
3. Power Switch: Press this button to turn the Looperboard’s power on. Press and hold this button
to turn the Looperboard’s power off.
4. Vent: Make sure this vent is unobstructed while using the Looperboard.
5. Inputs (XLR or 1/4”/6.35 mm, TRS): Connect your guitar, instrument, drum machine, keyboard,
or other audio source to these inputs. You can enable or disable +48V phantom power for these
inputs in the Global Settings page.
Important: Only enable phantom power if your microphone requires it. Most dynamic
microphones and ribbon microphones do not require phantom power, while most condenser
microphones do. Consult your microphone's documentation to find out whether it needs
phantom power.
6. Aux Input (1/8”/3.5 mm, TRS): Connect an optional audio source (e.g., smartphone, tablet, etc.)
to this input. Use the Aux knob to control the volume level.
7. Outputs (XLR): Connect these outputs to the inputs of your mixer, active loudspeaker, etc. Use
the Master knob to control the volume level. You can adjust the ground-lift setting for these
outputs on the Global Settings page.
8. Outputs (1/4”/6.35 mm, TRS): Connect these outputs to the inputs of your amplifier, audio
interface, mixer, etc. Use the Master knob to control the volume level. You can switch the level
of these outputs between Amp and Line on the Global Settings page.
9. Phones Output (1/4”/6.35 mm, TRS): Connect stereo headphones to this output. Use the
Phones knob to control the volume level.
10. Expression Pedal Input (1/4”/6.35 mm, TRS): Connect an optional expression pedal to this input.
11. MIDI In (5-pin DIN): Use a standard MIDI cable to connect this input to the MIDI output of an
optional external MIDI device.
12. MIDI Out/Thru (5-pin DIN): Use a standard MIDI cable to connect this output to the MIDI input of
an optional external MIDI device. You can set this output to be a standard MIDI output or MIDI
throughput.
13. USB Type-B Port: Connect this USB port to a computer using a standard USB cable. This
connection allows the Looperboard to send and receive the digital audio signal to and from your
computer. You can also use this connection to import or export loops, individual audio files,
backing tracks, etc. This connection is also used to update the firmware.
14. USB Type-A Ports: Connect USB flash drives to these USB ports to import or export loops to or
from Looperboard.
15. SD Card Slot: Insert a standard SD/SDHC card into this slot to import or export loops to or from
Looperboard.