
Use and Care Manual

HOMEDEPOT.COM/HDX
Please contact 1-800-514-6729 for further assistance.
Monday-Friday 8 a.m. - 7 p.m. EST and Saturday 9 a.m. - 6 p.m. EST
Item #SL-SSHD-34C
Model #1001663088
Dorm Space Saver
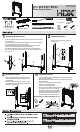
1
Assembling the bottom frame
□ Locate the desired position of the bottom frame (C). Ensure that it is no more than
6 in. from the floor.
□ Place two tapered sleeves (A) into the appropriate groove on each pole assembly.
Ensure the tapered end is up (see arrow on sleeve).
□ Place the bottom frame (C) on its side and slide the each pole assembly with
tapered locks through the bottom of the frame (C) until snug.
□ After all pole assemblies are in place, position the unit in the upright position.
□ Push down on each corner of the frame (C) and ensure the frame (C) is in a fully
locked position.
2
Assembling the posts
□ Screw a top pole (E) to a bottom pole (F) and
bend pole (D).
4
Assembling the shelf
□ Locate the desired position of the shelf (B) and place the tapered sleeves
(A) onto the pole assemblies.
□ Slide the shelf (B) down from the top of the pole assemblies and onto the
tapered sleeves (A).
□ Push down on each shelf (B) corner, ensuring the
shelf (B) is in a fully locked position.
□ Repeat for the remaining shelf (B).
3
Assembling the racks
□ Locate the desired position of the cup holder (G) and
swing arm (H). Place the tapered sleeves (A) on to the
pole assemblies.
□ Slide the cup holder (G) down from the top of the pole
assemblies and onto the tapered sleeves (A). Repeat for
the remaining swing arm (H).
A
F
C
D
E
F
D
G
H
A - Tapered Sleeves x 30
Spare Plastic Tapered
Sleeves x 2
B - Shelf x 2
C - Bottom Frame x 1
D - Bend Poles x 2
G - Cup Holder x 1
H - Swing Arm x 2
E - Top Poles with Pole Connector &
Caps Pre-installed x 4
F - Bottom Poles with Levelers Pre-installed x 2
I - Washerx 2
J - Anchor
x 2
K - Screw x 2
Tip resistant kit – fix to wall to prevent tipping over
K
I
J
B
□ Move unit to desired location and mark spot through
top shelf wire on each side of unit. Drill 1/4 in.
holes at each marked spot, then insert plastic
anchors (J) into holes. Insert screws (K) through
the washers (I) then through the back of the
top shelf wire and into the plastic anchors (J).