
User's Manual

Photomatix Pro 5.0 User Manual 33
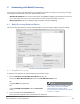
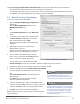
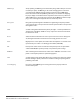
4.2 Batch Processing Single Images
To process a batch of single image les:
1� Open the Batch Tone Mapping of Single Photos
window by:
Click the Batch Single Photos button in the
Workow Shortcuts panel
OR
Select Batch Single Photos from the Automate
menu�
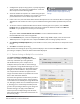
2� To select the source folder that contains the les,
click Select Folder, and Navigate to the folder
that contains the les and click OK�
The folder path and the les in the folder will be
displayed�
3� Optionally, you may select a subset of the
displayed les to process:
Hold the Control key (Windows) or Command key
(Mac), and click to specify les for processing�
4� To process the selected les using an existing
preset, select a preset from the Use: Preset menu�
To Process the selected les using a new
custom setting, select a method from the Use:
Custom Settings for menu, then click Set..., and then congure the preset as desired�
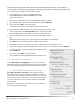
5� Click the checkboxes for noise reduction and CA correction, if needed�
6� To select a destination folder, click Created under Source Folder
to save the images in the same folder as the source les�
OR
Click Customized Location to save the images in a
dierent folder�
Click Choose to select the destination folder�
The folder path will be displayed�
7� Select the output le type� When using JPG le output,
select the amount of JPEG compression� 100 gives the least
compressed JPEG le, with most image quality retained�
8� Click Run� The batch processing status displays�
When batch processing is complete, a link to the batch results
will be displayed�
Batch Tone Mapping of Single Photos
The Batch Single Photos feature is intended
for automating the processing of a lot of
photos. To process a single image le, load the
image le using the information in Section 2.2.
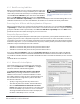
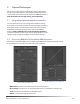
Click Select only part of the frames in bracketed set to load only selected frames from a bracketed set�
• Specify the total number of frames in each set using the drop-down list�
• Select the specic frames to process from the list� Select more than one le by holding down the Control
key (Windows) or Command key (Mac) and clicking on the desired frames�
To remove the watermark, Photomatix Pro
requires that the image was not retouched after
the watermark was added to it. If the brightness
or contrast of the image was changed, or the
image was double tone mapped, or cropped
or resized, then Photomatix will not be able to
remove the watermark.
Note
Note