Photomatix Light 1.
Table of Contents Introduction.................................................................................................................................... iii Section 1: HDR...............................................................................................................................1 1.1 Taking Photos for HDR..........................................................................................................2 1.1.1 Setting Up Your Camera........................................
Introduction Introduction Photomatix Light processes multiple, exposure bracketed photos into a single image by either fusing the exposures together or through a process known as HDR tone mapping. This manual is organized into three major areas. The first is a general description of HDR photography and how to shoot it. The second is a more detailed tutorial on how to use Photomatix Light. The third section is a glossary of some of the terms associated with HDR.
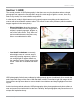
Section 1: HDR Section 1: HDR The central premise of HDR photography is that there are very few situations where a single photograph can capture the true dynamic range (the total range of light in a scene, from very little to very much) of a scene without compromise. In other words, today’s digital camera can’t properly expose everything at the same time in scenes with even moderate contrast ratios.
Section 1: HDR 1.1: Taking Photos for HDR Taking photos for HDR is easy. All it takes is a different mindset than traditional photography, which emphasizes taking and editing a single photo, independent from any others. 1.1.1 Setting Up Your Camera HDR photography requires that you set up your camera a bit differently than normal: • Shooting mode: Aperture Priority or Manual mode. Do not use Automatic or Shutter Speed mode as the aperture (and hence the depth of field) would vary between shots.
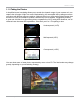
Section 1: HDR 1.1.2 Taking the Photos In simplified terms, bracketing allows you to stretch the dynamic range of your camera so it can capture the full range of light in a scene. Mechanically, you accomplish this by taking more than one photo with different exposure settings. Although there is no single method that is better than all others in every circumstance (indeed, cameras vary in their abilities, complicating matters), a good rule of thumb is to shoot three photos, separated by 2.0 EV using AEB.
Section 1: HDR Auto Exposure Bracketing (AEB) simplifies your job as a photographer greatly. After setting up and composing the shot, all you need to do is: 1. Configure number of brackets you want to take. Three is a good starting point. Choose more for higher contrast scenes. 2. Configure EV spacing. +/- 2.0 EV (if available) is a common spacing that provides you a good overall range if you take three photos. 3. Shoot the photos.
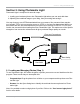
Section 2: Using Photomatix Light Section 2: Using Photomatix Light Photomatix Light is composed of two main steps: 1. Loading your bracketed photos into Photomatix Light where you can work with them. 2. Adjusting the combined image to your liking, then processing and saving it. You may choose to use JPEGs downloaded from your camera, files converted from raw photos (normally TIFFs, but you can also convert to JPEG), or the raw files themselves.
Section 2: Using Photomatix Light Dragging and Dropping To drag one or more photos into Photomatix Light, follow these steps: 1. Launch Photomatix Light. 2. Open the folder on your computer that contains the photo or photos you want to work with. 3. Arrange the folder and Photomatix Light so you can drag files from the folder and drop them on Photomatix Light. 4. Select the files as you would normally. 5. Drag and drop the photos to Photomatix Light.
Section 2: Using Photomatix Light Browsing To browse to one or more photos using a file selection dialog box, follow these steps: 1. Launch Photomatix Light. 2. Choose Browse. 3. Navigate to the folder on your system where the photo(s) are stored. 4. Select the files as you would normally. 5. Choose Open (Windows) or Select (Macintosh). Regardless of the method you choose, you can go back and add photos. Drag and drop additional photos or choose Browse again to choose more files.
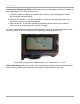
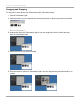
Section 2: Using Photomatix Light Managing Photos Once you load your photos into Photomatix Light, you should notice a few things in the interface. First, each photo is displayed as a thumbnail. This makes it easy to verify the photos are of the same subject and see their relative exposure compared to their bracketed companions. Additionally, there is a combined thumbnail that shows the result of processing the photos.
Section 2: Using Photomatix Light 2.2 Adjusting the Image with Fusion or Tone Mapping (Step 2) The heart of Photomatix Light is Step 2, where you choose a method to process your bracketed photos. The two methods you can choose from are: • Exposure Fusion: combines your bracketed photos in such a way that bright details (highlights) are taken from the underexposed photos and dark details (shadows) from the overexposed ones. The result is a more “natural” look with less noise than tone mapping.
Section 2: Using Photomatix Light Follow these steps when you are presented with Step 2: 1. Select the method (Exposure Fusion or the Details Enhancer) that gives you the result you prefer. If you change your mind, simply select the other method. If you select Details Enhancer Tone Mapping, you can also choose a preset, “Default”, “Painterly” or “Grunge”. 2. Adjust the sliders to get the effect you want. 3. When satisfied, select Process & Save. 4.
Section 2: Using Photomatix Light 2.2.1 Details Enhancer Presets and Settings The Details Enhancer has three main presets. Select a preset from the list to see the effect it has on your HDR image: • Default: Contains fairly neutral settings designed to achieve a reasonably realistic result. • Painterly: A more artistic preset, Painterly recreates the appearance of a painting. • Grunge: Grunge is a dramatic preset that accentuates contrast and color.
Section 2: Using Photomatix Light Strength Controls the strength of contrast enhancements to the image. Color Saturation Raises or lowers the color intensity, or saturation, of the resulting image. Greater values intensify color and lower values produce a subdued effect. A value of 0 removes all color, resulting in a grayscale image. Luminosity Controls how much the tonal range is compressed, which then affects the overall brightness. Increasing Luminosity increases shadow details and brightens the image.
Section 2: Using Photomatix Light 2.2.2 Exposure Fusion Settings Exposure Fusion has no presets. Work the sliders to achieve the desired effect. Accentuation Adjusts the strength of the overall effect. Color Saturation Adjusts the saturation of the color channels. The greater the saturation, the more intense the colors. A value of 0 produces a grayscale image. Blending Point Adjusts how much weight to give the underexposed or overexposed images.
Section 3: Glossary Section 3: Glossary • Bit Depth: How many bits a file type uses to represent a pixel’s color and location in an image. JPEGs use 8 bits per color channel to encode this information while 16-bit TIFFs use 16 bits. Camera Raw files are usually 12 to 14 bits per color channel. • Brackets: A group of exposure-bracketed photos, i.e. of photos of the same scene taken with different exposures.
For more information on HDR and Photomatix Light, visit www.hdrsoft.com. In addition, there are many books and Internet resources devoted to the subject that, along with your own experience, will help deepen your understanding of it.
www.hdrsoft.