
Operating Instructions


9Photomatix Essentials 3.2 User Manual
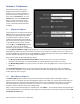
2.2.3 Details Enhancer Settings
• Strength: Aects the degree to which contrast and detail are
enhanced in the image. A value of 100 gives the maximum amount of
enhancement. To get a more natural eect, move the slider to the left.
The default value is 70.
• Color Saturation: Controls the saturation of the RGB color channels.
The greater the saturation, the more intense the color. Move the slider
right or left to change the setting. A value of 0 produces a grayscale
image. The value aects each color channel equally. The default value
is 46.
• Luminosity: Controls the compression of the tonal range, which has
the eect of adjusting the global luminosity level. Move the slider
to the right to boost shadow details and brighten the image. Move
it to the left to give a more “natural” look to the resulting image. The
default value is 0.
• Detail Contrast: Controls the amount of contrast applied to detail
in the image. Move the slider to the right to increase the contrast of
the details and give a sharper look to the image. Note that increasing
the contrast also has a darkening eect. Move the slider to the left to
decrease the contrast of details and brighten the image.
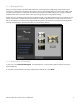
2.2.2 Working With Presets
Photomatix Essentials lists presets in the form of thumbnails on theright side of the Step 2 window. Each
thumbnail is a small preview of theeect of that preset on your image. When you click a thumbnail, that preset
is selected and applied to the main preview. The parameters at the left of the screen are also updated to reect
the settings contained in that preset.
These built-in thumbnail presets are “factory” presets that are provided with thesoftware. Photomatix Essentials
oers 27 built-in presets when you are working withbracketed photo sets, 23 presets when you have loaded just
a single photo.
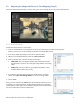
The built-in presets use a range of dierent settings combinations that provide pleasing results with a wide
variety of image types. Built-in presets are a good starting point for exploring your own custom settings, ne-
tuned to your specic image.
Dierent combinations of settings produce a wide range of image eects and styles. When you nd a new
settings combination that works well for a given type of image, you may wish to save this settings combination
for future use with similar images. To save your own “custom preset” for convenient access later, in the Presets
drop-down list:
1. Click the Presets drop-down list.
2. Select Save Preset from the list.
3. Enter a name for the preset in the File name eld and click Save.
If you save the preset in the default location (which is also the Presets folder used by the Photomatix Pro
application), the preset is automatically added to the Presets combo-box list. If you save it in another location,
you can access it by clicking on the Presets drop-down list and selectingLoad Presetfrom the list.
Details Enhancer – General Settings