Photomatix Essentials Version 3.2 User Manual HDR soft © 2012 HDRsoft. All rights reserved.
Contents Introduction 1 Section 1: HDR (High Dynamic Range) Photography 1 1.1 Taking Photos for HDR 2 1.1.1 Setting Up Your Camera 2 1.1.2 Taking the Bracketed Photos 3 Section 2: Using Photomatix Essentials 4 2.1 Loading and Managing Photos (Step 1) 4 2.1.1 Dragging and Dropping 4 2.1.2 Browsing 5 2.1.3 Managing Photos 7 2.1.4 Starting Over or Continuing 7 8 2.2 Adjusting the Image with Fusion or Tone Mapping (Step 2) 2.2.1 Step 2 Overview 8 2.2.2 Working With Presets 9 2.2.
Introduction Photomatix Essentials processes multiple exposure bracketed photos into a single image either by a process known as fusing the exposures together or through a process known as HDR (High Dynamic Range) tone mapping. This manual is organized into three major sections. The first section is a general description of HDR photography and how to shoot it. The second section is a detailed tutorial on how to use Photomatix Essentials.
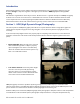
1.1 Taking Photos for HDR Taking photos for HDR is easy. All it takes is a different mindset than for traditional photography, which emphasizes taking and editing a single photo, independent from any others. Instead of taking a single exposure of a scene, for HDR you take at least 3 exposures: one optimized for midrange tones (as normal), plus one optimized for highlights and one optimized for shadows.
1.1.2 Taking the Bracketed Photos In simplified terms, bracketing allows you to extend the dynamic range of your camera so it can capture the full range of light in a scene. Mechanically, you accomplish this by taking multiple photos with different exposure settings. Although there is no single method that is better than all others in every circumstance (indeed, cameras vary in their abilities, complicating matters), a good rule of thumb is to shoot three photos, separated by 2.0 EV using AEB.
Section 2: Using Photomatix Essentials The Photomatix Essentials application workflow comprises two main steps: Step 1. Load your bracketed photos into Photomatix Essentials. Step 2. Adjust the combined image to your liking, then process and save it. 2.1 Loading and Managing Photos (Step 1) To use Photomatix Essentials, first select the photo or photos you want to use and load them into the program.
4. Select the files as you would normally. 5. Drag and drop the photos to Photomatix Essentials. You can drag and drop file individually or in groups. 2.1.2 Browsing To browse to one or more photos using a file selection dialog box, follow these steps: 1. Launch Photomatix Essentials. 2. Click Browse. Photomatix Essentials 3.
3. Navigate to the folder on your system where the photo(s) are stored. 4. Select the files as you would normally. 5. Choose Open (Windows) or Select (Macintosh). Regardless of the method you choose, you can go back and add photos. Drag and drop additional photos or choose Browse again to choose more files. You may mix and match these two methods. Photomatix Essentials 3.
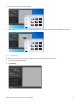
2.1.3 Managing Photos Once you load your photos into Photomatix Essentials, you should notice a few things in the interface. First, each photo is displayed as a thumbnail. This makes it easy to verify that the photos are of the same subject and see their relative exposure compared to their bracketed companions. Additionally, there is a larger combined thumbnail that shows a preview of the result of processing the photos using default settings.
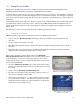
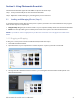
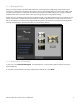
2.2 Adjusting the Image with Fusion or Tone Mapping (Step 2) The heart of Photomatix Essentials is Step 2, where you choose settings to process your bracketed photos. 2.2.1 Step 2 Overview Follow these steps when you enter Step 2: 1. Click on the thumbnails on the right side to select a preset that gives you the result you prefer. (Refer to section 2.2.2 on the next page for details on working with presets) 2. If necessary, adjust the settings on the left to refine the effect. 3.
2.2.2 Working With Presets Photomatix Essentials lists presets in the form of thumbnails on the right side of the Step 2 window. Each thumbnail is a small preview of the effect of that preset on your image. When you click a thumbnail, that preset is selected and applied to the main preview. The parameters at the left of the screen are also updated to reflect the settings contained in that preset. These built-in thumbnail presets are “factory” presets that are provided with the software.
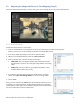
• Lighting Adjustments: Affects the overall ‘look’, controlling the extent to which the image looks natural or surreal. When the Lighting Effects Mode box is unchecked, move the slider to the right to make the image look more natural and to the left to make it look more ‘painterly’ or ‘surreal’. • Lighting Effects Mode: The checkbox lets you switch between two modes for the Lighting Adjustments setting, where each mode produces slightly different results.
Section 3: Preferences Photomatix Essentials offers Image Alignment, Ghost Removal and Noise Reduction. You can choose whether to use these features and adjust some of their options in Preferences. To access Preferences, click on the Preferences… button located at bottom left of the window where you load your images in Step 1 of the Photomatix Essentials workflow. 3.
3.3 Noise Reduction Options Noise Reduction is often useful when using presets such as Painterly, Surreal or Grunge, because these presets enhance local details, which has the drawback of accentuating noise. Noise reduction is particularly recommended when processing RAW files directly in Photomatix, or when processing just one photo, especially when this photo is underexposed. You can turn Noise Reduction on or off, or be prompted whether to apply it after Step 2, by adjusting the Reduce noise option.
Glossary AEB mode (Automatic Exposure Bracketing). DSLR cameras and some compact digital cameras offer this feature. It enables you to automatically take three or more exposures in a row: one at the proper exposure, one or more underexposed, and one or more overexposed. Aperture priority In Aperture Priority mode, you select the aperture and the camera determines the correct shutter speed for the available light. The shutter speed also depends on ISO sensitivity.
JPEG A common image file format with two primary strengths – a relatively small file size and universal compatibility. JPEGs use a lossy compression scheme and should not be edited and re-saved. Noise Statistical variations inherent in the sensor system cause noise. Noise is always present, but higher sensitivities and smaller sensors usually generate more noise. Pixel Digital pictures consist of pixels, the smallest units.
Resources You can find more tips, techniques, and regularly updated information in the Photomatix FAQ on the HDRsoft website at http://www.hdrsoft.com/support/faq_photomatix.html. Additionally, the resources page at http://www.hdrsoft.com/resources/ lists Internet tutorials, book and DVDs on the subject of HDR photography that, along with your own experience, will help deepen your understanding of it. Photomatix Essentials 3.
www.hdrsoft.