
Operating Instructions


8Photomatix Essentials 3.2 User Manual
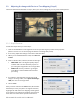
2.2 Adjusting the Image with Fusion or Tone Mapping (Step 2)
The heart of Photomatix Essentials is Step 2, where you choose settings to process your bracketed photos.
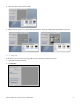
2.2.1 Step 2 Overview
Follow these steps when you enter Step 2:
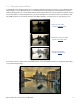
1. Click on the thumbnails on the right side to select a preset that gives you the result you prefer.
(Refer to section 2.2.2 on the next page for details on working with presets)
2. If necessary, adjust the settings on the left to rene the eect.
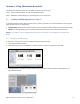
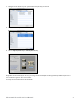
3. When you are satised with the result, select Process
& Save.
4. Enter a new le name, if desired, and select a le type:
• TIFF 16-bit: This is the highest quality output
available and is the best format if you plan on
processing the image further in an image edi tor.
• JPEG: JPEG is best if you want to go straight
to the Web or other medium with no further
processing.
5. If you want to automatically open the processed
image in an image editor, select Open saved image
with, then choose an image editor.
6. Choose Save.
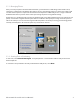
Once you have clicked on the Save button, Photomatix
Essentials processes your photos at original resolution,
aligning them and either tone mapping or fusing them.
It also applies noise reduction and ghost removal if you
have chosen to enable these options in Preferences.