
Instructions


Documentation Testing Software (Status 28.09.2011)
HAZET
®
Torque-Tester 7901 E , 7902 E, 7903 E
Page 18 from 24
HAZET-WERK GmbH & Co. KG · Postfach 10 04 61 · D-42804 Remscheid · Germany
Telefon +49 (0) 21 91 / 7 92-0 · Telefax +49 (0) 21 91 / 7 92-375 · www.hazet.com · info@hazet.de
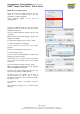
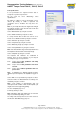
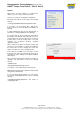
Test specifications
In test specifications the registered master data is
assigned to a specific torque wrench.
On the select list select <Measuring> <Test
specifications>.
By clicking on <New> a new test specification can be
entered. By clicking on <Edit> a registered test
specification can be modified. The entry boxes are
yellow.
Note: If you modify the data, the original data will get
lost. Please consider if you need the data of this test
specification for future tests.
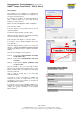
Select <Manufacturer> by using the scroll bar.
Select <Article number> by using the scroll bar.
If a torque wrench with an article test unit has to be
tested, select <Article test unit> by using the scroll bar.
Select <Precision> by using the scroll bar.
Select <Torque unit> by using the scroll bar.
Select <Measuring range> by using the scroll bar.
Select <Test specification> by using the scroll bar.
Note: The measurement range of the torque tester must
be adapted for the test values of the torque range.
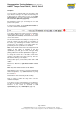
Select <Template> by using the scroll bar.
The templates and certificates are established in
German. There are three templates at your disposal
according to the type of torque wrench.
6100: Torque wrench with graduation and firmly
mounted drive side.
6200: Torque wrench with graduation and article
test unit.
6300: Torque wrench without graduation with one
preset value.
Note: If certificates in a different language or with a
different layout are required, see templates on page 12-
13.
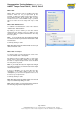
Select <DIN> or test specification by using the scroll bar.
Select the number of <Measurements> according to the
standard by using the scroll bar.
Note: If the number of measurements does not
correspond to the number of lines in the template, you
will get an error message during printing.
See also Templates page 12-13
Confirm by clicking on <OK>.
Note: Mandatory fields left unfilled are red once the
entry was confirmed by clicking on <OK>.
The newly created torque wrench can now be tested as
described in "Start Measuring“, page 7-9.