
User Manual


23
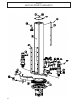
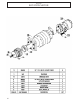
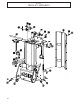
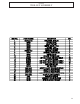
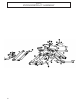
SLAVE CYLINDER CONFIGURATION
(1)First the T-WREX should be FULLY extended using the manual control lever on the center section
of the arm, under the cover.
(2)Next, remove the rear cover to expose the li cylinder and the slave cylinder.
(3)Turn both the HPU and e-stop o. On the extension cylinders, remove the -8 caps on the tee ttings
and connect jumper hoses between le and right cylinders, both in the front and rear sections of the
arm.
(4)Turn HPU back on. Raise the tool high enough that the front section can not hit the oor using the
manual control lever on the center section of the arm.
(5)Again using manual control on the arm, fully extend and retract the tool several times (six to ten).
Leave the tool in the fully extended position and lower it fully.
(6)Turn o the HPU again. Disconnect hoses from li cylinder, marking them as to which tting they
connect to.
(7)Using -8 to -6 adapters on the slave cylinder, connect li hoses to tee ttings on the slave cylinder.
(8)Using manual controls again, actuate the raise and lower valve, repeatedly (6 to10) times, being care-
ful to fully extend and retract the slave cylinder each time, but not holding the control long enough to
cause the arm to begin to retract.
(9)Leave the slave cylinder in the retracted position (opposite the extension cylinders, which should be
fully extended at this point).
(10)Turn the HPU o. Being careful to minimize oil loss and air intrusion, remove jumper hoses one at
a time and cap tee ttings.
(11)Remove li hoses from slave one at a time and cap, to minimize air intrusion, and then reconnect
li hoses to the li cylinder on the appropriate ttings.
(12)Turn HPU and e-stop back on and verify that the extend and retract functions actuate smooth and
level from the control console. Replace top and rear covers.