
manual


C-VS-1600-EXPL-1_INST_7-12.docx
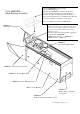
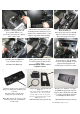
Attach 1-7/8” diameter “O” ring to
the OEM aux panel and snap into
adaptor plate. Attach plate assembly
to console forward bezel with #8 x
1/4" Phillips flat head screws.
(2014 Standard Aux panel shown)
Adaptor plate for 2014 Ford Retail
Explorer.
Adapts the smaller (2014) OEM aux
input panel to fit console forward
panel. Adaptor with “O” ring and
mount screws included with consoles
MFG after 9/1/13.
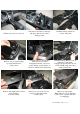
(2014 Premium Aux panel shown)
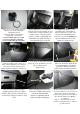
Attach the suppli
ed 3
-
1/2” diameter O
-
Ring to the back of the Auxiliary panel
as shown.
This helps make a snug fit when
snapped into the console bezel.
Note: This method also works for other
Auxiliary panels such as the MyFord
Touch system
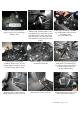
Route terrain management switch
and aux plugs to new mounting
locations. Cut off O.E.M. 12 volt
plug and attach supplied 1/4
female spade connectors on wires.
Place shifter assembly into console.
Do not bolt in yet.
Place previously removed O.E.M.
harness inside console housing.
Reconnect plugs as needed.
Place main console housing into
vehicle and loosely attach it to the
mounting brackets with six (6) 1/4 x
3/4 hex bolts and flat washers. (7/16)
Note: Carpet tucks between hump
bracket and console side panels.
Now attach shifter assembly to
shifter platform with four (4) 1/4 x
1” hex head bolts and flat washers.
(7/16 socket)
Reattach O.E.M. shifter cable to
original locations.
Attach # CM004239 rear mount
bracket to existing O.E.M. rear
floor bracket with two (2)
previously removed bolts. (10mm)
Sensor faces down.
Carefully place # CM004248
Top / forward trim bezel.
Do not screw down yet.