
Use and Care Manual

Halloween Figurine Assembly Instructions
The model number of your item is printed on the side of your carton.
Always use this number to identify your item.
Thank you for your purchase of this quality Halloween decor. With proper use and care, your Halloween decor will
provide you with years of enjoyment. Please follow the instructions on how to assemble and disassemble your
item. If you should have any problems with your item, or you have any questions, DO NOT return it to the place of
purchase. Please call our toll-free number: 1-888-840-4559 and a customer service representative will assist you.
Enjoy your Holiday!
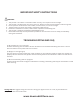
Your Package Includes:
4 legs, base connector, short metal tube(s), and long metal tubes with joint connectors.
Please note: depending on the height of your gurine, your package may also include additional metal poles, as
well as hooks to stabilize your gure. Make sure to add batteries to the battery pack prior to assembly for easier
access (batteries not included).
Your Halloween Figurine may also include a loop located near the gurine’s head for an optional hanging
display. If you choose to hang your gurine, the base assembly is no longer necessary.
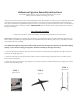
1. Form the base by inserting the foot into the base connector and pushing them together (see gure A-B) and
repeat for all 4 legs (Figure C)
2. Form the stand by connecting the metal tubes to form an extension (Figure D) then insert the tube into the
base connector (Figure E)
3. Insert the top of the stand into your gurine. The connection spot is hidden underneath your gurines clothes
located near the battery pack.
STEP 1
(Figure A & B)
STEP 3
(Figure D & E)
STEP 2
(Figure C)