
Instruction Manual

5
Section VII. OPERATING INSTRUCTIONS
Warning!
Take all safety measures before filling the air cylinder. It is compulsory for the user and bystanders to
wear eye & ear protection when filling the air cylinder.
Before filling the air cylinder; make sure the safety is in the ON position, no pellets are loaded in the air
rifle and/or barrel and magazine is not mounted in the gun. If the air tube is completely empty; fill air
tube after cocking the gun and keeping the cocking handle/bolt open at the rear.
While filling the air cylinder; the pressure in the air cylinder must be monitored from the air gauge of the
hand pump or scuba charging kit. Do not look at the air gauge on the air cylinder during filling process.
Instead, reference the gauge on your fill device.
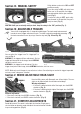
Charging the Rifle:
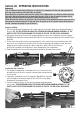
1. Pull the cocking handle backwards until it stops and locks at the back. Keep the cocking handle open at
the rear. (Fig.7A) THIS OPERATION COCKS THE TRIGGER MECHANISM/HAMMER ASSEMBLY. IF THE
SAFETY IS SET TO OFF POSITION AND THE TRIGGER IS PULLED, THE RIFLE WILL DISCHARGE.
2. Fit the filler nozzle to the air-line of the charging equipment, which must incorporate a pressure gauge.
(Fig.7B) Ensure both filler nozzle and rifle filler hole are clear from dirt and gently push the nozzle into the
filler hole.
3. Fill the rifle to the cylinder pressure quoted previously in this manual. Do not exceed the maximum fill
pressure as this will reduce the velocity of the rifle and may damage rifle components and may cause
danger to you and others around you. When using diver’s bottle, refill the rifle slowly to
prevent heat created by the filling process from damaging the rifles components.
4. Undo the bleeder valve on the hose before disconnecting the fill nozzle from the rifle.
Fig. 7A Fig. 7B
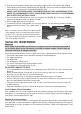
Fig. 8
Fig. 9 Fig. 10
Loading the rifle & shooting
1. The magazine incorporates a raised boss on its rear face and can only
be fitted one way to the rifle. It rotates clockwise when viewed from the
rear of the rifle.
2. Load pellets through the rear of the magazine. (Fig. 8). Push the pellet
noses through the retaining O-ring until their skirts lie flush or below
the bottom of the magazine face.
3. To fit the magazine into the air rifle; pull the cocking handle backwards
until it stops. THIS OPERATION COCKS THE TRIGGER MECHANISM/HAMMER ASSEMBLY. IF THE
SAFETY IS SET TO OFF POSITION AND THE TRIGGER IS PULLED, THE RIFLE WILL DISCHARGE.