
Instruction Manual

4
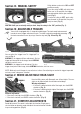
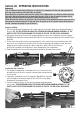
Safety button can be set to ‘ON’ and ‘OFF’
position manually.
To set the safety to ‘ON’, pull safety lever
to the rear. In this position, the trigger
cannot be pulled and the gun cannot be
fired. (Fig.1)
To move the safety to ‘OFF’, push safety
lever forward. In this position, the gun is
ready to shoot. (Fig. 2)
Section III. MANUAL SAFETY
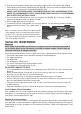
You can adjust the “trigger travel” & “trigger pull” as
seen on Fig. 4
SCREW#1 is for trigger pull force adjustment. For less
trigger pull force prior to discharge, rotate SCREW#1
clockwise; and vice versa.
SCREW#2 is for trigger travel adjustment. For less
trigger travel prior to discharge, rotate SCREW#2 clockwise; and vice versa.
NOTE: Make only small changes to one adjuster at a time. Over-adjusting can render the trigger inoperable
and may create a dangerous situation!
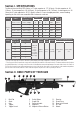
Section IV. ADJUSTABLE TRIGGER
Your air rifle is equipped with a 2-stage adjustable trigger. The stock needs to be removed
in order to access trigger adjustment screws. The stock can be disassembled by removing
the stock connection screws by using a 5mm hex key tool. (Fig. 3A and Fig. 3B)
Fig. 1 Fig. 2
Fig. 3A Fig. 3B
Fig. 4
Hercules Bully comes with fiber optic rear & front sights. The rear-
sight can be adjusted both for elevation and windage.
Windage adjustment
• If the shot is deflected to the left of the target, turn the KNOB1
clockwise. (Fig. 5)
• If the shot is deflected to the right of the target, turn the KNOB1
counter-clockwise. (Fig. 5)
Section V. MICRO ADJUSTABLE REAR-SIGHT
Safety ON Safety OFF
Fig. 5
Section VI. COMFORT ADJUSTMENTS
Comb Adjustment: The comb is adjustable for elevation. Simply press
circular button on beneath comb and adjust the comb elevation suitable
to your aiming position. (Fig. 6)
CAUTION: Until you are actually ready to shoot, keep the safety in the “ON” position (Fig. 1).
Elevation adjustment
• If the shot is too high, turn KNOB2 clockwise. (Fig. 5)
• If the shot is too low, turn KNOB2 counter-clockwise. (Fig. 5)
Fig. 6
SCREW#2
SCREW#1
KNOB#2
KNOB#1