
Instructions / Assembly


7
CAUTION
G) Then continue
connecting every
second spring.
H) Complete connecting
the remaining springs.
E) Continue using
the spring xing tool to
connect a total of four
springs to the top rail
frame by placing them
¼ circle apart from one
another.
F
F
F
F
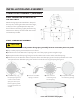
STEP 4: CONNECTION OF LEG BASES TO
TOP RAIL CIRCLE
Attach the leg supports assembled in Step 2 to
the top rails, ensuring that the screw holes align,
as shown on the right. Repeat this step until
the full frame is standing. Tightly secure the leg
extensions to the top rail frame with the screws
and washers provided.
A
A
A A
A
E
F
F
F
F
E
A
A
E
H
G
I
D
C
A
Frame with Assembled Jumping Mat
F) Connect all middle
springs, as shown
.
INSTALLATION AND ASSEMBLY
TRAMPOLINE
ASSEMBLY (continued)
Pay careful attention to hand position during spring assembly because connection points can pinch!
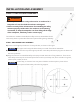
STEP 5: JUMPING MAT ASSEMBLY
A) Lay out the jumping mat inside the circular frame.
B) Hook the more rounded end of a spring onto one of the jumping mat’s triangular rings.
C) Grasp the handle of the spring xing tool and hook the tool into the other end of the spring.
D) Pull the tool in the direction of the trampoline frame until the spring end is lined up with the hole in the
trampoline frame. Slide the spring end into the hole while removing the spring xing tool.