
- HASSELBLAD User's Manual CF22 CF39
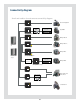


60
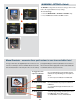
Cleaning the CCD Infrared Filter
If you see dark or coloured spots or lines in your images, then you may need to clean the
outer surface of digital back’s infrared (IR) lter. In most cases, the careful use of com-
pressed air will be adequate, but sometimes small particles will get stuck to the surface
of the IR lter, requiring for a more thorough cleaning, involving either uid or wipes.
For a good safe cleaning, follow descriptions below.
WARNING: never attempt to remove the glass lter from the front of the CCD—you
will probably ruin the CCD if you do so. If dust manages to get between the IR lter
and CCD, please contact your Hasselblad dealer for assistance.
Basic cleaning procedure
1. Discharge any static electricity that may have built up on your body by touching the
digital back housing.
2. Unlock the digital back from the camera (according to camera model).
3. The top of the digital back will be released (while it rests on the magazine retaining
hooks) and it can be swung away from the camera body.
4. Clean the outside surface of IR Filter by spraying it with clean compressed air. If this
is not enough, then use one of the procedures outlined below.
5. If you still see spots on your shot after you have cleaned the outside of the infrared
lter, then you may have dust on either on the back side of the IR lter or on the CCD
itself. This can only be removed at the Hasselblad factory. Contact your Hasselblad
dealer for assistance.
6. When reattaching the digital back to the camera, keep the magazine catch lock
depressed and the magazine catch to the right. Check that the back is rmly in place.
Cleaning using the HAMA Cleaning Fluid and tissues
Note! Hasselblad recommends HAMA Optic Cleaning Fluid 5902.
1. Carefully spray the uid onto the IR lter at a distance of 10-15 cm (4-5 inches), so
that the uid is applied onto the lter as a thin, even haze. 1-2 sprays are enough. If
you apply too little, the uid will start to dry up before you start wiping the lter. As
an alternative you can spray the uid onto the tissue rst, and then apply it to the
lter as you wipe it.
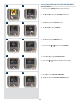
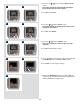
Cleaning
Regularly check the surface of the sensor
lter for dust specks that might cause time-
consuming retouching afterwards.
10