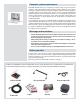
Francis Hills copyright Francis Hills User Manual Language version: English Manual version: 1 Fashion created using liveBooks, www.live-books.
C O N T E N T S I nt roduct ion 3 1 General over view Par ts, components and control panel Initial setup Shooting and storage modes 2 Init ial General Set t ings Over view of menu struc ture Set ting the menu language 14 15 17 3 Storage over view – working with media and batches Batches Navigating media and batches Creating new batches Using Instant Approval Architec ture Reading and changing approval status Browsing by approval status Deleting by approval status 18 18 18 20 21 22 22 23 4 5 ME
Welcome to Hasselblad! The Hasselblad CF line of digital backs offers 22 and 39 Mpix digital capture at a professional level for unbeatable results. Together with the option of an i-Adapter, Hasselblad’s interchangeable camera interface, this capability extends beyond medium format into the world of large format too. In addition, the option of true color multi-shot capture provides the possibility of moiré free captures in world class exhibiting stunning quality.
We have developed a new Hasselblad raw file format called 3F RAW (3FR) to help implement our new unique color system. The new 3FR file format is designed to ensure that images captured on Hasselblad digital products are quickly, effectively and safely stored on the available media (CF card, Imagebank, etc). The file format includes lossless image compression, which reduces the required storage space by 33%.
Computer system requirements Digital files naturally end up on a computer for processing. Image-storage and correction requires a certain minimum standard regarding computer capabilities. Large images will require a high-performance computer with plenty of memory, advanced graphics capabilities and a recent operating system. In most cases, the computer should include a FireWire 800/400 connector, which will enable you to load images directly from the camera or Imagebank.
1 General overview In very simple terms, a CF digital back holds a light sensitive sensor in place at the film plane. The electronic signals from the sensor are then processed and stored as a digital file. As an electronic colour image is made up of three components − red, green and blue which combine to form a so-called RGB image − the sensor’s task is to convert a multi spectrum light image into three digital files (red, green and blue) for combination later on.
A CF digital back is an electronic device and consequently attention to power access is vital. When working untethered it is therefore important to plan either battery loading or battery replacement to ensure continued workflow. Likewise, image storage is limited, particularly when using flash cards and appropriate steps should also be taken when planning a shoot. External storage is accomplished by FireWire connection to a separate hard disk or a computer.
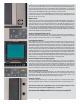
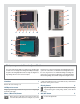
1 11 2 12 3 13 14 4 5 6 7 8 9 10 15 19 16 17 18 Parts, components & control panel buttons The buttons are used for browsing images and navigating the menu system. Two of the buttons, located at the bottom-right and -left of the screen, are given an on-screen label that changes according to the current context (e.g., the bottom-right button sets the approval rating when browsing images, but confirms settings when using the menus).
Ready light indicator Camera communication port 6 Used with certain camera models only. See adapter user manual for details. Flashes green to indicate that the digital back is performing an operation (such as saving a new capture) and is not available for new commands. Flashes green when the back is ready.
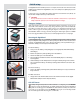
Initial setup A A CF digital back is delivered with a protective cover in place. This must be removed in order to fit the i-Adapter and re-attached if the digitalback is to be stored or transported separately as protection for the CCD/filter. To remove the cover, use the TORX T10 screwdriver supplied to unscrew all four screws (illus A). You can then fit the i-Adapter that suits your camera model.
Shooting/image storage modes A CF digital back can store captured images in three ways: 1. Untethered / Compact flash card mode In this mode a CF digital back acts independently of other connections. Images are stored on the internal, removable compact-flash card. • The main advantage with this mode is the freedom of cables and extra equipment. • The main disadvantages with this mode in the field are the battery power capacity and the size of the card’s holding capacity.
Using compact flash memory cards When shooting to a compact-flash card, a CF digital back is completely self-contained. No additional wires or connectors need to be attached. A CF digital back is shipped with a 1GB compact-flash card, which is able to hold over 45 shots. Lossless compression is applied to the images, so the actual size of each capture can vary, thereby affecting the total number of shots you can fit on the card.
To use an Imagebank with a CF digital back, simply assemble it as described in its manual and connect the two with a standard FireWire 800 (IEEE 1394b) cable. See the Imagebank manual for complete details. To remove the Imagebank, simply disconnect the FireWire cable. The back will then revert to saving and browsing images on the internal flash card (if available).
2 Initial general settings General Using the menu on a CF digital back is very similar to using a menu on a cell phone or similar. When you enter the menu (by pressing the MENU / button) you will be see an initial list: ISO White Bal. Media Browse Storage Settings The first four items are immediately accessible for changes, indicated by the appearance of a plus and minus sign in the highlight frame meaning the settings can be altered by the Zoom in / Zoom out buttons.
By using the buttons on the control panel you can navigate down through the various levels in the menu. It provides the source of information about image files and also provides a way of making custom settings so the digital back suits your way of working. Below is a simple overview of what is available and where it is situated on the menu. MENU STORAGE ISO Sets the light sensitivity of the sensor. Equivalent to ‘film speed’. WHITE BALANCE Set to match the colour temperature of light used.
Simple introductory overview of menu access, navigation and settings choice. The menu is structured in a manner similar to cell phones and similar electronic devices. Various branches within the tree system are accessed by pressing the navigation button until you reach the point where a choice has to be made. The OK (Approve) button or SELECTION (Zoom-in/Zoomout) buttons are then used to confirm choice. After pressing the MENU button, the main menu list appears.
1 In this manual you will see the following kind of description regarding settings changes (as opposed to general viewing and browsing etc). The method is the same for all changes, some stages taking a little longer than others and being a little more involved. The following is an example of a setting change : 2 Setting the menu language 3 The menu is available in English, French, German, Italian, Spanish, Japanese and Chinese. To choose any of the above languages, proceed as follows: 4 1.
3 Storage overview – Working with media and batches General With a new CF card (or a newly formatted CF card) inserted or with an Imagebank, a new folder (called a batch) is created automatically after the first image has been captured. More batches can be created whenever you choose and named for easier sorting. You should name them straight away though as they can only be changed later on (if required) when they have been transfered.
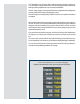
Medium-type icon (Compact Flash) Medium name The MEDIA list. In this example a CF card and a FireWire disk are illustrated and therefore connected. The blue frame around the CF card symbol tells you that captured images will be saved to the CF card and not the FireWire disk.
1 To select the current medium and view batches using the browse controls: 1. Press the zoom-out ( ) button repeatedly until you are all the way at the top zoom level. If you start with the singleimage preview view, then you pass through the following views to get there: • Single-image preview (as in fig 1) • Four-thumbnail view • Nine-thumbnail view (as in fig 2) • Batch list (as in fig 3) • Media list (as in fig 4) 3.
Using Instant Approval Architecture The Instant Approval Architecture system helps you to classify your images as quickly as you take them. It works by supplying immediate audio feedback, which tells you instantly whether each new picture is exposed correctly or likely to be over- or underexposed. Thereafter, the system enables you to assign each image one of three status levels.
conversely a rapid string of notes going down the musical scale if the image is judged as underexposed • Downgrades the approval status to yellow (if Approval is set to ‘Auto’). Note that some shots may trigger the warning even though they are exposed according to your intentions. You should consider these warnings only as a guideline. 3. If no problem is detected, then the image is saved with green status.
images are still there, but they will not be shown until you change the filter setting. Also, if you change the status of an image, the image may ‘disappear’ if it no longer passes the filter. For example, if you have set the camera to browse only green-status images and then change an image to yellow status, that image will not be shown again until you change the browse filter. There are many ways to make use of this feature. For example: • Set the filter to show only yellow images.
4 Overview of viewing, deleting and copying images Basic image browsing The large, full-colour OLED display enables you to inspect your shots while you are still on-location. The display offers full-screen previews, high-magnification zoom, two levels of thumbnails and analysis tools including a full histogram and camera settings. When you first turn on the camera, the display opens in standard browse mode, showing the last image taken (if any) for the current medium and batch.
Zooming in for more detail 1 The preview display has a much lower resolution than your images. You can therefore zoom very far into the images to inspect small details. To do this: 1. Browse to the image you wish to zoom into with the navigation button. 2. Press the zoom-in ( ) button to zoom in one step. The screen updates to show both a zoomed image and a thumbnail image that includes a red box outlining the portion of the images currently shown. 3.
You can cycle through all the available preview modes by pressing the View-Mode button. Preview Modes Choosing the Preview mode You can use the view-mode button to cycle through the available preview modes. The preview screen works in several different modes: • Standard preview: shows a preview image surrounded by a display of few important settings. • Histogram: shows a preview image overlaid with a histogram.
The standard preview display The standard preview display is the one shown when you first turn on the camera. It features a preview of your most recent shot and basic information about the digital back settings and the image itself.
Battery-saver mode 1 In this mode, the digital back is fully responsive, so you can take pictures but the screen is not lit up, thereby saving battery power. You can enter the menu system while shooting in this mode (which activates the screen until you exit the menu system again) but the approval, zoom and navigator buttons have no effect.
Deleting images − general Delete shortcut ! There is also a one-button shortcut for deleting single images. To use it, select a target image and then press and hold the until the confirm-delete dialog opens. A CF digital back enables you to delete images using any of the following techniques: • Delete the currently selected image only.
5 MENU – • • • • ISO White balance Media Browse Menu system overview The main menu contains those settings that you will need to access most often as you work on an assignment. It also provides sub-menus that give you access to all other settings, most of which you will need less often. Entry name (in white) and current setting in yellow Selected entry (indicated by blue frame).
Menu structure Entries of the main menu 31
1 Language 2 1. Press the MENU button to open the menu. 2. Use and to select the SETTINGS sub-menu. 3. Press to open the SETTINGS menu. 4. Press to select the USER INTERFACE sub-menu. 3 4 5. Press either the or this case Spanish). button to choose a new language (in 6. Press the MENU/EXIT button again to close the menu. ISO 5 6 1 2 You are able to set the light sensitivity of the digital back to match an equivalent ISO rating for standard film.
White balance There are six ‘White Balance’ settings to choose from. White Bal. Setting Setting description Daylight For general outdoor use in direct sunlight. Cloudy For general outdoor use in cloudy weather. Shade For general outdoor use in shady locations out of direct sunlight. Flash For general indoor use when using a normal flash system. Fluorescent For use when using fluorescent lighting. Tungsten For use when shooting indoors under standard tungsten lamps.
Note that you can also select media using just the (+) and (-) buttons while browsing images. This method also enables you to select a batch as you zoom in from media to batch to thumbnails to preview. See Navigating Media and Batches for complete details about this method. 1 2 Browse The browse filter complements the instant-approval system by enabling you to browse through images according to their approval status.
6 MENU – • Storage This section describes file storage, file transference, storage organization, file classification and related subjects.
1 MAIN MENU > STORAGE 2 The Storage menu provides entries for working with storage media. Here, you can format media, copy images from the camera to a hard disk or computer and create new batches on available media. You can also set the initial approval status (green or yellow) assigned to new pictures. The first item on the storage list is file deletion.
Menus for deleting several images from a batch. 1 Deleting several images from a batch 2 To delete several images from a selected batch: 1. Starting at the single-image preview display, Select MAIN MENU > STORAGE > Delete. (See also Navigating the Menu System for details about how to find this setting.) 2. Use to enter the Delete submenu. 3.
5. You now return to the main menu. Either move on to another setting by using the navigator button or 6 5 6. Press the menu (EXIT) button to exit the menu system. Deleting several images from a selected medium 1 To delete several images at once: 1. Starting at the single-image preview display, press the button until you reach the media list. 2. Use and to select the medium from which you wish to delete. You will be deleting from all batches stored on that item.
Menus for deleting several images from all batches from a selected storage medium. 5. You must now select the approval status that you wish to delete. All images from the selected medium that are also of the status that you select here will be deleted by the operation. Use and to select All Red, All Red & Yellow or All. 5 6. Then press to open the delete dialog for your selected status. You are now asked to confirm the delete. 6 7 7.
FORMAT The digital back is only able to read and write to media that have been formatted. However, new cards or disks sometimes arrive without any formatting, or you might want to convert media that are currently using a format that the camera cannot read. 1 Each time you get a new compact-flash card, we recommend 2 3 To format media: 1. If you have more than one type of medium connected (e.g.
COPY 1 Usually, you will copy images from a card by connecting the camera to a computer and using FlexColor. However, you might also want to load images from a card to a portable FireWire hard disk or Imagebank, allowing you to erase the card and keep shooting even when you do not have a computer with you. After the copy, the destination disk will have a folder named CARDXXX, where XXX is a number that increments with each new copy operation (e.g., CARD001 for the first copy, CARD002 for the next, etc.).
BATCH Batches help you to organize your work. They are very similar to folders on a computer hard disk. Use the Batch command of the STORAGE menu each time you want to create a new batch. For more information about batches, please see Working with Media and Batches. To create a new batch: 1. Press the MENU button. 2. Press to navigate down and select the Storage dialog. Press and then to navigate down and select Batch. 3 Press to open the Batch dialog.
DEFAULT APPR. LEVEL The Instant Approval Architecture system helps you to evaluate and mark each image based on how well it has come out. By default, the system assigns an initial approval status for each new shot based on an analysis of the distribution of exposure levels. In the factory configuration, the status of each new shot is assigned as follows: 1 • • 2 Green (approved): The new shot seems to have been exposed correctly.
7 Menu: Settings There are a number of settings grouped under the general ‘Settings’ heading which are: • User Interface • Camera • Miscellaneous • Default Navigating the USER INTERFACE settings 44
MAIN MENU > SETTINGS > User Interface By altering the User Interface settings, you can control the way the digital back interacts to suit you and your preferred way of working. It also includes date and time settings. Entries of the USER INTERFACE Menu The user interface menu includes both entries and sub-menus. The following entries are available here: • Language: The menu system can be displayed in any of seven languages. This menu entry enables you to select your preferred language for the menus.
Setting the options under the User Interface menu 1 2 Each of the above entries can be set by similar menu navigation. Language, Power Down and Mark Overex can be set immediately by the or buttons while Sound, Date & Time and Display require another move to sub menu for final choice. Proceed as follows: 1. Press the menu (MENU) button to open the menu. 2. Use and to select the SETTINGS sub-menu. 3 4 3. Press to open the SETTINGS menu. 4. Press to open the USER INTERFACE sub-menu. 5 6 5.
Navigating the CAMERA settings Please note that this particular list is only an illustration. Camera choice displayed will vary according to adapter fitted. MAIN MENU > SETTINGS > Camera The camera choices that appear on the menu are automatically restricted to the adapter you have fitted. So, if you have have fitted an adapter specifically intended for Hasselblad models, then only Hasselblad models will appear.
Exposure Cable EL All Hasselblad EL models except the ELD require an Exposure Cable EL. Illustrated here also is use of the Adapter EL to hold the battery. • Only the single shot function (A or AS mode camera settings) should be set on the camera. Rapid sequence shots are not possible. • Use the Adapter EL (supplied) to provide the necesssary extension beyond the motor housing of the EL models for battery attachment.
1 2 3 4 Capture sequence This feature functions in the same manner as an interval timer and only works in conjunction with a motor or winder driven camera model except in the case of the Pinhole setting where it is the only way of controlling such exposures (see later section for full details). Initial delay: Controls the amount of time required to elapse before the first exposure. Delay: Controls the amount of time required between each exposure. Count: Controls the total number of exposures required.
Connectivity diagram Hasselblad camera connectivity diagram H1, H2 Hasselblad H adapter 555 ELD Hasselblad ELD Exposure cable ELX 500 EL/ELM 500/553 ELX Hasselblad EL, ELM, ELX adapter Hasselblad CF CF-39 Exposure cable 503 CW 503 CW + Winder CW Hasselblad 503 CW adapter 500 C/CM Hasselblad CF-39MS CF/MS Flash sync input cable Single shot mode only 501 C/CM 503 CX/CXi/CW SWC / SWC/M Hasselblad ELD adapter 903 SWC 905 SWC 2000 FC / FCM 2003 FCW 201 F / 203 FE 205 TCC / FCC With C-type lens FlexB
Connectivity diagram 4NBMM BOE NFEJVN GPSNBU DBNFSB DPOOFDUJWJUZ EJBHSBN )PSTFNBO %JHJ'MFY ** )BTTFMCMBE &-% 'MBTI TZOD JOQVU DBCMF 3PMMFJ FYQPTVSF DBCMF 'VKJ (9 'VKJ (9 BEBQUFS .BNJZB "' .BNJZB "'% .BNJZB 1SP )BTTFMCMBE CF $' .BNJZB 1SP .BNJZB 3; )BTTFMCMBE $' .4 CF/39 .BNJZB 3; BEBQUFS 'MBTI TZOD JOQVU DBCMF 4JOHMF TIPU NPEF POMZ .BNJZB 3# .
Connectivity diagram 7JFX DBNFSB DPOOFDUJWJUZ EJBHSBN 'MBTI TZOD JOQVU DBCMF 4JOHMF TIPU NPEF POMZ )BTTFMCMBE CF $' "OZ TIVUUFS )BTTFMCMBE &-% "OZ WJFX DBNFSB BDDFQUJOH )BTTFMCMBE NPVOU )BTTFMCMBE CF / MS $' .4 4JOHMF TIPU NPEF 3PMMFJ FYQPTVSF DBCMF )BTTFMCMBE &-% "OZ WJFX DBNFSB BDDFQUJOH )BTTFMCMBE NPVOU )BTTFMCMBE CF / MS $' .4 4JOHMF BOE NVMUJ TIPU NPEF 3PMMFJ FMFD &YQPTVSF DBCMF &-9 USPOJD TIVUUFS XJUI MFOT )BTTFMCMBE &- &-.
1 Setting EXPOSURE TIME and CAPTURE SEQUENCE 2 Proceed as follows: 1. Press the menu (MENU) button to open the menu. 2. Use and to select the SETTINGS sub-menu. 3 3. Press to open the SETTINGS menu. 4 4. Use and to select CAMERA. 5 6 5. Press to open the CAMERA menu. 6. Press either the 7 8 button to select PINHOLE. 7. Press or to select EXPOSURE TIME. 8. Press either 9 or 10 or to make an exposure time setting. 9. Press to select CAPTURE SEQUENCE. 10.
11 11. Press either the or button to make an INITIAL DELAY setting. This setting controls the amount of time that elapses before the first exposure in the sequence. 12 12. Press to select DELAY. 13 14 13. Press either or to make a DELAY setting. This setting controls the amount of time between each exposure in the sequence. 14. Press to select COUNT. 15 16 15. Press either or to make a COUNT setting. This setting controls the number of exposures in the sequence. 16.
Navigating the MISCELLANEOUS settings MAIN MENU > SETTINGS > Miscellaneous 1 The MISCELLANEOUS menu contains two settings: Selecting an interface The interface setting controls the way the camera will appear to your computer when you connect it. You have the following choices: • Camera: The camera will present itself to your computer as a camera.
The About box 1 Occasionally, Hasselblad releases updates to the internal software of the digital back (this is called “firmware”). These updates may fix small errors and/or add new features. You will probably receive additional assistance from Hasselblad technical support if and when a new update is available. In this case, it may be important to know the serial number and current firmware version of your digital back. To find this out: 1. Select MAIN MENU > SETTINGS > MISCELLANEOUS > About.
MAIN MENU > SETTINGS > Default The DEFAULT setting will reset all custom settings you have made back to the original default / factory settings. To reset all settings: 1. Select the MAIN MENU > SETTINGS > DEFAULT entry. 2. Press the OK button and then the EXIT to return.
8 Multishot The Multishot facility is only available with Multishot units. Witha Multishot back, there are two extra modes available other than single shot; namely Multi-shot and Micro-step. These virtually eliminate unwanted moire and artefacts in studio type sets ups. Multi-shot The technology behind this mode is high precision piezo controlled movements of the sensor in pixel sized increments.
9 Flash / Strobe A CF digital back can be used together with most studio or portable units. When attached to a 503CW (or 503CWD), the TTL function is also available. Most flash units are suitable for use with a CF digital back. However, for safety reasons, care should be taken when using studio flash units (strobe) and tethered to a stationary computer.
10 Cleaning Regularly check the surface of the sensor filter for dust specks that might cause timeconsuming retouching afterwards. Cleaning the CCD Infrared Filter If you see dark or coloured spots or lines in your images, then you may need to clean the outer surface of digital back’s infrared (IR) filter.
2. Fold the tissue several times to match the width of the IR filter—you might use two or three tissues at a time if necessary (to give you a better grip). Be sure to fold the paper so that the coated glossy side faces outwards—do not use the other side, as it can do more harm than good! 3. Gently place the folded tissue onto the edge of the filter using two or three fingers. Be sure to wipe the entire surface evenly. Sweep the filter only once.
11 Equipment care, Service and Guarantee EQUIPMENT CARE in humid environments. Allow the equipment to acclimatize whenever possible before use. Try to ensure the storage conditions in such environments are as dry as possible. • Keep all equipment and accessories out of the reach of small children. • Do not place heavy objects on the equipment. • Prevent dust and grit from getting into your equipment. In coastal areas take measures to protect your equipment from sand and salt water spray.
Technical specifications — CF 22 Mpixels 39 Mpixels Sensor size 22 Mpixels: (4080 x 5440 pixels) 39 Mpixels: (5412 x 7212 pixels) Sensor dimensions 36.7 x 49.
The information in this manual is furnished for informational use only, is subject to change without notice, and should not be construed as a commitment by Victor Hasselblad AB & Hasselblad A/S. Not all the images in this manual were taken with a Hasselblad H3D. They are used for illustrative purposes only and are not intended to represent the image quality produced by a Hasselblad H3D.
Victor Hasselblad AB Hasselblad A/S Box 220, Hejrevej 30, SE - 401 23 Göteborg, DK - 2400 Copenhagen, Sweden Denmark 65