MIXBUS V2.0.
Table of Contents Section ---1.0 2.0 3.0 4.0 5.0 6.0 7.0 8.0 9.0 10.0 11.0 12.0 13.0 14.0 15.0 16.0 17.0 18.0 19.0 20.0 21.0 22.0 23.0 24.0 25.0 26.0 27.0 28.0 29.0 30.0 31.0 32.0 33.
1.0 Introduction Mixbus - Bringing real console mixing to the DAW Welcome to Mixbus! Mixbus is an “analog console” that has been incorporated into a Digital Audio Workstation. The Mixbus engine was developed in-house at Harrison Consoles, where we have been designing high-end digital and analog consoles for over 30 years. Many influential works such as Michael Jackson's Thriller (the best-selling album of all time) were recorded and/or mixed on Harrison consoles.
2.0 Features & Specifications Mixer Features: • Precision DSP algorithms developed by Harrison and used on their world-renowned large format digital mixing consoles. Mixbus also incorporates elements from the rich history of Harrison analog designs. Mixbus has been optimized to provide a classic Harrison “analog” sound. • Straightforward “what you see is what you get” mixer layout based on Harrison's renowned 32-series and MRseries music consoles.
3.0 Installation Installation - OSX Because Mixbus is a professional product which is intended to be interconnected with other professional products, it requires attention to your system setup before it is ready for use. Installing JACK: Before running Mixbus, you must install the Jack package. Jack is a system service that allows for the interconnection of audio between applications.
3.0 Installation Installation - Linux A note about Linux distributions: While an expert system administrator can adapt nearly any distribution for use with Mixbus, it is easier for most users to start with a distro that is designed for use in high-performance audio. Some distributions that are designed for audio include AVLinux, UbuntuStudio, and 64Studio. Mixbus has been tested on these distributions as well as vanilla Ubuntu and Fedora. A further list of distributions is at: http://www.linuxsound.
3.0 Installation Installation – All Platforms Download and Install the License file: Once purchased through the store, you should receive an email with a download link for your license key. Please download the file and save it to your Desktop (the Home folder and Downloads folder will work, too). When launched, Mixbus will find the license file and convert it to a hidden file in your home folder. The license file is used to display your name in the New Session dialog when Mixbus launches.
4.0 Getting Started Getting Started When Mixbus is first started, you will be presented with the “Audio Setup” dialog. On future launches, you will be presented with 3 tabs in the New Session Dialog: In the “New” tab, you can type the name of a new session, choose a folder location, and optionally select a template as a starting point. Any session may be saved as a “session template” which will then be available as an option in the template selector.
4.0 Getting Started you have created some track templates, the templates will appear as additional choices in the “Channel Configuration” menu. Mixbus also allows the creation of busses which may be used to combine tracks together into groups for further processing or utilitarian tasks such as headphone cue feeds. Busses do not have the processing or delay compensation features of the Harrison Mix Bus Channels. In general, the built-in Mixbus summing engine is sufficient for most bussing needs.
5.0 JACK I/O About JACK Mixbus uses an internal audio routing system called "JACK" to make audio connections between Mixbus, your sound I/O, other programs, and even between parts of Mixbus. In many cases, you can use Mixbus without ever being aware of JACK connections. By default, Mixbus makes these routes: • The master bus is connected to the first two physical output ports. • Track/Bus inputs are assigned sequentially from the physical inputs whenever a new track/bus is created.
5.0 JACK I/O I/O ("system") and any Jack-aware applications that are currently running, including Mixbus ("ardour"). Under each tab is a list of Jack ports. Click on any port name to connect it to the currently selected input. • Rescan: If any new Jack applications were launched since the dialog was created, click Rescan to show the new state of the software.
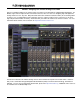
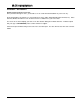
6.0 Overview Mixbus - Editor and Mixer Windows This document will reference the Editor Window, the Mixer Window, and the Editor Mixer. The image below indicates the areas that are being referred to: Editor Window Mixer Window Mixer Strips Plugin Window Editor Mixer A Mixer Strip is a vertically-aligned group of controls which affect a single track or bus.
6.0 Overview Mixer Window When viewed in the Mixer Window, Mixbus resembles a traditional analog console. Input Channels are on the left, while the busses and master are located on the right side. The audio signal flow is generally left-to-right. The signal starts at the input channels (which might be live inputs or playback tracks), progresses through the mix buses, and into the master.
7.0 Signal Flow While it is possible to add additional “utility” buses using the Mixbus editor, most users will find that the built-in Mixbus signal flow is adequate for all but the most complicated projects.
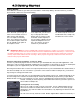
8.0 Input Channels Track Name Click to rename and other utility functions. Record Button Click to arm/disarm the track for recording. Input Selector Click to select input for the track from sound card or app. Polarity Invert Button Click to invert the polarity of the signal. Pre- and Post-fader redirects Right-click here to add or remove redirects. Redirects may be sends, insert paths, or plug-ins. Redirects positioned above the “---Fader---” are pre-fader and those positioned below are postfader.
9.0 Mix Bus Channels There are 8 “mix bus” channels. These are fed from the mix bus sends of the input channels. Polarity Invert Button Click to invert the polarity of the signal. Name button Click to rename or other utility functions. Pre- and Post-fader redirects Right-click here to add or remove redirects. Redirects may be sends, insert paths, or plug-ins. Redirects positioned above the “---Fader---” are pre-fader and those positioned below are postfader.
10.0 Master Channel Mixbus provides a single Master channel. The Master channel provides the final output signal for listening via speakers or exporting to wav files. In addition to the features listed below, the Master channel has a built-in transparent signal limiter to avoid the distortion that occurs in overly loud digital signals. Name button Click to rename or other utility functions. Note: There is no “input” button for the Master channel.
11.0 Mixer Conventions & Tips Mixbus Knobs and Faders: • When a knob is in the “default” position, the indicator is very dim. This allows you to scan the mixer for settings that are not at default. • Mixer strip knobs can be double-clicked to instantly return them to their default value. • Holding Ctrl/Cmd while turning the knob provides a fine-adjust mode, while Shift+Ctrl/Cmd allows super fine adjustments. • Mixbus knobs and sliders incorporate an “in-on-change” feature.
12.0 Redirects: Plug-ins, Sends & Inserts Redirects The black box at the top of each channel strip is the "redirect box". Mixbus uses the term "redirect" for the items that can be inserted into a channel strip: plug-ins, sends, and inserts. In the picture to the right, the track has a reverb plug-in, an insert, and a send. The reverb and the insert are pre-fader (because they are above the fader entry) while the send is post-fader.
12.0 Redirects: Plug-ins, Sends & Inserts Plug-ins Mixbus can load plug-ins in several formats. Mixbus can only use plug-ins that meet these criteria: • • • • % The The The The plug-in plug-in plug-in plug-in must must must must be a supported format on your platform (see below) be installed in the standard folder for your platform. be compiled for your platform.
12.0 Redirects: Plug-ins, Sends & Inserts Latency Compensation Some plug-ins, particularly complicated FFT-based plug-ins that use techniques such as convolution, can require significant latency (time delay) from the input to the output. This can cause problems if the delayed signal is mixed with a signal that is not delayed. A long delay can cause the tracks to sound "out of time", while a very short delay can cause comb filtering. Mixbus can automatically accommodate plug-in and insert latencies for you.
12.0 Redirects: Plug-ins, Sends & Inserts Sends When a new send is create, a window for configuring the Send will immediately appear. By default, Sends have no outputs and must be configured as needed. Click "add" to add ports, and connect them to the destination that should receive the output of the send (shown in the second picture, below) • Add/Remove: adds/removes a Jack port to the send.
12.0 Redirects: Plug-ins, Sends & Inserts Inserts An Insert incorporates a Jack "send" output and a Jack "return" input. The Insert send/return allows the audio signal to be routed out of a channel and back into it, after performing some external processing. Inserts are often used to "patch in" a piece of outboard gear that is not available as a plug-in. % Note: Inserts are created "deactivated", you must Activate the insert before it will work.
13.0 Edit Window Overview Basic Editing Concepts Users familiar with other DAW conventions will quickly adapt to the recording and editing features of Mixbus. Transport Toolbar Timeline & Markers Ruler Edit Mode & Grid Options Track Audio Region Editor Mixer Editor Sidebar % Note: Unless otherwise noted, "click" means a left-click. Right and middle-click are called out when specified.
13.0 Edit Window Overview puts from a single interface is the Track/Bus Inspector. From this window you can arbitrarily route tracks and busses between Mixbus I/O's, soundcard I/O's, and other application I/O's. The right side of the screen is a pull-out drawer which accommodates several different functions. Most panels have a right-click context menu for additional features: • Tracks/Buses – drag&drop to reorder tracks, or click to show/hide them • Regions - shows all of the recorded or imported regions.
13.0 Edit Window Overview Using Tracks To the left of the editing canvas are the track headers. You can select or deselect a track by clicking on the empty area. You may shift-click to select a range of tracks, or Ctrl/Cmd-click to select and deselect individual tracks. Right-clicking the empty track area will open the track context menu. Certain functions such as mute, solo, and record-arm can be applied to ALL tracks simultaneously by Ctrl-Alt-Shift-clicking (Cmd-OptShift-click).
13.0 Edit Window Overview Navigating in the Editor window: Zooming and Panning The area of the editor where the regions is shown is called the "canvas". There are several ways to navigate (pan and zoom) the editor canvas. In the bottom left corner there is a menu to select the zoom focus. There are also 2 buttons, one to increase and one to decrease the zoom level. The "zoom focus" affects the operation of the zoom buttons and the zoom key commands by changing the focal point for the zoom.
14.0 Mixbus Automation Region Gain and Automation Mixbus has 2 separate types of automation: Region Gain and Automation. Region Gain envelopes are often used for repair work, such as reducing unwanted breaths, accentuating syllables, or reducing noise. Automation is often used for creative changes such as fading elements in and out during a song. Region Gain only adjusts the volume (level) of the region across time.
14.0 Mixbus Automation Automation Thinning: When automation is recorded in realtime, the automation is "thinned" so that only enough control-points are created to adequately capture the moves. The points will appear very sparse if the control is unmoving or slow, and will get created very close together during fast moves. The aggressiveness of thinning can be adjusted via a configuration file if necessary. Tip: "Write" automation is a quick way to copy settings from one place to another.
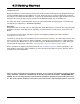
15.0 Editing Tools & Modes Edit Modes There are 4 different editing modes when moving regions: Slide, Splice, Lock and Ripple. The edit mode selector is to the far left, directly underneath the transport controls. Slide allows arbitrary movement. Splice allows regions to be swapped with each other, retaining the original starting points. Lock allows trimming, fades and track shuffling, but does not allow the region to be moved in time.
15.0 Editing Tools & Modes Gain Tool The Gain tool allows the user to edit the gain curve associated with audio regions. • • • • Click Drag Click Drag on on on on a region to edit the region's gain line. For more details, see "Region Gain and Automation". a region to select a range of the region's gain line.
15.0 Editing Tools & Modes Join Playhead Mode Join Playhead is the horizontal button under the "play range' and "play" buttons. Join-Playhead automatically moves the playhead to allow quick auditioning of selected ranges and/or the most recently-edited Region. Behaviors with Join Playhead on: • Starting playback (with the spacebar or any other means) will play the Range selection, if there is one. • A single click in Range (or Smart-Range) mode will locate the playhead to that location.
15.0 Editing Tools & Modes The Edit Point Functions on regions such as splitting, trimming, and pasting will happen at the currently defined edit point. The edit point can be the mouse cursor, the playhead, or a selected marker. Mixbus allows you to choose between all 3 modes on the fly using the edit point button (in the picture below, Playhead is selected as the edit point). % Note: To edit with regions, it is important to understand the concept of the Edit Point.
16.0 Object Region Editing Object (Region) Editing The basic element of audio editing in Mixbus is the Region. Another common name for a Region is a "clip". A region represents an audio file (or a portion of an audio file) on disk. Regions can be moved, stacked, trimmed, copied, deleted, and otherwise edited. The maximum length of a region is the length of the file that it uses as a source, but it can be much shorter.
16.0 Object Region Editing Region Layers Regions may be stacked on the same location in the timeline. This is called "layering". Normally only the top region is heard; it covers the audio regions below it. However there are cases where the region below can be heard. One example is the top region's fade-in or fade-out. Region fades operate as crossfades.
16.0 Object Region Editing Region level Every region in Mixbus has a level control (called Region Gain in some menus) that applies to the whole region.
17.0 Importing Files Importing Files to Mixbus Files may be imported to Mixbus by dragging and dropping them from a file browser into the editor window. Using the Import window (File->Import) is a much more flexible and powerful way to import files to Mixbus. The Import dialog has 2 tabs at the top: "Browse Files" and "Search Tags". Files may have "tags" attached that allow them to be searched quickly. • The Path Bar: Shows your current path and allows you to navigate back "up" the directory tree.
17.0 Importing Files Insert: • Use File Timestamp: After importing the file will be located at the file's time stamp (if it is a bwav file). • At Edit Point: After importing the file will be located at the edit point (usually the active Marker). • At Playhead: After importing the file will be located at the playhead location. • At Session Start: After importing the file will be located at the session's start marker. Mapping: • One Track Per File: Each file will be appear on one track.
18.0 Exporting Files Audio Consolidation and Export Mixbus has multiple ways of “rendering” audio into contiguous audio files. Tracks may be consolidated so that all regions (including crossfades, fade in/out, and region gain) are rendered into a single region. Right-click on any track and select Consolidate for this function. Or select multiple tracks and choose the Consolidate function from the Track menu. Consolidated tracks use the session start and end time as the length to consolidate.
18.0 Exporting Files When the export is initiated you choose the format of the output. Export to File: Enter the path and file name that you wish to create. This defaults to the sessions "export" folder. Click "Browse" to see a file browser and navigate to a different folder. Format: • Channels: Stereo or mono. • File Type: Format of the resulting files (the list depends on the system's available options). For CDquality, choose WAV • Sample Format: The “32-bit” setting means 32-bit integer format.
19.0 Clocks & Synchronization Clocks Mixbus provides two clocks which display the current position of the playhead. Having 2 clocks is a convenience: you can leave one clock showing "musical" time (such as bars/beats) while the other clock shows time in hours:minutes:seconds. Right-click on a clock to change the mode of the clock. A menu appears with the available options % Note: There are several other clocks in Mixbus, such as the Nudge clock and the SMPTE offset clock.
20.0 Tempo, Click, & Grid Defining a Song's Tempo and Meter Mixbus allows simple creation and editing of a musical time/tempo map for each session. The meter and tempo map is controlled with the Meter and Tempo rulers. To show these rulers, right-click in the ruler area underneath the transport buttons and check the boxes for the Meter and Tempo rulers. Alternatively, you can use the View menu to hide/show the rulers. There are 2 reasons that you might want to set the Meter/Tempo for your song: 1.
20.0 Tempo, Click, & Grid The settings for the Grid menu are: • No Grid: No grid is applied. • Grid: the grid is applied; any mouse move in the editing canvas will "jump" between grid locations. Operations at the Edit Point will be snapped to the nearest grid point. • Magnetic: When the Edit point is very near a grid location, it will snap to the location. But in-between the locations it will remain manual (no grid).
21.0 Monitoring Monitoring "Monitoring" is the process of hearing the prerecorded tracks (and/or yourself) while the transport is playing. There are several options that control how Mixbus should monitor the inputs of each track. Audio Hardware Does Monitoring This option is best used with audio interfaces that have the ability to monitor the inputs to the interface.
21.
22.0 Locations Window The Locations window provides another view of the Location Markers, Loop Range, Punch Range, Ranges, and CD Ranges that appear on the "rulers" of the Editor window. This window allows you to see all of the existing markers in one window with all of the parameters displayed. • • • • Go: Moves the Playhead to the associated Marker or the start/end of the associated Range. Use PH: Assign the current playhead location to the marker or the start/end of the associated Range.
23.0 Rhythm Ferret Window The Rhythm Ferret dialog provides a method to quickly "split" an audio region (or selection of regions) based on events. This can be useful when separating a recorded performance into its component strikes or notes for further editing. • Mode: Determines whether the Ferret will trigger on percussive onsets for unpitched percussion instruments), or note onsets (for pitched instruments).
24.0 Keybindings The keybindings window allows you to assign shortcut keys to all of the functions available in Mixbus. There are many more operations than keys available, so you will see some commands that do not have keys assigned. Because Mixbus operations are not shown in the same order that they appear in the Mixbus main menu, finding the correct operation can sometimes be a challenge.
25.0 Preferences On OSX, you will find the Preferences window under the menu item Mixbus->Preferences. On Linux & Windows, you will find it at Windows->Preferences The preferences window has 6 tabs. Each is described below: Sync • SMPTE Offset: If you set a time in this clock, Mixbus will apply this offset to SMPTE time (via MTC) that is sent and received. "SMPTE offset is negative" indicates that the time should be subtracted to the timeline, rather than added.
25.0 Preferences in the exported audio, unless you re-route it into a track/bus manually. % Note: If no soundfile(s) are defined, Mixbus will use an internally-generated click sound. Audition This is where you define the outputs of audio that is "auditioned". There are several ways to "audition" audio through Mixbus. You might audition a region in the region list that is not yet assigned to a track, or you might audition a soundfile that you are considering for import.
25.0 Preferences • Trace Input, Trace Output: When checked for a port, the sent (Output) or received (Input) MIDI data will be displayed on the console. This is a troubleshooting tool if you aren't sure that you are sending or receiving MIDI messages. • MTC, MMC, MIDI Parameter Control: You can choose which port is used for which kind of MIDI information. For each kind - MTC, MMC and MIDI Parameter Control - one MIDI port have to be assigned. The same MIDI port can be used for several kinds of information.
26.0 Mixbus Options Menu Options Audio File Format: Sample Format The audio data format that Mixbus uses internally. New recordings will be stored in this format, and files will be converted to this format when imported. • Float (floating point 32-bit) (default value) Allows extra headroom above 0dBFS for JACK-enabled connections and/or bounces within Mixbus. • 24-bit: If you plan to record live sources from a A/D converter and do not use internal bouncing-to-disk, then 24-bit will save some disk space.
26.0 Mixbus Options Control Surfaces: Mackie If you are using a Mackie Logic protocol control surface then this should be ON. Control Surfaces: Generic MIDI If you are using a generic MIDI controller to control Mixbus knobs then this should be ON. AutoConnect • Auto-connect Inputs to Physical Inputs: When a new track is created, Mixbus will automatically connect the next available physical input to the track.
26.0 Mixbus Options Layering Every region in a playlist has a "layering order" which defines the stacking order of regions. The topmost region is the one that is seen and heard. See section 15.0 Editing Tools & Modes for more information on layering. • Later is Higher: (default OFF) This is the most "automatic" mode. In this mode, the later region (in time) is always a higher layer. This works well for simple cases but does not allow manual tweaks when layering does not work for you.
26.0 Mixbus Options making a long-form recording. The user can examine the xruns after the fact and try to fix and/or hide them. Stop Transport at Session End If this option is ON then the transport will automatically stop when it hits the session End marker. Note that this does not affect recording. When recording the End marker will be pushed farther out.
27.0 Generic MIDI Control Surfaces Mixbus can utilize generic MIDI control messages to control some common editor and mixer parameters. You will need to use an OSX "midi router" such as http://notahat.com/midi_patchbay to connect from your MIDI interface to the ports of Mixbus. You can see the various MIDI ports, and control their operation, in Windows->Preferences->MIDI.
28.0 Logic Control Protocol Controls Each Mixer Strip features control of the channel's fader, stereo pan, rec-enable, mute, and solo. The Jog wheel has various modes: • Scroll mode. Part of the Scrub button cycle. The default. Scrolls the playhead. Displays "SC" in the 2 character LED. • Scrub mode. Part of the Scrub button cycle. Rate of rotation of the Jog wheel controls the direction and speed of the transport. Displays "Sb" in the 2 character LED. • Shuttle mode. Part of the Scrub button cycle.
29.0 Keyboard & Mouse Shortcuts - Linux Mixbus has three predefined keyboard shortcut layouts. Additionally, the shortcuts can be further customized by using the Windows -> Keybindings window. In the following tables “KP” is used to reference the number pad on the right side of the keyboard.
29.
29.
29.0 Keyboard & Mouse Shortcuts - Linux Aligning With The Edit Point Align operations move regions so that their start/end/sync point is at the edit point. ”Relative” operations just align the first region and moves other selected regions to maintain relative positioning.
29.
29.
29.
29.0 Keyboard & Mouse Shortcuts - Linux Mouse Object Mode This mode provides many different operations on both regions and control points, partially depending on where you click/drag with the mouse. The ”body” of a region is the area where the waveform is displayed.
29.0 Keyboard & Mouse Shortcuts - Linux Mouse Ops on Solo Buttons Only Mixbus Function exclusive solo temporary latched solo Mouse Command Control+Alt+left-click Shift+left-click Mouse Ops on Faders & Plug-in Controls Mixbus Function adjust fine-drag control finest-drag control learn MIDI control reset to default Mouse Command left-drag Control+left-drag Control+Alt+left-drag Control+middle-click Shift+left-click Section 29.
30.0 Keyboard & Mouse Shortcuts - Mac Mixbus has three predefined keyboard shortcut layouts. Additionally, the shortcuts can be further customized by using the Windows -> Keybindings window. In the following tables “KP” is used to reference the number pad on the right side of the keyboard.
30.
30.
30.0 Keyboard & Mouse Shortcuts - Mac Aligning With The Edit Point Align operations move regions so that their start/end/sync point is at the edit point. ”Relative” operations just align the first region and moves other selected regions to maintain relative positioning.
30.
30.
30.
30.0 Keyboard & Mouse Shortcuts - Mac Mouse Object Mode This mode provides many different operations on both regions and control points, partially depending on where you click/drag with the mouse. The ”body” of a region is the area where the waveform is displayed.
30.0 Keyboard & Mouse Shortcuts - Mac Mouse Ops on Solo Buttons Only Mixbus Function exclusive solo temporary latched solo Mouse Command Command+Option+left-click Shift+left-click Mouse Ops on Faders & Plug-in Controls Mixbus Function adjust fine-drag control finest-drag control learn MIDI control reset to default Mouse Command left-drag Command+left-drag Command+Option+left-drag Command+middle-click Shift+left-click Section 30.
31.0 Appendix A: FAQ General questions: MAC • • • • OS X version support Compatible with both Intel and PowerPC (G5) systems 10.4 (Tiger) - must be 10.4.11 10.5 (Leopard) all supported 10.6 (Snow Leopard) all supported (32bit and 64 bit) Linux version support • Only x86 and x86-64 desktop platforms are supported (no PowerPC) • Most Debian, Ubuntu, or Fedora-based distributions will work • Audio-specific distributions such as AVLinux, UbuntuStudio, or CCRMA are suggested.
31.0 Appendix A: FAQ Does Mixbus have a video player window? How do you sync to picture? On Linux, there are several applications that have JACK synchronization, including xjadeo, openmoviestudio, and Blender. These products are not supported by Harrison but are believed to work. On OSX, there is a free, useful video player called Jadeo which is available here: http://mir.dnsalias.
31.0 Appendix A: FAQ What audio file formats are supported? Formats supported by libsndfile: • WAV and Broadcast WAV (Microsoft) • AIFF/AIFC (SGI,Apple) • AU/SND (Sun, DEC, NeXT) • RAW (Headerless) • PAF (Paris Audio File) • IFF / SVX (Commodore Amiga) • WAVE (Sphere Nist) • SF (IRCAM) • VOC (Creative) • W64 (Sound forge) • MAT4 (GNU Octave 2.0) • MAT5 (GNU Octave 2.
31.0 Appendix A: FAQ What Hardware controllers are supported? • Anything that supports the Logic Protocol (Mackie Control Universals, BCF2000, etc.) • Ardour does not support the Mackie protocol, it supports the Logic Control Protocol, which was the predecessor to it. HUI was the predecessor to the Logic Control Protocol. • Any MIDI Control Surface that uses standard MIDI messages in the way Ardour expects them ie Standard NOTE, CC, and Transport messages.
31.0 Appendix A: FAQ Troubleshooting Mixbus won't open files from a certain directory, but it works from other directories. What is the problem? Mixbus is designed to be a cross-platform app that works with files stored in Unix, OSX, and Windows/DOS-formatted drives. You may be using a folder with punctuation or other characters that are not recognized by Mixbus.
32.0 Appendix B: Release Notes Mixbus 2.0.2 FIXES: • Fixed a crash caused by the new "plug-in slider" controls on some AU plug-ins. IMPROVEMENTS: • Added SMPTE timecode mode selectors to the View menu. KNOWN ISSUES: • Sometimes opening a new session snapshot without first restarting Mixbus will cause a crash. This has been fixed in Ardour3 but will not appear in Mixbus until we adopt the Ardour3 platform.
32.0 Appendix B: Release Notes • Refinements to the mix engine providing less CPU usage, and more resistance to plug-ins that generate denormals or NANs. • Renaming a Marker will now mark the session as “dirty” and allow saving. IMPROVEMENTS: • Polarity (phase) buttons on the top of every mixer strip. • Plug-ins, sends, inserts and the fader now appear in a single redirect box at the top of the mixer strip. This allows easier signal reordering and allows more space for Mixbus controls.
32.0 Appendix B: Release Notes Mixbus 1.5.1 (8858) FIXES • Fixes a bug revealed by sessions created by the 3rd-party AATranslator application. • Fixes a bug which removed the outputs for "Sends" and the Click (metronome). This bug was introduced in v1.5. • Fixes the key shortcut to the "Separate" function in the default keybindings. • Fixes a bug that causes a crash in Tom Szilagyi's IR LV2 plug-in when an impulse response is loaded. (Linux version only) Mixbus 1.
32.0 Appendix B: Release Notes • New “protoolish” and “cubasish” keybindings options make the key commands similar to popular workstations. These are initial versions and will be expanded in the future. • Mixbus now checks for updates via the internet and alerts the user when there is news. FIXES • In 1.3, menus would sometimes not get “attention” when they were first opened. The mouse would have to be moved off the menu, then back onto it. This has been fixed. • Solo-ing a mixbus now works as expected...
32.0 Appendix B: Release Notes • Occasional problem which caused 100% CPU usage after killing JACK has been fixed. • Stopped GTK shutdown from causing a crash in some cases. • Clocks no longer cease updating when reverse playback is used. • Keyboard event forwarding now works better for plug-in windows. • A benign problem that caused an error at startup: "the object for a history XML node can't be found" has been fixed. • Disallow de-activation of master and mixbus DSP.
32.0 Appendix B: Release Notes den. This is a nice editing convenience that helps you manage large sessions. Save As: In addition to Save and Snapshot, there is now a ¨Save As¨ function which creates a new snapshot in the session, but differs from "snapshot" in that future Save commands to go into the newly-created snapshot. Track templates: Track templates can be stored by clicking on the track name and choosing "Save As Template".
32.0 Appendix B: Release Notes KNOWN ISSUES • Stereo-only AU plug-ins may not be loaded into mono channel strips. • Solo-ing a Mixbus does not mute the assignments to the Master bus • Some graphical glitches in file lists (GTK issue) • Multi-monitor displays are not very well supported (GTK issue) • On PPC systems, the region name does not show up under the region in the editor window. • Closing a session and then creating or opening a new one may result in a crash.
32.0 Appendix B: Release Notes • Correctly continue to keep sending MTC when looping • Make display of files to process during import correct (i.e.
33.0 Contact Information Mixbus Website http://mixbus.harrisonconsoles.com For support inquiries please email: mixbus@harrisonconsoles.com or visit the Mixbus IRC Chat at: http://webchat.freenode.net/?channels=ardour-mixbus Harrison Consoles 1024 Firestone Parkway La Vergne, TN 37086 615-641-7200 Phone 615-641-7224 Fax Harrison Consoles Main Website www.harrisonconsoles.com Section 33.