
User Manual
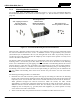

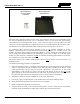
Table Of Contents
- 1 REGULATORY AND SAFETY INFORMATION
- 1.1 SAFETY SYMBOL CONVENTIONS
- 1.2 RF ENERGY EXPOSURE AWARENESS AND CONTROL INFORMATION FOR FCC OCCUPATIONAL USE REQUIREMENTS
- 1.3 COMPLIANCE WITH RF EXPOSURE STANDARDS
- 1.4 REGULATORY APPROVALS
- OCCUPATIONAL SAFETY GUIDELINES AND SAFETY TRAINING INFORMATION
- 1.6 COMMON HAZARDS
- 1.7 SAFE DRIVING RECOMMENDATIONS
- 1.8 OPERATING RULES AND REGULATIONS
- 1.9 OPERATING TIPS
- 2 SPECIFICATIONS
- 3 INTRODUCTION
- 4 UNPACKING AND CHECKING THE EQUIPMENT
- 5 PLANNING THE INSTALLATION
- 6 ANTENNA INSTALLATION
- 6.1 ANTENNA MOUNTING LOCATIONS
- 6.2 ANTENNA INSTALLATION PROCEDURES
- 7 FRONT-MOUNT RADIO INSTALLATION
- 8 REMOTE-MOUNT RADIO INSTALLATION
- 8.1 MOUNTING THE REMOTE-MOUNT RADIO
- 8.2 REMOTE-MOUNT RADIO’S DC POWER INSTALLATION
- 8.3 CONTROL HEAD INSTALLATION
- 8.3.1 General Information on the CH100 Control Head
- 8.3.2 General Information on the CH721 Control Head
- 8.3.3 Multi-Head Radio Installations
- 8.3.4 Control Head Mechanical Installation
- 8.3.5 Control Head-to-Radio CAN Cable Connections
- 8.3.6 Control Head Power Cable Installation
- 8.3.7 Using Vehicle Fuse and TTap Kit (Optional) Instead of Waterproof Inline Fuse Holder (Standard)
- 9 SPEAKER INSTALLATION
- 10 MICROPHONE ATTACHMENT
- 11 OPTIONAL CABLES AND CONNECTIONS
- 12 GPS NMEA-FORMATTED DATA CONNECTION
- 13 INITIAL POWER-UP TEST
- 14 PERFORMANCE TESTS
- 15 COMPLETE THE INSTALLATION
- 16 WARRANTY REGISTRATION
- 17 WARRANTY

14221-1200-4000, Rev. A
49
8 REMOTE-MOUNT RADIO INSTALLATION
This section includes detailed instructions for mechanically installing and wiring a
remote-mount Unity XG-100M mobile radio. For front-mount Unity XG-100M mobile
radio installation procedures, refer to Section 7 which begins on page 41.
8.1 MOUNTING THE REMOTE-MOUNT RADIO
This section provides details on mounting a remote-mount Unity XG-100M mobile radio in the vehicle.
Control head installation procedures are included in Section 8.3 which begins on page 56.
The remote-mount radio weighs approximately 5.25 pounds (2.38 kilograms). The preferred mounting of
the radio is on top of a firm, flat surface. Radio dimensions included in Section 2.1 on page 13.
Prior to beginning the installation, verify the radio has the proper version of software
and verify it has been configured properly for customer usage. Consult with the radio
system network administration personnel as necessary.
Though generally mounted in a trunk or remote location, the remote-mount mobile
radio must be kept away from heat sources. Mounting it in a location which is out of
direct sunlight is recommended but not required. Adequate ventilation space must be
provided to the side fins. The radio reduces its RF output power when its ambient
temperature exceeds approximately +140
o
Fahrenheit (+60
o
Celsius).
At a minimum, the mounting surface should be 16-gauge (approximately 1/16-inch
thick) steel sheet metal. Mounting to plastic or other material with low tensile and
shear strength is unsafe. A weak mount could turn the radio and its mounting
bracket into a dangerous projectile during a high-shock incident such as a motor
vehicle accident. If the selected mounting surface does not meet the minimum
16-gauge steel sheet metal requirement, the surface should be reinforced with a
metal backing plate (not supplied) or it should be reinforced using some other
approved mounting method.
Before drilling holes and/or installing mounting screws, verify these operations will not
damage or interfere with any existing vehicle component (the fuel tank, a fuel line, the
transmission housing, existing vehicle wiring, electronic control modules, etc.). Always
check to see how far the mounting screws will extend beyond the mounting surface
prior to installation. Always deburr drilled holes before installing screws.
8.1.1 Mounting Bracket Installation
The remote-mount radio’s mounting bracket is included with the Remote-Mount Mounting Bracket Kit
KT23117. Kit contents are shown in Figure 8-1. This is item 1 in the respective remote-mount
installation kit (i.e., Table 4-4 for CH-100 control head and Table 4-5 for the CH-721 control head).
Typically, the radio’s mounting bracket is mounted in the vehicle’s trunk, on the top surface of the trunk
tray or on the trunk floor. However, it can be suspended from the trunk’s rear deck if the surface is
completely flat and the thickness of deck’s sheet metal is adequate.
NOTE
NOTE
CAUTION
WARNING
CAUTION