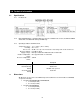
EFFECTIVE: July 8, 2013 SMART LIMIT for NER2 SERIES ELECTRIC CHAIN HOIST 1/8 and 5 Ton Capacities Code, Lot and Serial Number This equipment should not be installed, operated or maintained by any person who has not read and understood all the contents of this manual. Failure to read and comply with the contents of this manual can result in serious bodily injury or death, and/or property damage.
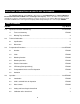
IMPORTANT INFORMATION ON HOW TO USE THIS MANUAL This OWNER’S MANUAL SUPPLEMENT is intended for use in combination with the “Owner’s Manual for Electric Chain Hoist ER2 and NER2 Series 1/8 through 5 Ton Capacity”. Refer to the Table of Contents below to determine the location(s) of information pertaining to your hoist. References to the “Owner’s Manual for Electric Chain Hoist ER2 and NER2 Series 1/8 through 5 Ton Capacity” will be designated by the use of the acronym “ER2OM”. Table of Contents Section 1.
Section 5.0 6.0 Page Number Inspection …………………………………………………………………………………… 8 and ER2OM 5.1 General ER2OM 5.2 Inspection Classification ER2OM 5.3 Frequent Inspection ER2OM 5.4 Periodic Inspection ER2OM 5.5 Occasionally Used Hoists ER2OM 5.6 Inspection Records ER2OM 5.7 Inspection Methods and Criteria 8 Maintenance & Handling …………………………………………………………………………... ER2OM 6.1 Count/Hour Meter ER2OM 6.2 Lubrication – Load Chain, Hooks and Suspension ER2OM 6.3 Lubrication – Gearbox ER2OM 6.
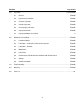
1.0 Important Information and Warnings 1.2 Warning Tags and Labels The NER2 Smart Limit tag illustrated below in Figure 1-1 is supplied with each hoist shipped from the factory. If the tag is not attached to your hoist’s pendant cord, order a tag from your dealer and install it. Read and obey all warnings attached to this hoist. Tag is not shown actual size.
2.0 Technical Information 2.1 Specifications 2.1.1 Product Code 2.1.2 ER2 and NER2 Models - Harrington ER2 series hoist are available in two versions, the ER2 and NER2. Smart Limits is available with dual speed NER2 only. 2.1.
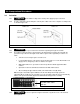
3.0 Preoperational Procedures 3.8 Activation 3.8.1 3.8.2 Ensure that the voltage of the electric power supply is proper for the hoist. In order to activate the Smart Limit option, turn the piano switch on the micro-computer assembly to ON as shown in Figure 3-10. Figure 3-10 Piano Switch on the Micro-Computer Assembly 3.8.3 3.8.4 Do not put a load on the hoist when registering the length of load chain. The length of load chain must be registered before the Smart Limits is activated.
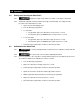
4.0 Operation 4.4 Setting and Canceling the Smart Limit 4.4.1 4.4.2 Smart limit is adjustable from the pendant for both upper and lower limits. The setting/canceling procedure for the Smart Limit is as follow: • Stop hook at the desired limit position. • Press the Emergency Stop Button. • To set the limit: • • 4.5 Register the length of load chain before setting or canceling the Smart Limit. o For upper limit, depress the UP button to low speed for 5+ seconds.
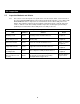
5.0 Inspection 5.7 Inspection Methods and Criteria 5.7.1 This section covers the inspection of specific items. The list of items in this section is based on those listed in ANSI/ASME B30.16 for the Frequent and Periodic Inspection. In accordance with ANSI/ASME B30.16, these inspections are not intended to involve disassembly of the hoist. Rather, disassembly for further inspection would be required if frequent or periodic inspection results so indicate.
This Page Intentionally Left Blank 9
9.0 Parts List 9.
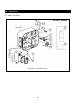
9.7 Smart Limit Parts Figure No.
9.
9.7 Smart Limit Parts Figure No.
9.
9.7 Smart Limit Parts Figure No.
9.
9.7 Smart Limit Parts Figure No.
9.
9.7 Smart Limit Parts Figure No.
www.harringtonhoists.com Harrington Hoists, Inc. 401 West End Avenue Manheim, PA 17545-1703 Phone: 717-665-2000 Toll Free: 800-233-3010 Fax: 717-665-2861 Harrington Hoists – Western Division 2341 Pomona Rincon Rd.