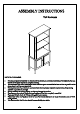
ASSEMBLY INSTRUCTIONS Tall Bookcase 7 7/L NOTE TO CUSTOMERS: For ease and speed of assembly we recommend that before you commence each step of the assembly that you identify all the parts required to complete that step. ‘We recommend that where possible you allow sufficient space to assemble the item as close as possible to the place where it will be once assembled. For the protection of your furniture we recommend that the product is placed on protected surfaces during assembly to prevent any damage.
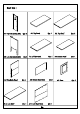
<7 Al. Top Side Qty: 2 A2. Top Panel Qty: 1 A3. Top Shelf Qty: 2 A4. Low side Qty:2| AS. Divider Panel Qty: 1 | A6. Bottom Panel Qty: Top Back Panel Qty: 1 A8. Middle Back Panel Qty: 1 A9. Door Qty: 2 A10. Low shelf Qty: 1 | All.
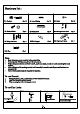
Hardware list Cam lock Qty: 20 B2. Wood Dowel Qty: 12 B3. Screw Qty: SS=( oun B4. Knob with bolt Qty: 2 B5. Wood Dowel Qty: 4 B6. Metal plate with screw Qty: Hinge with screw Qty: 4 BS. Shelf support Qty: 4 B9. Magnet with screw Qty: 1 CT B10. Glue Qty: 1 Note: ® Read these instructions carefully before assembling. e Tools required : Phillips screwdriver, flat screwdriver. e Find a clean, smooth area on which to work , such as a carpet, in order to avoid scratching the wood surfaces.
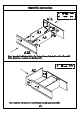
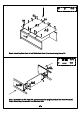
Assembly instructions [Be Bow sets | secs | Step 1: Assemble Top Side Panel A1L to Top Shelves A3 using Cam locks B1 and Wood Dowels B2. Step 2: Repeat Step 1 to assemble Top Side Pane] AIR. Step 3: Assemble Top Panel A2 to Top Side Panels using Cam locks Bl.
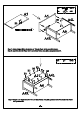
Bi @m ses | B22 —g PCs | _ Step 5: Assemble Low Side Panel A4L to Bottom Panel A6 using Cam locks B1 and Wood Dowels B2., Step 6: Repeat Step 5 to assemble Low Side Panel A4R.
Step 7: Attach Magnet BY to the bottom of Divider Panel AS by included screws. Step 8: Assemble Divider Panel AS to Low Side Panels using Cam locks Bl. Step 9: Attach Low Back Panel A11 to Low Side Panels ,Bottom Panel A6 and Divider Panel AS by screws B3.
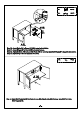
A9L Step 10: Attach Knobs B4 to Doors using included bolts. Step 11: Attach Hinges B7 to Door A9R by included screws. Step 12: Assemble Door AIR to Low Side Panel A4R by screwing assembled Hinges B7 using included screws. Step 13: Repeat Step 11&12 to assemble Door A9L. Step 14: Insert Shelf Supports B8 into holes on Low Side Panels then put Low Shelf A10 onto Shelf Supports BS.
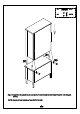
Step 15: Assemble the top part to the low part by Wood Dowels BS and Metal Plates B6 with included S Crews. NOTE: Maximum load capacity of each shelf is 20 LBS.