HARMONIC RESOLUTION SYSTEMS MXR AUDIO STAND
Discover Your System’s Capability
Introduction Thank you for purchasing the Harmonic Resolution Systems MXR Audio Stand. When used properly, it will give you many years of superior musical or video signal reproduction. The MXR Audio Stand significantly reduces the negative impact of structure-borne noise on your audio or video component performance. Decades of engineering experience, custom material development, and listening tests are incorporated into the design of the MXR Audio Stand.
Safety Instructions IMPORTANT WARNINGS! Do not place any tall objects on the top shelf of the MXR Audio Stand. A tall object is any object with a height that is greater than the length of the isolation base. A tall object is also any object that has a height greater than its own width or length. Tall objects must not be placed on top of the MXR Audio Stand for any reason. The object may become unstable and tip over causing damage to the component, adjacent objects, or injury to people.
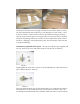
Set-Up Instructions The MXR Audio Stand consists of a frame structure and the isolation bases that support each component. The standard three and four shelf frame structures come in three boxes. Each box will be marked with the model number starting with MXR. There are two longer boxes that contain the left and right vertical panels. The third box contains the panel brace system, the isolation base support brackets, the adjustable rack feet, screws, and wrenches required to complete the assembly process.
Photo 1 Photo 2 Lift the panel out of the crate by lifting vertically at each end (see Photo 2). Move the panel and packing material directly to your damage free work surface. Once at the work surface, remove and save the two fitted foam end support cushions. Then open the protective paper covering the panel to expose the unit for assembly. Saving all the packing material is critical to secure transportation of the frame in the future.
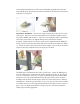
vertical panel threaded insert. (This ensures maximum engagement between the insert and the foot). Repeat this procedure and install the second foot to the bottom of the first vertical panel. Photo 5 Photo 6 Panel Brace Installation - You are now ready to attach the primary brace system to the panel. There are two braces that hold the two end panels together to form the primary MXR Frame Structure.
Photo 8 Photo 9
Install all eight 1/4-20 x 3/4" screws to the brace (see Photo 10) until they are fully engaged but do not torque the screws at this time. You will want to leave them just loose enough so that there is a very small amount of play to complete balance of assembly. All the screws for the brace system will be fully tightened at a later point in the assembly process. If they are tightened at this time, you may not be able to complete assembly or it will not be level when complete.
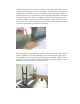
Second Panel Assembly - Remove the second panel from the wooden crate and place it in a separate area to remove all the packing material (see Photo 12 & 13). As noted before, the area and surface used should not pose any threat to the integrity of the panel surface finish. Please follow the same procedure as noted for un-wrapping the first panel.
Install all sixteen screws, eight at each panel block on the second panel, 1/4-20 x 3/4" screws to the brace (see photo 16) until they are fully engaged, but do not torque the screws at this time. You will want to leave them just loose enough so that there is a very small amount of play to complete balance of assembly. All the screws for the brace system will be fully tightened at a later point in the assembly process.
When the proper location has been achieved, torque all 32 of the 1/4-20 x 3/4" screws at the panel block locations (see Photo 20) and the 16 1/4-20 x 1" screws in the center of the two brace sub assemblies (see Photo 19). All of the screws should be very securely tightened by hand. With the wrenches provided you should apply maximum hand tightening force without straining yourself. Do not use any extension or large wrenches that could over torque and strip the threads.
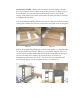
Photo 23 Photo 24 Once all the feet are installed, you can now stand the frame up on the four feet. You will want to have two or more people carefully lift the frame and clear any objects so you do not damage the panel finish. Isolation Base Bracket Installation - Each of the isolation bases has four feet on the bottom that supports the shelf. Each of these feet sits in the pocket of a bracket screwed to the MXR panel.
Be very careful not to cross-thread the fastener. The fastener should thread in very easily. If it does not, back it out and start it in again. If necessary, loosen the other three nuts on the bracket and move the bracket position until all the screws thread in with minimal torque. Once all four screws on each bracket are engaged, hand-tighten the screws using the T-wrench. The top of the T-wrench handle will twist about 10 degrees (1/36th of a rotation) without screw rotation to obtain correct torque.
Photo 27 Isolation Base Installation into MXR Frame - Uncrate each of the isolation bases if not already complete. Make sure you read and follow all of the instructions in the isolation base manual prior to installing into the MXR Audio Stand frame. You will want to verify that the frame size matches the isolation base size. The MXR-1921 uses the 1921 isolation bases. The MXR-1719 uses the 1719 isolation bases. Match the load range of each isolation base with the component weight.
Photo 28 Completed MXR Audio Stands. Singlewide shown on left, and double wide shown on the right. Loading Components into MXR Frame - Carefully load each component into the MXR Audio Stand. Be careful not to hit the front edge of the isolation base because you will scratch the aluminum frame. Once all the components are loaded, you should check to see that none of the isolation bases are overloaded.
supplied with the MXR frame. The cable organizer can also be used to support the weight of a network box for cables that apply this approach. Solid Brace System for Oversized Isolation Bases (Accessory) – The MXR Audio stand can also be set up to accommodate a larger isolation base at the top of the frame. This is often done for large turntable systems but the brace system can be used to support and large audio component. The billet machined brace system is installed directly onto the existing MXR brackets.
Care and Maintenance The MXR Audio Stand is a very low maintenance item that will provide many years of trouble-free performance by applying these basic care instructions. Clean the external surfaces of the MXR Audio Stand frame using a professional quality ultra soft lint-free micro-fiber cloth available in high quality automotive stores. Use a lightly water damped cloth if you need to clean dirt from the frame. Do not use commercial furniture polishes on the MXR.
Do not wash the interior flex element of the isolation feet even if you see a coating or white substance on the surface of the flex element.
Warranty Limited Five Year Warranty Harmonic Resolution Systems warrants to the purchaser that each HRS MXR Audio Stand is free of manufacturing defects for a period of five (5) years from the date of purchase. This warranty is subject to the following conditions and limitations. 1. A copy of the original purchase receipt from a certified Harmonic Resolution Systems authorized retailer is used to verify the date of original purchase and ownership. 2.
HARMONIC RESOLUTION SYSTEMS INC. 2495 Main Street, Suite 355 Buffalo, NY 14214 Telephone: 716-873-1437 Web: www.avisolation.com E-mail: info@avisolation.