
Operation Manual


Press buttons when inserting or removing the plug.
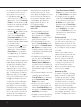
Docking Your iPod
After placing the appropriate insert in
the center well of The Bridge and con-
necting The Bridge to your receiver,
dock your iPod by placing it into the
insert, gently pressing it down until
the connectors mate on the iPod and
The Bridge.
NOTE: If you normally keep your iPod
in a protective case, or “skin,” you will
need to remove it before playing your
iPod in The Bridge.
Using The Bridge
Once The Bridge is connected, you
may use either the front-panel controls
or the AVR’s remote to select tracks
for playback from your iPod.
To select the iPod docked in The
Bridge, press the
DMP/The Bridge
Button
on the remote, or use the
Source Selection Button on the
front panel to change sources, as
described in the receiver’s owner’s
manual. When an iPod is correctly
docked in The Bridge, a message will
appear in the front-panel and on-
screen displays to confirm that
The Bridge is
CONNECTED,
after which the displays will switch to
the iPod navigation menus and the
iPod’s own menu screen will be
replaced by a “check mark” and a
message reading “OK to disconnect”.
NOTE: If the iPod is not properly con-
nected to the dock, a message read-
ing “Please check connection or bat-
tery condition” may scroll across the
bottom line of the receiver’s on-screen
and front-panel displays. If you see
this message, remove the iPod and
insert it in The Bridge again, making
sure that it seats properly.
When an iPod is properly connected
to a receiver via The Bridge (as con-
firmed by the appearance of the
check mark rather than the standard
iPod menus) the iPod’s Click Wheel
and controls do not operate. Instead,
you must use either the receiver’s
front-panel buttons or the remote
control to operate your iPod.
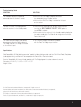
Controlling the iPod
Refer to the table below to select the
front-panel or remote control button
for the desired iPod function. Press
that button to operate the iPod. For
example, to play a track on the iPod,
you would normally press the
›
II icon
at the bottom of the Click Wheel. To
play a track using an iPod docked in
The Bridge, press the
Tune Mode
Button
on the front panel of your
receiver, or the
Play Button on the
receiver’s remote.
Navigating the iPod’s Menus
To help you in selecting tracks and
navigating through the iPod’s contents,
two-line messages will be displayed in
the receiver’s front-panel display and
on the video display connected to
your receiver. In most cases, these
display and navigation messages will
closely mirror the familiar iPod menus.
The upper line of the receiver’s display
will show the title of the current menu,
such as Playlists, Artists, Albums,
Genres, Songs, etc. The lower line will
show each choice available for selec-
tion within that category as you scroll
to it, similar to scrolling down the list
of choices in the iPod’s menu.
iPod Button iPod AVR Front- AVR
Equivalent Function Panel Button Remote Button
›
II Play/Pause Tune Mode Play
I
‹‹
Previous Track Tune Down
‹‹
››
I Next Track Tune Up
››
Menu Menu Call-Up AM/FM Menu
Select Button Select Function Set Set
›
II Pause Tune Mode Pause
Click Wheel Scroll Preset Up Navigation
Clockwise Forward Arrow Right
›
Click Wheel Scroll Preset Navigation
Counterclockwise
Backward Down Arrow Left
‹
3