Harman Kardon AVR55 Audio/VideoReceiver Volume Center Level Contour EC Surround Level D 2 URCE TAL Subwoofer Level RF COAX OPT PHONO TV DVD VID 1 VID 1 REC. VID 2 FRT/REAR SPK. MODE SURR.OFF SURR.
Owner’s Manual AVR55 Audio/Video Receiver Table of Contents Introduction . . . . . . . . . . . . . . . . . . . . . . . . . . . . . . . . . . 1 Safety Information . . . . . . . . . . . . . . . . . . . . . . . . . . . 2–3 Unpacking. . . . . . . . . . . . . . . . . . . . . . . . . . . . . . 3 Front Panel Controls. . . . . . . . . . . . . . . . . . . . . . . . . . 4–6 Front Panel Information Display . . . . . . . . . . . . . . . . . . 7 Rear Panel Connections . . . . . . . . . . . . . . . . . . . . . . .
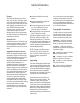
Introduction 4 Congratulations! With the purchase of a Harman Kardon AVR55 you are about to begin many years of listening enjoyment. The AVR55 has been custom designed to provide all the excitement and detail of movie sound tracks and every subtle nuance of musical selections. With on-board Dolby * Digital Decoding, the AVR55 delivers six discrete channels of audio that take advantage of the digital sound tracks from the latest DVD and LV releases as well as future HDTV broadcasts.
Safety Information 5 Important Safety Information Verify Line Voltage Before Use Your AVR55 has been designed for use with 120-volt AC current. Connection to a line voltage other than that for which it is intended can create a safety and fire hazard, and may damage the unit. If you have any questions about the voltage requirements for your specific model, or about the line voltage in your area, contact your selling dealer before plugging the unit into a wall outlet.
Safety Information 6 Cleaning When the unit gets dirty, wipe it with a clean, soft, dry cloth. If necessary, wipe it with a soft cloth dampened with mild soapy water, then a fresh cloth with clean water. Wipe dry immediately with a dry cloth. NEVER use benzene, aerosol cleaners, thinner, alcohol or any other volatile cleaning agent. Do not use abrasive cleaners, as they may damage the finish of metal parts. Avoid spraying insecticide near the unit.
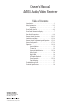
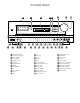
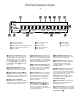
Front Panel Controls 7 ¸ ˘ ¯ AVR 55 Volume 1 2 3 4 5 6 7 8 9 0 Center Level VID 1 REC STEREO CONTOUR TV DVD VID 2 SOURCE DIGITAL T• MON TUNED AUTO MEMORY Contour PRESET Surround Level PRO LOGIC 3 - STEREO THEATER HALL STADIUM CHURCH SLEEP Subwoofer Level RF COAX OPT MEMO Power FM MODE Headphones AM/FM TUNE CD T • MON T•2 PHONO TV DVD VID 1 VID 1 REC. VID 2 FRT/REAR SPK. MODE SURR.OFF SURR.
Front Panel Controls 8 1 Main Power Switch: Press this button to apply power to the AVR55. When the switch is pressed the unit is placed in a Standby mode, as indicated by the amber LED 3 surrounding the System Power control 2. This button MUST be pressed in to operate the unit. To turn the unit off and prevent the use of the remote control, this switch should be pressed until it pops out to extend from the front panel so that the word “OFF” may be read at the top of the switch.
Front Panel Controls 9 * Vid 2: Press this button to select the device connected to the Video 2 Play jacks · as the listening and viewing source. ( Vid 2 Front/Rear: Press this button to choose either the rear panel Video 2 Play jacks · or the front panel Video 2 Inputs ˜ as the input source. When the red light above the button is illuminated, the front panel jacks are selected. Ó Speaker Mode Selector: Press this button to configure the AVR55 for the type of speakers used in your system.
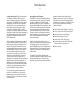
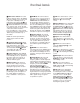
Front Panel Information Display 10 VID 1 REC M L K CONTOUR STEREO T• MON TV DVD VID 2 SOURCE DIGITAL A J I TUNED AUTO H G MEMORY PRESET F PRO LOGIC B 3 - STEREO THEATER HALL C D A Vid 1 Record Indicators B Dolby Digital Indicator C Analog Dolby Surround Mode Indicators D Analog Surround Mode Indicators E Sleep Indicator A Vid 1 Record Indicators: A dot appears next to one of the sources shown in this indicator to tell you which input has been selected as the output to the device conn
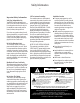
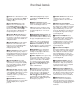
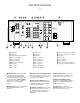
Rear Panel Connections 11 i hg f e L ANTENNA d c ba · ° IN R MAIN IN FRONT OUT L VIDEO MON. FM 75Ω R L R OUT TAPE 2 PLAY GND MODEL NO.: AVR55 HARMAN KARDON NORTHRIDGE CALIFORNIA, U.S.A. IN VIDEO 1 TAPE 1 REC L SER. NO TAPE 1 PLAY OPTICAL/PCM REAR PRE OUT L R VIDEO 2 PLAY CD COAXIAL/PCM SUB CENTER PRE-OUT WOOFER OUT AC INPUT ~120V/60HZ 3.
Rear Panel Connections 12 ª Tape 2 Play: Connect the PLAY/OUT jacks of an audio tape recorder to these jacks. ‚ Tape 1 Rec: Connect the RECORD/INPUT jacks of an audio tape recorder to these jacks. ⁄ Tape 1 Play: Connect the PLAY/OUT jacks of an audio tape recorder to these jacks. NOTE: The recorder connected to the Tape 1/Mon jacks may be monitored during a recording session by pressing the Tape 1/Mon button !d on the front panel or remote.
Remote Control Functions 13 Sending a b c d e f g Use ON Learn OFF ON OFF SLEEP Source Power P/L 3 ST Main Power AC-3 PHONO TV STEREO MATRIX z DVD NIGHT 1 2 3 VID 1 DELAY 4 5 6 VID 2 RF 7 8 9 OPT * 0 # MEMO CLEAR h i Learning + AM/FM COAX PRESET DISC CD P-SCAN SKIP TUNE/ SEARCH TAPE 1 j v t / FM MODE TAPE 2 PTY SELECT MUTE RDS DISP.
Remote Control Functions 14 a Use/Learn: This switch selects the operation mode of the remote control. Slide it to the left for normal operation. Slide it to the right when the remote is being programmed. b Source Power: Press these buttons to control power for the last source device selected when power on/off commands have been programmed into the remote’s memory. c Main Power: Press these buttons to turn the unit on or off.
Remote Control Functions 15 s Preset/Disc: These buttons have multiple functions, which vary according to the input device selected. a. When the TUNER has been selected, these buttons will scroll up · or down ‡ through the stations that have been programmed in the preset memory. b. When CD is selected and the unit is a CD changer, these buttons will change to the next disc ∏ or previous disc Â. c.
Installation and Setup 16 System Installation After unpacking the unit, and placing it on a solid surface capable of supporting its weight, you will need to make the connections to your audio and video equipment. These steps need to be done only when the receiver is first installed, or when a change is made to the input source equipment.
Installation and Setup 17 When connecting wires to the speakers, be certain to observe proper polarity. Remember to connect the “negative” or “black” wire to the same terminal on the receiver and the speaker. Similarly, the “positive” or “red” wire should be connected to the like terminal on the AVR55 and speaker. 2. Connect the audio and video outputs of a satellite receiver, cable TV converter or television set or any other video source to the TV jacks ¤. 3.
Remote Control Programming and Operation 18 This product is equipped with a powerful remote control. As supplied, it will operate the receiver, as well as most CD players and tape decks manufactured by Harman Kardon. If your equipment requires different codes, it may be programmed to copy the codes from most infrared remotes. Loading Batteries The life of the batteries for the remote control is about one year in normal operation.
Remote Control Programming and Operation 19 All other keys may only be programmed with one remote code. The code contained in these keys remains the same regardless of the source selection. WARNING: These keys transmit codes that are vital to the operation of the product. It is not recommended that they be programmed with alternative codes, as it may then be impossible to operate certain functions of the receiver. Night Delay 1.
System Configuration 20 Speaker Selection The placement of speakers in a multichannel home theater system can have a noticeable impact on the quality of sound reproduced. No matter which type or brand of speakers is used, the same model or brand of speaker should be used for the front left, center and right speakers. This creates a seamless front soundstage, and eliminates the possibility of distracting sonic disturbances that occur when a sound moves across mismatched front channel speakers.
System Configuration 21 System Configuration Once the speakers have been placed in their proper positions and connected to the AVR55, the final steps in the installation process involve configuration of the unit for the specific speaker types in use and the balancing of speaker output levels. Before proceeding, check to make certain that all connections are secure and follow these steps: 1. Plug the unit into an unswitched AC outlet and press the Main Power button 1 until it is flush with the front panel.
System Configuration 22 Speaker Output Adjustments Adjustments and calibration of the speaker output levels is important to proper surround operation. During this process, the unit is adjusted so that the output levels from each channel have a reference level that is as close to one another as possible. A small amount of time spent to properly calibrate the AVR55’s output levels will enable the unit to deliver all the performance it is capable of within the environment of your specific listening room.
System Configuration 23 6. The test tone will now be heard through the front right speaker. Once again, first listen to the test noise to determine if it is louder or softer than the previous two channels. If an adjustment is required, use the Speaker Level Adjust buttons m until the level is matched. In this case, the offset level for both front channels will be shown in the display, such as FL 0 FR +0. Only the FR indication will change, as only the front right channel is being adjusted at this time.
System Configuration 24 With the correct delay time figures for your listening room calculated, first make certain that the unit is in the Dolby Pro Logic mode by pressing the Surround Mode button Ò or Dolby Surround Mode buttons ` until the Pro Logic indicator C is illuminated. Press the Select button j to begin the adjustment process. The Information Display F will show the current delay setting, such as REAR - 15mS.
Operation 25 Basic Operation Once you have completed the setup and configuration of your new receiver, it is simple to operate and enjoy. The following instructions will provide the steps needed to enjoy the AVR55: • When using the AVR55 for the first time, it is necessary to press the Main Power button 1 on the front panel to turn the unit on. This places the unit in a standby mode, as indicated by the amber color of the Power Indicator 3 .
Operation 26 • To program the AVR55 for automatic turn off, press the Sleep button on the remote. Each press of the button will increase the time before shut down in the following sequence: 10 min 20 min 30 min 60 min 90 min OFF After a GOOD NIGHT message the sleep time will be displayed on the right side of the Information Display F, and it will count down until the time has elapsed. When the programmed time has elapsed the unit will automatically turn off.
Operation 27 To listen to a program in traditional twochannel stereo, with only the front left and right speakers plus the subwoofer, if installed, press the Stereo button x on the remote or the Surround Off button Ô on the front panel. Dolby Digital Dolby Digital (also known as AC-3) is the latest advancement in surround sound technology, delivering up to five fullrange surround channels (left, center, right, left surround and right surround) plus a special dedicated Low-Frequency Effects (LFE) channel.
Operation 28 6. NOTE: The design of some early DVD players is such that you may occasionally hear a click or pop when the player starts after being paused or after a Search mode is used. This is a function of the format and does not indicate any problem with your AVR55. Station Selection 1. Press the AM/FM button 8 i to select the tuner as an input. PCM Audio Playback 3. Press the Tuning Mode button 6 q to select manual or automatic tuning.
Operation 29 Recalling Preset Stations • To manually select a station previously entered in the preset memory, press the Numeric Buttons 37 w corresponding to the desired station’s location. To select the station in location “30,” press the 0 button only. • To manually tune through the list of stored preset stations one by one, press the Preset/Disc Skip buttons s on the remote. • To automatically scan through the stations entered in the preset memory, press the P.Scan button v on the remote.
Troubleshooting Guide 30 Troubleshooting Guide SYMPTOM CAUSE SOLUTION No front panel lights when power switch is pressed • No AC Power • Make certain AC power cord is plugged into a live outlet • Check to see if outlet is switch controlled Display lights, but no sound or picture • Intermittent input connections • Make certain that all input and speaker connections are secure • Press Mute button • Turn up volume control • Mute is on • Volume control is down No sound from any speaker.
Technical Specifications 31 Audio Section FM Tuner Section Stereo Mode Continuous Average Power (FTC) 65 Watts per channel 20Hz–20kHz: @ < 0.07% THD, both channels driven into 8 Ohms Five-Channel Surround Mode Power Per Individual Channel Front L&R channels: 55 Watts per channel, @ 0.
Staple or clip original invoice here.
AVR 55 1 2 3 4 5 6 7 8 9 0 VID 1 RE TV DVD VID SOU DIGI MEMO Power Printed in Korea FM MODE Headphones AM/FM TUNE CD T • MON Speaker Part #1111-AVR55REVOM 5707046840021 T•2