
Manual

System Configuration
You are now ready to power up the AVR 120 to
begin these final adjustments.
1. Plugthe Power Cordi_) into an
unswitchedACoutlet.
2. Pressthe Main Power Switch[] in until
it latchesandthe word "OFF" onthe top
of the switchdisappearsinsidethefront
panel.Notethat the Power Indicator []
will turn amber,indicatingthat the unit is
in the Standbymode.
3. Removethe protectiveplasticfilm from the
front-panellens.If left inplace,the film
mayaffectthe performanceof yourremote
control.
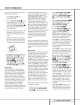
4. Installthethree suppliedAAA batteriesin
the remoteas shown.Becertainto follow
the (+) and (-) polarityindicatorsthat are
onthe bottom of the batterycompartment.
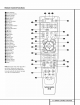
5.TurntheAVR120on eitherbypressingthe
SystemPower Control [] on thefront
panel,or viathe remotebypressingthe
AVRSelector O or anyof the Input
SelectorsOO on the remote.The
Power Indicator [] will turn greento
confirmthat the unitison,andthe Main
InformationDisplay[] will alsolight up.
System Setup
TheAVR 120featuresan advancedmemory
systemthat enablesyouto establishdifferent
configurationsfor the bassmanagement,digital
input, surroundmode,delaytimesand output
levelsfor eachinput source.Thisflexibility
enablesyou to custom-tailorthe wayin which
youlisten to eachsourceand havethe AVR120
memorizethose settings.Thismeans,for exam-
ple,that you mayusedifferentoutput levelsor
trimsfor differentsources,or setdifferent
speakerconfigurationswith the resultant
changesto the bassmanagementsystem.Once
thesesettingsare made,they will automatically
be recalledwheneveryouselectthat input.
Thefactorydefaultsettingsfor theAVR120
haveall inputsconfiguredfor ananalogsource
(exceptfor the DVDinput,which hasthe
Coaxial Digital Input 1 _ asthe default),
Stereoasthe surroundmode,all speaker
positionssetto "small," anda subwoofer
connected.Beforeusingthe unit, youwill
probablywantto changethe settingsfor most
inputs sothat they are properlyconfiguredto
reflectthe useof digital or analoginputs,the
typeof speakersinstalledand the surround
modespecifics.Rememberthat sincethe
AVR120 memorizesthe settingsfor eachinput
individually,youwill needto makethese
adjustmentsfor eachinput used.However,
oncetheyare made,furtheradjustmentis
only requiredwhen systemcomponentsare
changed.
Onceyou havecompletedthe settingsfor the
first input, manysettingsmaybeduplicatedfor
the remaininginputs.Rememberthat oncethe
settingsare enteredfor one input,they mustbe
completedfor all other input sourcesin your
system.
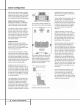
Speaker Setup
Theseadjustmentstell the AVR120which type
of speakersare in use.Thisis importantas it
adjuststhe settingsthat determinewhich
speakersreceivelow-frequency(bass)informa-
tion. Foreachof thesesettingsusethe
LARGE setting if the speakersfor a particular
position aretraditional full-rangeloudspeakers
that arecapableof reproducingsoundsbelow
lOOHz.Usethe SMALL settingfor smaller,
frequency-limitedsatellitespeakersthat do not
reproducesoundsbelow lOOHz.Notethat
when "small" speakersare used,a subwoofer
is requiredto reproducelow-frequencysounds.
Rememberthat the "large" and "small"
descriptionsdo not refer to the actualphysical
sizeof the speakers,butto their ability to
reproducelow-frequencysounds.If youare in
doubt asto which categorydescribesyour
speakers,consultthe specificationsin the
speakers'owner'smanual,or ask yourdealer.
With theAVR120 turned on,follow these steps
to configurethe speakers:
1. PuttheAVR 120in the DolbyProLogicII
modeby pressingthe SurroundMode
Selector [] onthe front panelor by press-
3,
4.
6,
ing the SurroundMode Selector_ on
the remote,until PRO LOGIC II
appearsin the Main Information Display
[] and the Pro Logic II Indicator []
lights.
Pressthe Speaker Select Button _ m
on the remoteor front panel.Thewords
FNT SPEAKER will appearinthe
Main Information Display [].
Pressthe Set Button qi_W.
Pressthe A/V Buttons qi_tqi_i_on the
remoteor the Selector Buttons [] onthe
front paneluntil eitherLARGE or
SMALL appears,matchingthe typeof
speakersyou haveat the left-front and right-
front positions,as describedbythe defini-
tionsshown in the precedingsection.
When SMA L L is selected,low-frequency
soundswill besentto the subwooferoutput
only.Notethat if youchoosethis option,
and there is no subwooferconnected,you
will not hearanylow-frequencysoundsfrom
the front channels.
When LARGE isselected,a full-rangeout-
put will be sentto the front-left andfront-
right outputs,and NOlow-frequencysignals
will be sentto the subwooferoutput.
Whenyou havecompletedyour selectionfor
the front channel,pressthe Set Button
_, and then pressthe A/V Buttons
li_)_ on the remoteor the Selector
Buttons [] onthe front panelto change
the displayto CEN SPEAKER.
Pressthe Set Button li]_ _ again,and
usethe A/V ButtonsI[_)_ on the
remote,or the Selector Buttons[] on the
front panel,to selectthe option that best
describesyoursystembasedon the speaker
definitionsshownin the precedingsection.
When CEN S MA L L is selected,low-fre-
quencycenter-channelsoundswill besentto
the subwooferoutput only.Notethat if you
choosethis optionandthere is no sub-
wooferconnected,you will not hearany
low-frequencysoundsfromthe center-chan-
nel speaker.
When CEN LARGE is selected,a full-
rangeoutput will besentto the center-
speakeroutput,and NOcenter-channelsig-
nal will besentto the subwooferoutput.
17 SYSTEMCONFIGURATION