AVR1600.OM cover.
AVR1600.OM.qxd 5/6/09 1:29 PM Page 2 SAFETY INFORMATION IMPORTANT SAFETY INSTRUCTIONS 1. Read these instructions. 2. Keep these instructions. 3. Heed all warnings. 4. Follow all instructions. 5. Do not use this apparatus near water. 6. The A/V receiver’s cabinet may be cleaned by gently wiping with a soft cotton or microfiber cloth. Do not use water or any liquid cleaners. 7. Do not block any of the ventilation openings. Install in accordance with the manufacturer’s instructions. 8.
AVR1600.OM.qxd 5/6/09 1:29 PM Page 3 SAFETY INFORMATION IMPORTANT SAFETY INFORMATION Verify Line Voltage Before Use Your AVR 1600 has been designed for use with 120-volt AC current. Connection to a line voltage other than that for which it is intended can create a safety and fire hazard and may damage the unit. If you have any questions about the voltage requirements for your specific model, or about the line voltage in your area, contact your selling dealer before plugging the unit into a wall outlet.
AVR1600.OM.
AVR1600.OM.qxd 5/6/09 1:29 PM Page 5 INTRODUCTION Please register your AVR 1600 at www.harmankardon.com. NOTE: You’ll need the product’s serial number. At the same time, you can choose to be notified about new products and/or special promotions. Thank you for choosing a Harman Kardon® product! For more than fifty years, the Harman Kardon® mission has been to share a passion for music and entertainment, using leading-edge technology to achieve premium performance. Harman Kardon, Inc.
AVR1600.OM.
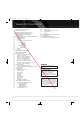
Digital Input Tuning Surround Mode Source Selectors Video 3 Analog Audio and Video Inputs Volume Headphone Jack/EzSet/EQ USB Port Microphone Digital Audio Input Inputs (Optical 3 and Coaxial 3) Surround Mode NOTE: To make it easier to follow the instructions throughout the manual that refer to this illustration, a copy of this page may be downloaded from the Product Support section at www.harmankardon.com.
AVR1600.OM.qxd 5/6/09 1:29 PM Page 8 FRONT- PANEL CONTROLS Power Indicator: This LED has three possible modes: Tuning: Press these buttons to tune a radio station. • Main Power Off: When the AVR is unplugged or the rearpanel Main Power Switch is off, this LED is off. • Standby: Amber indicates that the AVR is ready to be turned on. • On: When the AVR is turned on, this LED turns white.
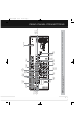
Tape Audio Inputs & Outputs Subwoofer Output Front Speaker Outputs Surround Back/ Zone 2 Speaker Outputs Surround Speaker Outputs Coaxial Digital Audio Output Center Speaker Outputs HDMI 1-3 Inputs Main Power Switch Optical 1& 2 Digital Audio Inputs 6/8 Channel Inputs Coaxial 1 & 2 Digital Audio Inputs NOTE: To make it easier to follow the instructions throughout the manual that refer to this illustration, a copy of this page may be downloaded from the Product Support section at www.harmankardon.
AVR1600.OM.qxd 5/6/09 1:29 PM Page 10 REAR - PANEL CONNECTIONS AM and FM Antenna Terminals: Connect the included AM and FM antennas to their respective terminals for radio reception. Component Video Monitor Output: If you are using one of the Component Video Inputs and your television or video display is component-video-capable, connect these jacks to the video display. NOTE: Due to copy-protection restrictions, there is no output at the Component Video Monitor Outputs for copy-protected sources.
AVR1600.OM.
AVR1600.OM.qxd 5/6/09 1:29 PM Page 12 MAIN REMOTE CONTROL FUNCTIONS The AVR 1600 remote is capable of controlling up to 11 devices, including the AVR itself and a device connected to the Auxiliary Input. During the installation process, you may program the codes for each of your source components into the remote. Each time you wish to operate any component, or the AVR first press its Selector button to change the device mode to the appropriate codes.
AVR1600.OM.qxd 5/6/09 1:29 PM Page 13 MAIN REMOTE CONTROL FUNCTIONS Memory: After you have tuned a particular radio station, press this button, then the numeric keys, to save that station as a radio preset. Tuning: Press these buttons to tune a radio station. Depending on whether the tuning mode has been set to manual or automatic, each press will either change one frequency step at a time, or seek the next frequency with acceptable signal strength.
AVR1600.OM.qxd 5/6/09 1:29 PM Page 14 INTRODUCTION TO HOME THEATER This introductory section will help you to familiarize yourself with some basic concepts unique to multichannel surround sound receivers, which will make setup and operation smoother.
AVR1600.OM.qxd 5/6/09 1:29 PM Page 15 CONNECTIONS There are different types of audio and video connections used to connect the receiver, the speakers, the video display, and the source devices. The Consumer Electronics Association has established the CEA® color-coding standard. Some of these connectors are not used on the AVR 1600, although they may be found on other components in your system. See Table 1.
AVR1600.OM.qxd 5/6/09 1:29 PM Page 16 CONNECTIONS NOTE: Some DVD-Audio, SACD, Blu-ray Disc and HD-DVD players only output multichannel audio through their multichannel analog outputs. Make a separate analog audio connection in addition to the HDMI connection, which is still used for video and to listen to Dolby Digital, DTS or PCM materials that may be stored on the disc.
AVR1600.OM.qxd 5/6/09 1:29 PM Page 17 CONNECTIONS If it’s available on your video display, an HDMI connection is recommended as the best quality connection, followed by component video, and then composite video. NOTE: Copy-protected sources are not available at the Component Video Monitor Outputs. ANTENNAS The AVR 1600 uses separate terminals for the included FM and AM antennas. The FM antenna uses a 75-ohm F-connector. See Figure 12. Figure 12 – FM Antenna The AM loop antenna needs to be assembled.
AVR1600.OM.qxd 5/6/09 1:29 PM Page 18 SPEAKER PLACEMENT Optimally, the speakers should be placed in a circle with the listening position at its center. The speakers should be angled so that they directly face the listening position. Green SUB C Purple FR Red White FL Front Speaker Placement The center speaker is placed either on top of, below or mounted on the wall above or below the video display screen.
AVR1600.OM.qxd 5/6/09 1:29 PM Page 19 GETTING STARTED Installing the AVR 1600 and connecting it to the other system components can be complicated. To simplify installation, it is suggested that you design your system before you begin connecting wires and cables.
AVR1600.OM.qxd 5/6/09 1:29 PM Page 20 GETTING STARTED If you select an HDMI input, that becomes the AVR source for the device. If you select a 2-channel analog audio input, that input becomes the AVR source. The digital audio inputs will be assigned to a source during Initial Setup. NOTES: • For multichannel disc players, if both the device and the TV use HDMI connections for video, then check the owner’s manual for the device to determine whether it transmits multichannel audio via its HDMI output.
AVR1600.OM.qxd 5/6/09 1:29 PM Page 21 INSTALLATION You are now ready to begin installing the AVR. Before beginning to connect the various components to the receiver, turn off all devices, including the AVR 1600, and unplug their power cords. Don’t plug in any of the power cords until you have finished making all of your connections. The receiver generates heat. Select a location that leaves several inches of space on all sides. Avoid completely enclosing the receiver inside an unventilated cabinet.
AVR1600.OM.qxd 5/6/09 1:29 PM Page 22 INSTALLATION While the DVD Source Selector may be used to operate either a Harman Kardon Blu-ray Disc player or a Harman Kardon DVD player, the default mode is to operate a Harman Kardon Blu-ray Disc player. To toggle between Harman Kardon Blu-ray Disc player and DVD player operation, press and hold the DVD Source Selector for 2 seconds. The source selector will flash twice to confirm that the remote’s mode has changed to operate the other type of disc player.
AVR1600.OM.qxd 5/6/09 1:29 PM Page 23 INITIAL SETUP In this section, you will configure the AVR 1600 to match your actual system. A video display must be connected to one of the video monitor outputs on the receiver. USING THE ON-SCREEN MENU SYSTEM Although it’s possible to configure the AVR using only the remote and the front-panel messages, it is easier to use the full-screen menu system. The menu system is accessed by pressing the OSD Button on the remote.
AVR1600.OM.qxd 5/6/09 1:29 PM Page 24 INITIAL SETUP NOTE: If there are fewer than five main speakers in your system, do not use the EzSet/EQ process. Instead, proceed as described in the Advanced Functions section. If you have selected a 6.1-channel configuration with a single surround back speaker, use EzSet/EQ automatic configuration for 5.
AVR1600.OM.qxd 5/6/09 1:29 PM Page 25 INITIAL SETUP to enjoy the sound mix created by your favorite movie and music artists. BXR: Enhances bass performance when playing MP3 tracks. Select ON, or leave at the default OFF setting for non-MP3 audio. Tone: Determines whether the treble and bass controls are active. When it’s off, the tone controls are “flat”, with no changes. When it’s on, the bass and treble frequencies are boosted or cut, depending upon the tone-control settings.
AVR1600.OM.qxd 5/6/09 1:29 PM Page 26 INITIAL SETUP HDMI Audio to TV: Determines whether HDMI audio signals are passed through the HDMI Output to the video display. In normal operation, leave this setting OFF, as audio will be played through the AVR. To use the TV by itself, without the home theater system, turn this setting ON. Mute the TV’s speakers when using the AVR for audio.
AVR1600.OM.qxd 5/6/09 1:29 PM Page 27 OPERATION Now that you have installed your components and completed a basic configuration, you are ready to begin enjoying your home theater system. If you press the Sleep Button after the timer has been set, the remaining play time will be displayed. Press the Sleep Button again to change the play time. TURNING ON THE AVR 1600 TONE CONTROLS Flip the rear-panel Main Power Switch to the “On” position.
AVR1600.OM.qxd 5/6/09 1:29 PM Page 28 OPERATION • Using the on-screen menus, press the OSD Button, highlight “Input Setup” and press the OK Button. Use the 7/3 Buttons to select a source. • For direct access to any source, press its Source Selector on the remote. The AVR selects the audio and video inputs assigned to the source, and any other settings made during setup. The source name, the audio and video inputs assigned to the source, and the surround mode will appear on the front panel.
AVR1600.OM.qxd 5/6/09 1:29 PM Page 29 OPERATION Figure 24 – Surround Modes Menu Auto Select: For digital programs, such as movies recorded with a Dolby Digital soundtrack, the AVR will automatically use the native surround format. For 2-channel analog and PCM programs, the AVR uses Logic 7 Movie, Music or Game mode, depending on the source.
AVR1600.OM.qxd 5/6/09 1:29 PM Page 30 ADVANCED FUNCTIONS Much of the AVR 1600’s performance is handled automatically, with little intervention required on your part. The AVR 1600 is capable of being customized to suit your system and your tastes. In this section, some of the more advanced adjustments available are described.
AVR1600.OM.qxd 5/6/09 1:29 PM Page 31 ADVANCED FUNCTIONS “3” indicates that all three front channels (left, right and center) are present. The second number indicates whether any surround channels are present: “0” indicates that no surround information is present. “1” indicates that a matrixed surround signal is present. “2” indicates discrete left and right surround channels.
AVR1600.OM.qxd 5/6/09 1:29 PM Page 32 ADVANCED FUNCTIONS The EzSet/EQ process automatically detects the capabilities of each speaker, and optimizes the AVR 1600’s performance. If you are unable to run EzSet/EQ calibration, or if you wish to make further adjustments, use the Manual Speaker Setup on-screen menus. Before beginning, place your loudspeakers as explained in the Speaker Placement section, and connect them to the AVR.
AVR1600.OM.qxd 5/6/09 1:29 PM Page 33 ADVANCED FUNCTIONS Crossover Menu After you have programmed the number of speakers, return to the Manual Setup menu (see Figure 29). Navigate to the Crossover line and press the OK Button to display the Crossover menu (see Figure 28). NOTE: If you are using a Harman Kardon HKTS Series speaker system, select the appropriate numeric crossover frequency for the Main Speaker groups, and the subwoofer will automatically be set to LFE.
AVR1600.OM.qxd 5/6/09 1:29 PM Page 34 ADVANCED FUNCTIONS With up to seven main channels, plus a subwoofer, imaging becomes both more critical and more complex. The goal is to ensure that each channel is heard at the listening position with equal loudness. EzSet/EQ calibration can handle this critical task for you, simply and automatically. However, the AVR’s Level Adjust menu allows you to calibrate the levels manually, either using the system’s test tone or while playing source material. 1.
AVR1600.OM.qxd 5/6/09 1:29 PM Page 35 ADVANCED FUNCTIONS or a remote command is received, and going dark again 5 seconds after the last command. The VFD FADE TIME OUT feature also causes the display to light up only when a button is pressed or a change in the incoming signal is detected, but the display immediately begins to fade to dark. This setting allows you to program the length of the fade time.
AVR1600.OM.qxd 5/6/09 1:29 PM Page 36 ADVANCED FUNCTIONS You may reassign the transport control punch-through programming for the AVR, VID2 and VID3 devices to other devices, such as CD. If you wish to remove transport control punch-through altogether for the AVR, VID2 or VID3 device, follow the same procedure as for programming punch-through, but in Step 3 press either of the other two of these three special selector buttons.
AVR1600.OM.
AVR1600.OM.
AVR1600.OM.qxd 5/6/09 1:29 PM Page 39 APPENDIX Table A2 – Source Setting Defaults Source Title Component Video Input Audio Input Auto Poll Surround Mode DVD HDMI 1 HDMI 2 HDMI 3 Video 1 Video 2 Video 3 Coax 1 On Logic 7 Movie HDMI On Logic 7 Movie HDMI On Logic 7 Movie HDMI On Logic 7 Movie Analog Off Logic 7 Movie Optical 1 On Logic 7 Movie Analog Off Logic 7 Movie AUX CD Tape Tuner 6-/8-Channel INT.
AVR1600.OM.qxd 5/6/09 1:29 PM Page 40 APPENDIX Table A5 – Source Input Settings Source DVD Title Video Input Component Video Input Digital Audio Input Analog Audio Input Auto Poll HDMI 1 HDMI 2 HDMI 3 Video 1 Video 2 Video 3 AUX CD Tape Tuner 6-/8-Channel INT.
AVR1600.OM.
AVR1600.OM.qxd 5/6/09 1:29 PM Page 42 APPENDIX Table A9 – Surround Modes Surround Mode Description Incoming Bitstream or Signal Dolby Digital Provides up to five separate main audio channels and a dedicated low-frequency effects (LFE) channel. • Dolby Digital 1/0/.0 or .1, 2/0/.0 or .1, 3/0/.0 or .1, 2/1/.0 or .1, 2/2/.0 or .1, 3/2/.0 or .1 • Dolby Digital EX (played as 5.1) • Dolby Digital Plus decoded and delivered via coax or optical connection Dolby Digital EX An expansion of Dolby Digital 5.
AVR1600.OM.qxd 5/6/09 1:29 PM Page 43 APPENDIX Table A9 – continued Surround Mode Description Incoming Bitstream or Signal Dolby Pro Logic IIx Movie This mode is similar to Dolby Pro Logic II Movie, with an added surround back channel. • Dolby Digital 2/0/.0 or .1, 2/2/.0 or .1, 3/2/.0 or .1, EX • Analog (2-channel) • Tuner • PCM (32kHz, 44.
AVR1600.OM.qxd 5/6/09 1:29 PM Page 44 APPENDIX Table A9 – continued Surround Mode Description Incoming Bitstream or Signal DTS Neo:6 Cinema Depending on the number of speakers in your system, select 3-, 5- or 6-channel modes, enhanced for movie or video presentations. • DTS 2/2/.0 or .1, 3/2/.0 or .1 • DTS 96/24 • Analog (2-channel) • PCM (32kHz, 44.1kHz or 48kHz) DTS Neo:6 Music Available only in 5- and 6-channel modes, creates a surround presentation • DTS 2/2/.0 or .1, 3/2/.0 or .
AVR1600.OM.qxd 5/6/09 1:29 PM Page 45 APPENDIX 3 2 1 4 5 6 7 8 9 10 11 12 13 14 15 16 17 18 19 20 21 22 23 25 24 26 28 27 29 30 32 31 33 34 35 36 37 38 39 40 41 42 43 44 45 46 47 48 49 50 51 52 53 54 55 56 57 58 59 60 61 62 63 64 66 65 Refer to the numbered buttons in this image when using the Function List.
AVR1600.OM.qxd 5/6/09 1:29 PM Page 46 APPENDIX Table A10 – Remote Control Function List No. Button Name 1 Power On 2 3 4 5 6 7 8 9 10 11 12 13 14 15 16 17 18 Power Off Mute AVR DVD VID 1 (VCR) HDMI 1 AM/FM CD VID 2 (CBL/SAT) HDMI 2 AUX Tape VID 3 (TV) HDMI 3 Sleep/CH+ Test Tone 6/8 CH 19 Vol Up 20 CH– 21 22 23 24 25 26 27 28 29 30 31 32 33 34 35 36 37 38 39 40 41 42 43 OSD T/V Vol Down CH.
AVR1600.OM.qxd 5/6/09 1:29 PM Page 47 APPENDIX Table A10 – continued No.
AVR1600.OM.qxd 5/6/09 1:29 PM Page 48 APPENDIX Refer to Tables A11 through A17 when programming the codes for your components into the remote.
AVR1600.OM.
AVR1600.OM.
AVR1600.OM.
AVR1600.OM.qxd 5/6/09 1:29 PM Page 52 AVR 1600 TECHNICAL SPECIFICATIONS Audio Section Stereo Mode, Continuous Average Power (FTC) 40 Watts per channel, 20Hz–20kHz, @ <0.07% THD, both channels driven into 8 ohms Seven-Channel Surround Modes Power per Individual Channel Front L & R channels: 30 Watts per channel @ <0.07% THD, 20Hz–20kHz into 8 ohms Center channel: 30 Watts @ <0.07% THD, 20Hz–20kHz into 8 ohms Surround (L & R Side, L & R Back) channels: 30 Watts per channel @ <0.
AVR1600.OM.
AVR1600.OM cover.qxd 5/6/09 1:33 PM Page 2 8500 Balboa Blvd., Northridge, CA 91329 www.harmankardon.com © 2009 Harman International Industries, Incorporated. All rights reserved. Part No.