
User manual

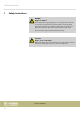
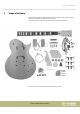
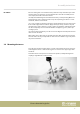

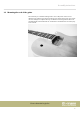
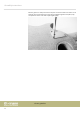
Table Of Contents
- Table of contents
- 1 Safety instructions
- 2 Scope of delivery
- 3 Assembly instructions
- 3.1 Painting the body and neck
- 3.2 Mounting the tuners
- 3.3 Mounting the neck of the guitar
- 3.4 Wiring the potentiometers, pickups and switch
- 3.5 Mounting the pickguard
- 3.6 Mounting the tailpiece and bridge
- 3.7 Mounting the potentiometer knobs and strap buttons
- 3.8 Strings, neck relief and the position of the strings
- 4 Protecting the environment

The neck of the guitar is sealed at the factory with a thin layer of matt lacquer and is
already ready to use. However, if you would still like to treat the neck with paint or
clear lacquer, follow the instructions below.
Carefully mask o the ngerboard and all frets before you start painting. Make sure
that all surfaces are free of dust and dirt. Carry out all painting operations in a well-
ventilated, dust-free environment.
Use a clear or lightly coloured wood lacquer of high quality for the neck. Start on the
front and the edges of the headstock. Apply a thin layer evenly, allow it to dry and
repeat this two or three times. If you notice surface irregularities, wait until the paint
has dried completely and correct them with ne sandpaper (e.g. 800+) before pro‐
ceeding to paint.
Once the headstock has dried, place the neck on the ngerboard and paint the back
of the neck as described.
Wait another two to three days to dry until the paint is fully cured. Polish or burnish
the neck until it meets your expectations. Take care not to bu too vigorously as this
may remove the nish.
3.2 Mounting the tuners
Insert the four machine heads from the rear side of the headstock into the holes pro‐
vided. Align the tuners so that the tuning pins are vertical to the upper edge of the
headstock.
Fasten the tuners in this position as shown in the picture, initially fastening them
only nger-tight with the screws provided.
Neck nish
Assembly instructions
Electric Guitar Kit Single Cut
7