
Installation Sheet
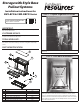

STEP 3 - Mark Rear Mounting Bracket
If the countertop is installed, pull the organizer partially open to gain
access to the upper slide. Firmly grasping the upper slide, tap it against
the back of the cabinet. The rear bracket should make small indentations
in the back of the cabinet. Proceed to step 4. If countertop is not installed,
pull the organizer partially out to gain access to the rear bracket and
install three (3) #8 x 5/8” Pan Head Wood Screws provided in the slots.
Proceed to step 5.
SWSBPO06/19 v.3
STEP 5 - Finishing Touches
Remove the packaging material from around the acrylic liners and place it
in the bottom of the organizer unit. Install the middle shelf using the shelf
supports provided and cycle the organizer making sure the soft-close
slides are operating.
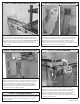
STEP 4 - Install Rear Mounting Bracket
Remove the unit from the base again and then slide the rear mounting
bracket o the slide. Align the rear bracket prongs with the indentation
marks on the rear of the cabinet and secure with three (3) #8 x 5/8” Pan
Head Wood Screws in the slots as shown. Re-install the unit onto the
slides, making sure as you push it in the cabinet, that the top slide is
properly seated into the rear mounting bracket. Operate the unit to make
sure the undermount slides are working properly.
STEP 5 - Install Front Mounting Bracket
Pull the top front mounting bracket into position on the side of the face
frame (or cabinet) allowing for a 3/16” setback (shown left above). Firmly
secure with one (1) #8 x 5/8” Pan Head Wood Screw. Make sure the gap
between the unit and the side of the face frame is equal from top to
bottom. Adjust accordingly and then securely tighten the bracket set
screw (shown right above). Operate the unit and make adjustments as
necessary for the slides to operate smoothly.
STEP 6 - Door Installation
Using a tape measure, determine the mounting location of the top door
mounting brackets. Install door with two (2) #8 X 5/8” Flat Head
Phillips Wood Screws and make necessary adjustments following the
diagram above. To adjust door up or down loosen door mounting
screws (A). To adjust left or right, loosen both set screws (B) adjust and
retighten. To adjust tilt, loosen tilt screw (C), adjust and retighten
set screws. Once the door is in the desired position rmly secure the two
bottom door mounting screws.
(Screw C)
Tilt Adjustment
(Screw A) Up/Down
Adjustment
(Screw B)
Left/Right
Adjustment