
Product manual


Page 6 For technical questions, please call 1-800-444-3353. SKU 68782
Maintenance
TO PREVENT SERIOUS INJURY
FROM HELMET FAILURE:
Do not use damaged equipment.
If damage or abnormal operation occurs,
have the problem corrected before further use.
1. BEFORE EACH USE, inspect the general
condition of the helmet. Check for loose
hardware, misalignment or binding of moving
parts, cracked or broken parts, damaged
electrical wiring, and any other condition
that may affect its safe operation.
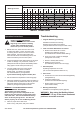
2. Replace the Lens Cover(s) (2, 4) if they are cracked,
scratched, soiled, pitted or damaged in any way:
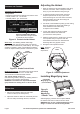
Front Lens Cover Replacement
1. Squeeze the Lens Holder Latches (8) inside
the Helmet at the base of the Lens Holder (5)
together and pull the bottom of the Lens Holder
towards the inside of the helmet. See Figure E.
Figure E: Lens Holder Latches
and Finger Notch
Lens Holder Latch (8)
Lens
Holder (5)
Inner Lens
Cover (4)
nger notch
2. Remove Front Lens Cover (2) from Shell (1).
3. Remove any protective lm from
both sides of the new Lens.
4. Assemble Front Lens Cover, Lens, and Lens Holder
into Shell the same way they were removed.
Inner Lens Cover Replacement
1. Remove the old Inner Lens Cover (4) by pulling
it up at the nger notch. See Figure E.
2. Remove any protective lm from both
sides of the new Lens cover.
3. Line up the new Inner Lens Cover with the anges
at the sides of the lens and snap it into place.
Filter Lens Replacement
1. Squeeze the Lens Holder Latches (8) inside
the Helmet at the base of the Lens Holder (5)
together and pull the bottom of the Lens Holder
towards the inside of the helmet. See Figure E.
2. Gently pull the Shade Control Knob (7) off
the side of the Helmet. See Figure G.
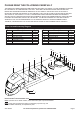
3. Remove Auto-darkening Filter (3) from Lens Holder:
a. Push up on top center of front of Lens Holder and,
b. lift top of Auto-darkening Filter out. See Figure F.
Figure F: Removing Auto-darkening Filter
Auto-darkening
Filter (3)
Lens
Holder (5)
a. push here
b. lift top of
Filter Lens out
WARNING! TO PREVENT SERIOUS INJURY
AND BLINDNESS:
Replace the Auto-darkening Filter ONLY with an
exact replacement. Other lters may not protect
properly from welding light, or may not t helmet
closely enough to block all light at the edges.
4. Remove any protective lm from
both sides of the new Lens.
5. Install new Filter Lens into the Lens Holder
and replace Lens Holder into Shell.
6. Place shade control wire up against side of Shell (1).
Attach Shade Control Knob (7) to post of
shade control wire. See Figure G.
Figure G: Shade control wire post
Shade
Control
Knob (7)
Dial Marking
Panel (6)
shade
control
wire post
Auto-darkening
Filter (3)