
Product manual


Page 4 For technical questions, please call 1-800-444-3353. SKU 68782
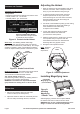
Features and Controls
Time Delay and Sensitivity:
SKU 68782
Sensitivity Adjustment Switch
Adjusts the amount of light needed
to activate the lens to darken.
Delay Switch
Adjusts the speed the lens changes from dark to clear.
In FAST position: .25 - .45 seconds
In SLOW position: .65 - .80 seconds
Figure A: Controls Inside Helmet
Solar Cells: This Welding Helmet utilizes high
performance solar cells as power supply, and has two
built-in 3V lithium batteries as power backup. No change
of battery is needed. Under normal welding conditions,
users can expect a battery lifetime of more than 6 years.
Shade
Control Knob
Figure B: Shade Control Knob
Shade Control Knob: The shade control knob controls
the shade of the lens when it is in its dark state.
Turn the knob to the desired shade number.
The “Grind” setting disables the
auto-darkening function, allowing the welding helmet to
be used for eye protection while grinding.
WARNING! The helmet will not provide adequate
eye protection for welding while in “Grind” mode.
Before Use
1. Remove the protective lm from both sides
of the front lens (if not already done).
2. Adjust the Helmet so that it ts comfortably and the
user can easily see through the lens, as follows:
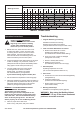
Adjusting the Helmet
1. Wear the helmet and set the headband size using
the knob on its back. Set it to keep the helmet
rmly on your head without it being too tight.
2. To adjust the height of the Helmet, adjust the
strap that passes over the top of your head.
Push the locking nub out of the hole in the band,
adjust as needed, and push the locking nub
through the nearest hole.
3. Test the t of the headband by lifting up and closing
down the helmet a few times while wearing it.
If the headband moves while tilting,
re-adjust it until it is stable.
4. Loosen both Adjustment Knobs to adjust
the distance between the helmet and
your face in the down position.
5. Slide the helmet nearer or further from your face.
It is important that your eyes are each the
same distance from the lens. Otherwise the
darkening effect may appear uneven.
6. Re-tighten both Adjustment Knobs.
Note: Numbers
correspond to
steps above.
Figure C: Helmet Adjustment
1
5 5
2
4/6 4/6
Shell
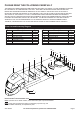
Installing Magnifying Lens
Figure D:
Installing
Magnifying
“Cheater” Lens
compatible
Magnifying Lens
(not included)
Slide magnifying “cheater” lens into place INSIDE
the helmet under the four tabs, as shown above.
WARNING! Do not use a different Magnifying Lens
design or install lens outside welding helmet.