
Product manual


Page 4 For technical questions, please call 1-800-444-3353. Item 60800
SAFETY OPERATION MAINTENANCESETUP
Installation Instructions
Read ENTIRE IMPORTANT SAFETY INFORMATION section at beginning of this manual including
all text under subheadings therein before set up or use of this product.
Note: This Cargo Unloader is intended for use with a truck bed that has a friction-free surface.
Heavier loads may be difficult to unload if there are conditions present, such as:
a. Bed has a sprayed-in bedliner
b. A no-slip bedliner is in place
c. A rubber mat is in place
d. Rust or debris is on the bed
Before using the Cargo Unloader, remove rubber mats and no-slip bedliners, along with any dirt and debris
that may cause friction or tear Load Sheet. Install liner or another smooth surface if necessary.
Note: For additional information regarding the parts listed in the following pages,
refer to the Assembly Diagram near the end of this manual.
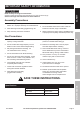
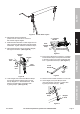
1. Position Roller Bar (17) so that Crank Slot is on left
and Load Sheet unwinds away from you. Make
sure hook-and-loop straps secure Load Sheet.
2. Remove Roller Bar Caps (18) from Roller Bar.
3. Slide first set of Bracket Stops (8) on Roller
Bar on both sides of Load Sheet.
4. Slide “L” Brackets (7) next to
Bracket Stops on both sides.
5. Slide second set of Bracket Stops next
to “L” Brackets on both sides.
6. Insert Stop Bolts (9) and thread Stop Nuts
(10) loosely on all four Bracket Stops.
7. Reinstall Roller Bar Caps on both sides.
(See Figure A.)
Stop
Bolt (9)
Roller
Bar Cap
(18)
“L” Bracket
(7)
Bracket
Stops (8)
Roller
Bar
(17)
Stop
Nut (10)
Load Sheet
Direction
Figure A
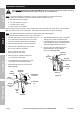
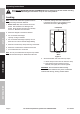
8. Slide Rear Brackets (12) under “L” Brackets,
making sure to place Rear Bracket with
Left Tailgate Strap (2), which includes extra
buckle for Bumper Strap, and Rear Bracket
with Right Tailgate Strap (3) correctly.
9. Secure loosely with Bracket Bolts (14),
Bracket Washers (16) and Bracket
Nuts (15). (See Figure B.)
Bracket
Washers (16)
“L”
Bracket
Rear
Bracket
(12)
Bracket
Nut (15)
Bracket
Bolt (14)
Figure B