
Product manual
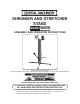


Page 4SKU 96008
For technical questions, please call 1-800-444-3353.
Make certain that the work area is large enough so that the Shrinker Stretcher
Stand and the workpiece are clear of any walls, furniture and obstacles.
Only use this Stand with SKU 95062 Manual Shrinker Stretcher.
ASSEMBLY INSTRUCTIONS
Note: For additional information regarding the parts listed in the following pages, refer to
the Assembly Diagram near the end of this manual.
Connect each Wheel (6) to Support (4) with Pin (7) and Cotter Pin (8).
Attach Support (4) and Support Leg (13) to the Stand (1) with Bolts (5) and Lock
Nuts (12). Insert each Bolt (5) through the Support (4), the Stand (1) and through
the Support Leg (13), then thread on Lock Nuts (12).
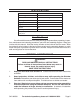
Secure each Clevis (15) to each Shaft (14) with Pin (9), Cotter Pin (16) and Lock
Pin (17)-see Figure 1.
Lock Pin (17)
Figure 1
Clevis (15)
Pin (9) (hidden from view)
Shaft (14)
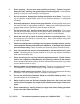
Secure each Pedal (3) to Frame (1) with Bolt (10) and Lock Nut (2)-see Figure 2.
Bolt (10)
Pedal (3)
Figure 2
Lock Nut (2)
Spring (11)
Stand (1)
17.
18.
1.
2.
3.
4.