Specifications Tire Capacity All tires from 8 IN. to Light Truck Tires (7-1/2 IN. x 16 IN.) Flotation Tires: Up to 12.5L16 Includes 1 Bead Breaker Handle 37 IN. Long Mount/ Demount Tool Important Safety Information 1. Do not exceed max. tire capacities. Do not use on standard tires exceeding 16" or on flotation tire exceeding size 12.5L16. 2. CAUTION! Do not use on tires with high-end rims. Tire removal and installation can result in scratches and slight marring on rims. 3.
Assembly/Mounting Instructions Read the ENTIRE IMPORTANT SAFETY INFORMATION section at the beginning of this document including all text under subheadings therein before set up or use of this product. 1. The Tire Changer will require some assembly after unpacking. See the assembly components in Figure A, below. 3. Fasten Center Post and Post Base together using the Hex Bolts (6), Washers (11), and Nuts (12). See Figure B, below.
5. At this point, the assembled base should be mounted to the selected floor surface (such as a wood pallet or concrete floor) using the 7/16 IN. mounting holes at the ends of the Side Bases and the Post Base. NOTE: The floor surface should be at least 4 IN. in depth. 6. With assistance, move the Tire Changer to the selected location. Use the four 7/16 IN. mounting holes as templates to mark four 7/16 IN. holes on the mounting surface. 12.
15. Once fully assembled and mounted to the floor, the assembled Tire Changer will look as it does in Figure F, below. 2. Mount/ Demount Bar (14) Set Tire down on the longer end of the Post Base (the end with the mounting tab). Position the tire so that the rim is set against the mounting tab, which will keep the tire in place. See Figure G, below.
5. Lift Bead Breaker Handle up and slide tire around so that Bead Breaker Shoe can be set against the opposite end of rim. 6. Set the Bead Breaker Shoe against the edge of tire rim. Push down on Bead Breaker Handle, allowing the Bead Breaker Shoe to lift other end of tire bead off of rim. 7. Lift Bead Breaker Handle up, flip tire over and reposition tire against mounting tab. 8. Set Bead Breaker Shoe against the edge of tire rim and push down on Bead Breaker Handle, removing bead from rim.
17. Slide bar down and, using the Post Cap as leverage, pull the Bar around, continuing to separate the bead from rim. See Figure L, below. 19. Using Post Cap as leverage, pull Bar around, separating inner bead from tire rim. Figure N Figure L NOTE: You may need to hold onto Post Cap with your free hand for added 18. Once bead on outer side of tire is separated from rim, pull tire up with free leverage. See Figure N, above. hand and push Bar down so it is against 20.
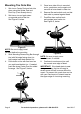
Mounting Tire Onto Rim 1. 2. Set rim on Center Post and lock into place using the Spider Post and Post Cap (if not already done). Set tire on rim and push down on opposite ends of the tire. See Figure O, below. 5. Once inner side of tire is mounted to rim, push down on tire again until one side of outer bead is under rim. 6. Remove Bar and switch ends, so that hook side is pressed against bead. 7. Push Bar down so that hook end wedges bead under rim. See Figure Q, below.
. Depending on the flexibility of rubber (and the amount of bead lubricant used), you may not switch the Bar around and use the flat edge of Bar to wedge the last sections of the bead under the rim. See Figure R, below. 10. WARNING! Do not use the bar to hammer on the side of the tire during mounting. Doing so can damage the tire. 11. Once tire is properly mounted onto the rim, inflate tire to the PSI recommended in tire’s owner manual. WARNING! Do not over-inflate tire. 12.
Parts List Part 1 2 3 4 5 6 7 8 9 10 11 12 13 14 Description Center Post Post Cap Lug Pin Spider Post Clevis Pin (7/16”) Bolt (3/8” x 16 x 1”) Bead Breaker Handle R-Clip Side Base Bead Breaker Shoe Lock Washer (3/8”) Nut (3/8” x 16) Post Base Mount/Demount Bar Qty. 1 1 1 1 2 4 1 2 2 1 4 4 1 1 Record Serial Number Here: Note: If product has no serial number, record month and year of purchase instead.
Assembly Diagram Item 62317 For technical questions, please call 1-888-866-5797.
Limited 90 Day Warranty Harbor Freight Tools Co. makes every effort to assure that its products meet high quality and durability standards, and warrants to the original purchaser that this product is free from defects in materials and workmanship for the period of 90 days from the date of purchase.