
Product manual


Page 4
SKU
47337
FIGURE 2
Pin
Refer to FIGURE 1 and FIGURE 2.
1. Squeeze both of the adjustment buttons on the sides of the Handle (B), and adjust the
Handle (B) to the proper length for your application. Release the adjustment buttons and
lock the Handle (B) into place.
2. Snap off the Protective Cover (E).
3. Turn the Pin Adjustment Knob (D) to the proper length for the carpet you are working with.
The Pin Adjustment Knob (D) has 8 settings. The lower numbers stand for shorter Pin
lengths and the higher numbers stand for longer Pin lengths. Turn the Pin Adjustment Knob
(D) clockwise to decrease Pin length and counterclockwise to increase Pin length.
Note: The Pin length must allow the Pins to pass through the top of the carpet (pile) and
grip into the cloth-like backing. The Pins must not go through the backing into the pad or
they will damage the pad. This tool is not used for stretching carpet; it is only used for
catching the carpet on the tack strips located around the perimeter of the room.
Note: FIGURE 2 shows the Pins fully extended at 3/8”.
4. Position the Carpet Installer next to the tack strips with the pins properly inserted through
the carpet and into the backing. Push your Knee against
the Knee Pad (A) to move the carpet forward onto the tack
strips. Continue along the perimeter of the room.
5. When you are finished, use the Pin Adjustment
Knob (D) to fully retract the Pins and snap on the
Protective Cover (E). The Protective Cover (E) only
fits on one way. Rotate it until it fits properly.
Operation
1. Keep the Carpet Installer clean. Remove any dirt or
debris from the Pins and Teeth Plates.
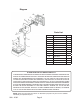
2. When the Teeth Plates (11) need replacing, remove
the two cross-head screws that hold the Teeth Plates
(11) in place and install new Teeth Plates (11).
Replace the Bolts (13). See FIGURE 3.
Note: Always verify that the Teeth Plates (11) are
securely fastened before each use.
Maintenance (see page 5 for parts list)
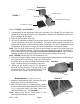
FIGURE 1
FIGURE 3
Teeth Plates
(11)
Handle Grip (C)
Handle (B)
Knee Pad (A)
Pin Adjustment Knob (D)
Protective Cover (E)