
Product manual


Page 3For technical questions, please call 1-888-866-5797.Item 62202
Assembly Instructions
Read the ENTIRE IMPORTANT SAFETY INFORMATION section at the beginning of this document
including all text under subheadings therein before set up or use of this product.
Note: When assembling the leg/base section of the
Stool, all of the bolts should have their heads facing
outside, with all of the nuts on the inside of the frame.
Note: The Stool should be assembled and
used on a flat, level, dry surface. Refer to the
Assembly Diagram during assembly.
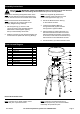
1. Set the Upper Leg (1) over the Lower
Leg (2) as shown in the Assembly Diagram
below. When nested together properly,
the top of the assembly will be flush.
2. Slide the Foot Rest (4) over the leg assembly and
connect the three pieces with four Long Bolts (6).
Note: The Long Bolts (6) should travel
from the outside of the Foot Rest (4) to the
inside of the Upper/Lower Legs (1, 2).
3. Secure the Bolts with Acorn Nuts (7)
on the inside of the Stool.
4. Insert the four Medium Bolts (8)
through the Swivel (9) plate, and into
the leg section. Tighten all Bolts.
5. Place the Seat (5) cushion-side down on a
flat surface that will not scratch the cushion.
Place the Swivel (9) assembly on the bottom
of the Seat, so the holes on the Swivel line up
with the holes on the underside of the seat.
6. Use Short Bolts (10) to attach Swivel to Seat.
Parts List and Diagram
Part Description Qty
1 Upper Leg 1
2 Lower Leg 1
3 Feet 4
4 Footrest 1
5 Seat 1
6 Long Bolt M6x45 4
7 Locknut (M6) 8
8 Medium Bolt M6x31 4
9 Swivel plate 1
10 Short Bolt M6x12 4
1
2
3
4
5
6
7
8
9
10
Record Serial Number Here:
Note: If product has no serial number, record
month and year of purchase instead.
Note: Some parts are listed and shown for
illustration purposes only, and are not available
individually as replacement parts.