
Product manual


Page 5For technical questions, please call 1-800-444-3353.SKU 68385
Operation Instructions
Read the ENTIRE IMPORTANT SAFETY
INFORMATION section at the beginning
of this document including all text
under subheadings therein before
set up or use of this product.
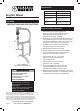
WARNING! Metal edges can be very sharp. Avoid
injuries by wearing ANSI approved safety
goggles and heavy duty work gloves whenever
working, and wear a durable long-sleeved shirt
or coat when working with large workpieces..
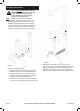
1. Use the included Lower Wheel or select a
different lower wheel (sold separately) from the
Rack, and place on the Bracket for the Lower
Wheel. When selecting the Wheel, consider the
type and hardness of the metal being formed,
as well as the desired curvature of the metal.
Note: Measurements on lower wheels are the
radius of their curvature. The smaller the
measurement, the more severe the curve.
2. Insert the work piece in between the
Upper and Lower Wheels.
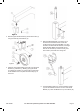
3. Turn the Bracket Height Handle to raise or lower
the Lower Wheel for appropriate clearance (or
pinching) of the metal between the two wheels.
It is recommended to have a looser pinch than
a tighter one. A tighter pinch will make it harder
to push the metal through (increasing the risk of
crushing your nger) and may cause unwanted
creasing. A looser pinch makes it easier to push the
metal through, and with more accuracy. However,
it may take more passes to form the metal.
4. Begin forming the metal by pushing and
pulling it over the dies carefully. KEEP
YOUR HANDS CLEAR OF THE DIES.
5. Use the Release Handle to separate the wheels for
removal or repositioning of the workpiece.
Maintenance Instructions
Read the ENTIRE IMPORTANT
SAFETY INFORMATION section at the
beginning of this document including
all text under subheadings therein
before servicing this product.
Regularly lubricate all Shafts (2 and 12), all exposed
metal surfaces and the inside of part 13.