
Product manual


Page 3For technical questions, please call 1-800-444-3353.SKU 66892
Operating Instructions
Read the ENTIRE IMPORTANT
SAFETY INFORMATION section at the
beginning of this manual including
all text under subheadings therein
before set up or use of this product.
Setup
Note: This Analyzer is powered by the battery
being tested. No additional battery is required.
1. The clip on the back of the tool can
be used to hang the tool.
2. The soft case can be used as a
stand while using the tool.
3. The battery should be rested 30 minutes
before testing. Vehicle should be turned
off with no accessories operating.
4. Attach clamps securely to the battery terminals.
Terminals should be cleaned prior to testing.
5. Test a single 12V battery only. Do not connect this
analyzer to a series of batteries or an electrical
system containing more than one 12V battery.
Do not connect to any other electrical system;
damage to the analyzer will result.
6. Be careful not to damage the analyzer.
Avoid dropping it or dropping items onto it.
Do not expose to moisture or chemicals.
7. The analyzer may be used continuously
without overheating.
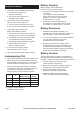
Analyzing a Battery
1. Attach the Clamps to the battery terminals.
a. Attach the RED Clamp (2) to the
POSITIVE (+) terminal. Attach the BLACK
Clamp (3) to the NEGATIVE (–) terminal.
Note: There must be a good connection between the
clamps and the terminals. If there is a poor connection,
the Clamp sign will appear in the lower left corner of
the Display (1), and a “beeping” sound will be heard.
b. If poor connection signal is received,
reconnect the Clamps, and restart the Analyzer
(see next paragraph) to restart the test.
2. With the Clamps connected, turn on the ON / OFF
Button (4) and perform the following steps:
a. Press the ON / OFF (4) Button (4) for 1 second.
The Display (1) will light and a single “beep” tone
will be heard. All symbols on the Screen will briey
light as the Analyzer goes through test mode.
b. Press the OK Button (7) to enter
CCA (Cold Cranking Amp) test.
c. The numerical display will ash, for you to enter
the rated CCA of the Battery. Press the Up/Down
Arrow Button (6) to set the ashing digit.
Press the SEL button to move between digits.
Note: The lowest digit changes in increments of 5 only.
d. After the rated CCA is entered, press
the OK Button (7). The Analyzer
will test for 10 seconds.
e. The unit will beep when the test is complete.
Press any button to stop it from beeping.
f. If the voltage of the battery is too low for testing,
a LOW sign will appear at the lower left of the
Display. The battery must be charged and then
rested for 30 minutes before it can be tested.