
Product manual


Page 24SKU 38471
For technical questions, please call 1-800-444-3353.
Step 5) Make a bend at your second chalk mark to 45 degrees. Repeat for the third mark.
Step 6) Take the stock out of the Bender. Insert the second side. Repeat steps 4 and 5.
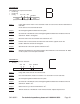
Step 7) Weld the 3-7/8” piece to the open side so that a complete circle is formed.
Step 8) Weld the two short pieces to the right bottom corner of the circle you just completed. The 2”
blank should be welded to the inside, with the 3/4” blank on the outside.
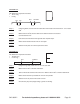
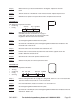
The Letter “R”
Two blanks are required for this letter:
• 8-7/8”
• 6”
• 3-1/8”
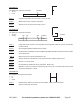
Step 1) Refer to directions for making a “P” on page 22. Using chalk, mark off 2-3/4” in from each side
of the long blank. From this first mark, mark off one inch on each side.
Step 2) Set the Right Angle Bend Attachment into place.
Step 3) Set the stock in the Bender so that the Right Angle Bend Attachment will bend at the first
chalk mark. Bend to 45°.
Step 4) Move the stock to the second chalk mark and bend to 45°.
Step 5) Pull the stock out of the bender and insert the stock with the opposite end in the
bender. Make the 3rd bend at 45°.
Step 6) Slide the stock to the fourth position and bend to 45°.
Step 7) Weld the loop to the top of the 6” piece to form a letter “P”.
Step 8) Weld the 3-1/8” blank opposite the leg of the “P”. You will have to weld it at a
slight outward angle to form an “R”.
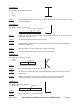
The Letter “S”
One blank is required for this letter:
• 16-1/2”
Step 1) Mark off the blank as indicated above.
Note: The thin bend lines shown above (for bends 4, 5, 6 and 7) must be on the opposite side of the
blank from the four marks on the front side of the blank (#1, 2, 3, and 8).
Step 1) Using chalk, mark off 3-5/8” in from each side. Mark off one inch on each side-see
Figure above.
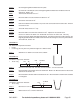
1st Bend2nd
3rd
4th
5th6th
7th
8th
1st Bend
2nd
3rd 4th
2-3/4”1”
2-3/4”
1”
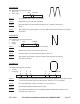
3-5/8”1”
1-1/4”
1”
3-5/8”
1”
1-1/4”
1”