
Product manual


Page 8 For technical questions, please call 1-888-866-5797. Item 96464
SAFETY OPERATION MAINTENANCESETUP
Operating Instructions
Read the ENTIRE IMPORTANT SAFETY INFORMATION section at the beginning of this
manual including all text under subheadings therein before set up or use of this product.
Tool Set Up
TO PREVENT SERIOUS INJURY FROM ACCIDENTAL OPERATION:
Make sure that the Trigger is in the off-position and unplug the tool from its
electrical outlet before performing any procedure in this section.
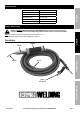
1. Screw on the welding Nozzle (6).
2. Set the Potentiometer (11) at “2”.
3. Connect the Air Hose (13) to a clean, dry,
compressed air supply. The air supply must
be filtered and regulated to 4-5 PSI.
4. Plug the Power Cord (1) into the nearest
120 volt, grounded, electrical outlet.
5. If necessary, adjust the air temperature
with the Potentiometer. (See Figure A)
6. Allow the Welder to warm up for
several minutes prior to use.
7. Make sure the workpiece to be welded is free
of any dirt, dust, or debris. If any oily substance
remains on the workpiece, use methyl ethyl ketone
9 (MEK) (not included) to clean the workpiece.
NOTE: Make sure to read and understand
all instructions and precautions as
outlined by the MEK manufacturer.
TEMPERATURE PARAMETERS
Potentiometer
Setting
2 3 4 5 6 7 8 9 10 11 12
752 F
400 C
0
0
572 F
300 C
0
0
392 F
200 C
0
0
212 F
100 C
0
0
Figure A
Workpiece and Work Area Set Up
1. Designate a work area that is clean and well lit.
The work area must not allow access by children
or pets to prevent distraction and injury.
2. Route the power cord along a safe route to reach
the work area without creating a tripping hazard or
exposing the power cord to possible damage. The
power cord must reach the work area with enough
extra length to allow free movement while working.
3. Secure loose workpieces using a vise or clamps
(not included) to prevent movement while working.
4. There must not be objects, such as utility lines,
nearby that will present a hazard while working.
General Operating Instructions
1. Make sure that the Trigger is in the
off-position, then plug in the tool.
IMPORTANT! Turn on the air flow first
and turn off the air flow last. Start air flow
before connecting to the electricity.
NOTE: Practice the welding procedure on
scrap material before the work peice.
NOTE: Rods or strips are not
necessary for tack welding.
2. Make sure the Nozzle is installed. Allow air
to run through the Nozzle to heat it up.
3. While waiting for the Nozzle to heat up,
position the workpiece to be welded.
4. Carefully apply the heated Nozzle to the
area or seams of plastic to be joined.
5. With small pieces, weld them just enough
to hold the pieces together. If the pieces
are large, you may need to weld along
the entire seam or connection point.
6. Avoid overheating tack points as doing so will
cause the plastic to warp, burn, or discolor. Grind
the tack points down to take off the edges.
7. When finished welding, keep air flowing for five
minutes after disconnecting the electricity.
8. To prevent accidents, turn off the tool and
unplug it after use. Clean, then store the
tool indoors out of children’s reach.