
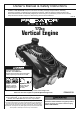
Product manual


Page 7For technical questions, please call 1-888-866-5797.Item 69731
SAFETYOPERATIONMAINTENANCE SETUP
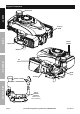
Set Up
Read the ENTIRE IMPORTANT SAFETY INFORMATION section at the beginning of this manual
including all text under subheadings therein before set up or use of this product.
TO PREVENT SERIOUS INJURY:
Operate only with proper spark arrestor installed.
Operation of this equipment may create sparks that can start fires around dry vegetation.
A spark arrestor may be required. The operator should contact local fire agencies
for laws or regulations relating to fire prevention requirements.
The emission control system for this Generator’s Engine is warranted for standards set
by the U.S. Environmental Protection Agency and by the California Air Resources Board
(also known as CARB). For warranty information, refer to the last pages of this manual.
WARNING! DO NOT INSTALL THIS ENGINE ON A VEHICLE.
NOT FOR HIGHWAY USE. FOLLOW ALL APPLICABLE LAWS FOR INSTALLATION AND USE.
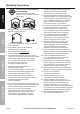
High Altitude Operation Above 3000 feet
WARNING! TO PREVENT SERIOUS INJURY FROM
FIRE:
Follow instructions in a well-ventilated area away from
ignition sources.
If the engine is hot from use, shut the engine off and
wait for it to cool before proceeding. Do not smoke.
NOTICE Warranty void if necessary adjustments
are not made for high altitude use.
At high altitudes, the engine’s carburetor, governor
(if so equipped), and any other parts that control the
fuel-air ratio will need to be adjusted by a qualified
mechanic to allow efficient high-altitude use and to
prevent damage to the engine and any other devices
used with this product. The fuel system on this engine
may be influenced by operation at higher altitudes.
Proper operation can be ensured by installing an altitude
kit at altitudes higher than 3000 ft. above sea level. At
elevations above 8000 ft, the engine may experience
decreased performance, even with the proper main
jet. Operating this engine without the proper altitude
kit installed may increase the engine’s emissions and
decrease fuel economy and performance. The kit should
be installed by a qualified mechanic.
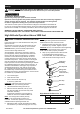
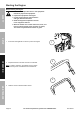
1. Turn off the engine.
2. Close the fuel valve.
3. Place a bowl under the fuel cup
to catch any spilled fuel.
CAUTION! Carburetor bowl may have gas in
it which will leak upon removing the bolt.
4. Unthread the bolt holding the fuel cup.
5. Remove the bolt, Bolt Seal, fuel cup, Fuel
Cup Seal and Main Jet from the body of the
carburetor assembly.
A carburetor screwdriver (not included) is
needed to remove and install the Main Jet.
Note: The mixing tube is held in place by
the Main Jet and might fall out when it is
removed. If it falls out, replace it in the same
orientation before replacing the Main Jet.
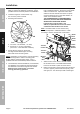
6. Replace the Main Jet with the replacement Main
Jet needed for your altitude range (part 1a or 2a).
Note: The Fuel Cup Seal and Bolt Seal may
be damaged during removal and should be
replaced with the new ones from the kit.
7. Replace the Fuel Cup Seal (4a), fuel cup,
Bolt Seal (3a), and bolt. Tighten in place.
CAUTION: Do not cross thread bolt when tightening.
Finger tighten first and then use a wrench to
make sure the bolt is properly threaded.
8. Wipe up any spilled fuel and allow excess
to evaporate before starting engine.
To prevent FIRE, do not start the engine
while the smell of fuel hangs in the air.
Carburetor
Assembly
Main Jet
Fuel Cup Seal
Mixing Tube
(might remain
inside carburetor)
Fuel Cup
Bolt Seal
Bolt
High Altitude Kit Parts List - A
Part Description Qty
1a Main Jet 3000-6000 ft. 1
2a Main Jet 6000-8000 ft. 1
3a Bolt Seal 1
4a Fuel Cup Seal 2