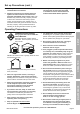
Owner’s Manual & Safety Instructions Save This Manual Keep this manual for the safety warnings and precautions, assembly, operating, inspection, maintenance and cleaning procedures. Write the product’s serial number in the back of the manual near the assembly diagram (or month and year of purchase if product has no number). Keep this manual and the receipt in a safe and dry place for future reference. Using a generator indoors CAN Using an engine indoors KILL YOU IN MINUTES. CAN KILL YOU IN MINUTES.
Table of Contents Safety.......................................................... 2 Maintenance............................................... 15 Setup........................................................... 6 Parts List and Diagram............................... 21 Specifications.............................................. 6 Warranty..................................................... 23 SAFETY Operation.....................................................
8. Use only lubricants and fuel recommended in this manual. 9. Improper connections to a building electrical system can allow electrical current from the generator to backfeed into the utility lines. Such backfeed may electrocute utility company workers or others who contact the lines during a power outage, and the generator may explode, burn, or cause fires when utility power is restored. Consult the utility company and a qualified electrician if intending to use the generator for back up power. 10.
Operating Precautions (cont.) 16. Connect the Generator only to a load or electrical system (120 volt or 240 volt) that is compatible with the electrical characteristics and rated capacities of the Generator. SAFETY 17. Insulate all connections and disconnected wires. 29. Stay alert, watch what you are doing and use common sense when operating this piece of equipment. Do not use this piece of equipment while tired or under the influence of drugs, alcohol or medication. 18.
b. Turn the engine switch to its “OFF” position. c. Allow the engine to completely cool. d. Then, remove the spark plug cap from the spark plug. 2. Keep all safety guards in place and in proper working order. Safety guards include muffler, air cleaner, mechanical guards, and heat shields, among other guards. 3. Keep all electrical equipment clean and dry. Replace any wiring where the insulation is cracked, cut, abraded, or otherwise degraded. Replace terminals that are worn, discolored, or corroded.
Functional Description Specifications SAFETY Rated Output Generator Phase Electrical Receptacle Displacement Engine Type Cooling System Type Capacity Fuel Engine Engine Oil Type SAE SETUP Capacity Run Time @ 50% load Spark Plug Operational Volume Available accessories 120/240VAC, 60Hz 3,200 Running Watts (4,000 Peak Watts) Single Two 3-Prong, duplex NEMA #5-15 120V One 4-Prong, NEMA #L14-30 twistlock 120V/240V One DC Outlet 12VDC 212cc Horizontal Single Cylinder 4 stroke OHV Forced air cooled 87+ oc
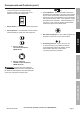
Components and Controls (cont.) I O ON OFF 3. Circuit Breakers: The circuit breaker protects the Generator from overloading. The rating of the breaker and the load it protects are marked near the breaker. Should any of the Circuit Breakers trip, the Generator will stop the electricity output. If this happens, unplug all loads from the Generator. Allow the Generator to cool down. Then, press the tripped Circuit Breaker, restart the Engine, and re-attach loads.
Initial Tool Set Up/Assembly Read the ENTIRE IMPORTANT SAFETY INFORMATION section at the beginning of this manual including all text under subheadings therein before set up or use of this product. SAFETY TO PREVENT SERIOUS INJURY: Operate only with proper spark arrestor installed. Operation of this equipment may create sparks that can start fires around dry vegetation. A spark arrestor may be required.
Operating Instructions Read the ENTIRE IMPORTANT SAFETY INFORMATION section at the beginning of this manual including all text under subheadings therein before set up or use of this product. SAFETY Inspect tool before use, looking for damaged, loose, and missing parts. If any problems are found, do not use tool until repaired. Generator Pre-Start Checks Inspect engine and equipment, looking for damaged, loose, and missing parts before set up and starting.
Using the Generator Before Starting the Generator Engine SAFETY Before starting the engine: a. Follow the Set Up Instructions to prepare the Generator. b. Unplug all loads from the Generator. c. Inspect the Generator and engine. d. Fill the engine with the proper amount and type of both stabilizer-treated fuel and oil. Basic Generator Use Procedure See following pages for specific instructions 1. Check that the generator can handle the wattage needed to power your products. SETUP 2.
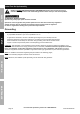
Starting the Engine SAFETY 1. To start a cold engine, move the Choke to the CHOKE position. To restart a warm engine, leave the Choke in the RUN position. SETUP 2. Open the Fuel Valve. 3. Turn the Engine Switch to ON. I ON OPERATION O MAINTENANCE 4. Grip the Starter Handle of the Engine loosely and pull it slowly several times to allow the gasoline to flow into the Engine’s carburetor. Then pull the Starter Handle gently until resistance is felt.
Connecting Electrical Loads Familiarize yourself with the engine controls, power panel and how to start the engine before using the generator. Calculate the wattage of the products you will use with the generator and verify that the generator can handle the 0 1,00 0 total load. 0 t SAFETY WARNING! Connect only properly wired plugs to the generator. A plug that is spliced onto a different cord may be hazardous. Only a qualified electrician should wire a plug onto a cord.
Calculating Total Wattage of Devices Used with the Generator Note: Wattages listed below are estimates for that type of equipment only. Check nameplate wattages on all loads before connecting to Generator.
Stopping the Engine in an Emergency To stop the engine in an emergency, turn the Engine Switch off. I SAFETY NOTICE: Generator shut-off under load may damage the generator and attached equipment. O OFF Stopping the Engine Under Normal Conditions 1. Before turning off the Engine, turn off all electrical loads, then unplug them. SETUP 2. Turn the Engine Switch off. I O OFF OPERATION 3. Close the Fuel Valve. MAINTENANCE Page 14 For technical questions, please call 1-888-866-5797.
User‑Maintenance Instructions TO PREVENT SERIOUS INJURY FROM ACCIDENTAL OPERATION: Turn the Power Switch of the equipment to its “OFF” position, wait for the engine to cool, and disconnect the spark plug cap before performing any inspection, maintenance, or cleaning procedures. SAFETY Procedures not specifically explained in this manual must be performed only by a qualified technician. TO PREVENT SERIOUS INJURY FROM EQUIPMENT FAILURE: Do not use damaged equipment.
Checking and Filling Fuel SAFETY WARNING! TO PREVENT SERIOUS INJURY FROM FIRE: Fill the fuel tank in a well-ventilated area away from ignition sources. If the engine is hot from use, shut the engine off and wait for it to cool before adding fuel. Do not smoke. 1. Clean the Fuel Cap and the area around it. 2. Unscrew and remove the Fuel Cap. Note: Do not use gasoline containing more than 10% ethanol (E10). Do not use E85 ethanol.
1. Remove the air filter cover and the air filter elements and check for dirt. Clean as described below. 2. Cleaning: • For “paper” filter elements: To prevent injury from dust and debris, wear ANSI-approved safety goggles, NIOSH‑approved dust mask/respirator, and heavy-duty work gloves. In a well‑ventilated area away from bystanders, use pressurized air to blow dust out of the air filter. If this does not get the filter clean, replace it.
Storage When the equipment is to remain idle for longer than 20 days, prepare the Engine for storage as follows: SAFETY 1. CLEANING: Wait for Engine to cool, then clean Engine with dry cloth. NOTICE: Do not clean using water. The water will gradually enter the Engine and cause rust damage. Apply a thin coat of rust preventive oil to all metal parts. 2. FUEL: To protect the fuel tank during storage, fill the tank with gasoline that has been treated with a fuel stabilizer additive.
Troubleshooting FUEL RELATED: FUEL RELATED: 1. No fuel in tank or fuel valve closed. 1. Fill fuel tank and open fuel valve. 2. Choke not in CHOKE position, cold engine. 2. Move Choke to CHOKE position. 3. Gasoline with more than 10% ethanol used. 3. Clean out ethanol rich gasoline from fuel (E15, E20, E85, etc.) system. Replace components damaged by ethanol. Use fresh 87+ octane unleaded gasoline only. Do not use gasoline with more than 10% ethanol (E15, E20, E85, etc.). 4.
Troubleshooting (cont.) Problem SAFETY Engine misfires SETUP Engine stops suddenly Engine stops when under heavy load Engine knocks Possible Causes Probable Solutions OPERATION 1. Spark plug cap loose. 1. Check wire connections. 2. Incorrect spark plug gap or damaged spark plug. 2. Re-gap or replace spark plug. 3. Defective spark plug cap. 3. Replace spark plug cap. 4. Old or low quality gasoline. 4. Use only fresh 87+ octane unleaded gasoline.
Parts List and Diagram Qty 1 1 1 1 4 2 2 2 4 1 1 1 1 1 1 2 2 1 1 3 1 2 1 1 1 1 2 1 6 1 1 2 1 1 1 1 1 1 1 1 1 1 1 1 2 2 1 2 2 2 2 2 1 Part 54 55 56 57 58 59 60 61 62 63 64 65 66 67 68 69 70 71 72 73 74 75 76 77 78 79 80 81 82 83 84 85 86 87 88 89 90 91 92 93 94 95 96 97 98 99 100 101 102 103 104 105 106 Description Bolt Shroud Shroud, Cylinder Body Shield,Lower Protector, Oil Bolt Bolt Bolt Collar Bolt Carburetor Assy.
Page 22 For technical questions, please call 1-888-866-5797.
Harbor Freight Tools Co. makes every effort to assure that its products meet high quality and durability standards, and warrants to the original purchaser that this product is free from defects in materials and workmanship for the period of 90 days from the date of purchase.
2. 6. Repair or replacement of any warranted part will be performed at no charge to the owner if the work is performed through a warranty station authorized by HFT. For emissions warranty service, contact the HFT Customer Service Department at 1-888-866-5797. 1) Coverage under this warranty shall also extend to the failure of any engine components caused by the failure of any warranted part while it is still covered under this warranty. 2) 3. 4.