
Product manual


SKU 99721 For technical questions, please call 1-888-866-5797. Page 5
OPERATION
Read ENTIRE IMPORTANT
SAFETY INFORMATION
section at beginning of this
manual including all text under
subheadings therein before set
up or use of this product.
Loading
1. Remove LEFT Wheel Lock Pin (8),
Adjustment Pin (16), and their R-pins
(6).
2. Move Adjustment Pin (16) so that
motorcycle’s weight will be centered
on Platform. Some larger wheels will
require Adjustment Pin to be left off
entirely. If used, secure Adjustment
Pin in place with a R-pin (6).
3. Remove Wingnut (10), Press Plate
(9) and Ramp (2).
4. Hook Ramp (2) to lip on RIGHT side
of platform. The Ramp must be se-
cured to Platform.
5.
Put motorcycle in neutral and, with
an assistant, push it up Ramp. Stop
when front wheel reaches center of
Platform (1) and have assistant sup-
port motorcycle.
6. Remove right Wheel Lock Pin (8),
and its R-pin (6).
7. Push motorcycle completely onto
carrier. Install both Wheel Lock Pins
through motorcycle wheels and se-
cure with R-pins (6).
Note: If a wheel cannot be secured with
Wheel Lock Pins, use a properly-rat-
ed ratchet tie downs to rmly secure
it to its end of platform.
8. Put motorcycle in gear.
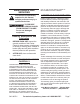
9.
a
b
d
c
Tie down motorcycle, as shown
above (view from outboard side):
a. Connect a ratcheting tie down from
bracket on end of Tube (3), over
front frame of motorcycle and to
Platform (1) on the inboard side.
b. Connect a second ratcheting tie
down from bracket on end of Tube
(3), over rear frame of motorcycle
and to Platform (1) on the inboard
side.
c. Connect a third ratcheting tie down
from Tie Down Bracket (4), over front
frame of motorcycle and to Platform
(1) on the outboard side.
d. Connect a fourth ratcheting tie down
from Tie Down Bracket (4), over rear
frame of motorcycle and to Platform
(1) on the outboard side.
10. Use ratcheting tie downs to compress
motorcycle’s suspension evenly until