NOTICE is used to address practices not related to personal injury. SAVE THIS MANUAL Keep this manual for the safety warnings and precautions, assembly, operating, inspection, maintenance and cleaning procedures. Write the product’s serial number in the back of the manual near the assembly diagram (or month and year of purchase if product has no number). Keep this manual and the receipt in a safe and dry place for future reference.
This enables better control of the product in unexpected situations. d. Dress properly. Do not wear loose clothing or jewelry. Keep your hair, clothing and gloves away from moving parts. Loose clothes, jewelry or long hair can be caught in moving parts. e. Only use safety equipment that has been approved by an appropriate standards agency. Unapproved safety equipment may not provide adequate protection. Eye protection must be ANSI-approved. 3. Carrier use and care a.
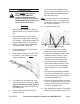
SPECIFICATIONS Weight Capacity 400 Pounds 7 5 18,19 15 Motorcycle Platform Size 78-3/4” L X 8-5/8” W Receiver Size 2” 20 UNPACKING When unpacking, make sure that item is intact and undamaged. If any parts are missing or broken, please call Harbor Freight Tools at number shown on cover of this manual as soon as possible. ASSEMBLY Read ENTIRE IMPORTANT SAFETY INFORMATION section at beginning of this manual including all text under subheadings therein before set up or use of this product.
OPERATION Read ENTIRE IMPORTANT SAFETY INFORMATION section at beginning of this manual including all text under subheadings therein before set up or use of this product. Loading 1. Remove LEFT Wheel Lock Pin (8), Adjustment Pin (16), and their R-pins (6). 2. Move Adjustment Pin (16) so that motorcycle’s weight will be centered on Platform. Some larger wheels will require Adjustment Pin to be left off entirely. If used, secure Adjustment Pin in place with a R-pin (6). 3.
there is no possibility of motorcycle coming loose. 11. Turn knob on each Wheel Clamp (23) to secure motorcycle’s front wheel. 12. Return Ramp (2) to mounted position and secure with Wingnut (10) and Press Plate (9). 13. Attach any needed markers and/or lights to carrier and motorcycle as required by vehicle codes. 6. Set motorcycle into Neutral gear. With assistance, push motorcycle off Ramp until rear wheel is halfway across Platform (1). Have assistant support motorcycle. 7.
MAINTENANCE AND SERVICING Procedures not specifically explained in this manual must be performed only by a qualified technician. TO PREVENT SERIOUS INJURY FROM PRODUCT FAILURE: Do not use damaged equipment. Cleaning, Maintenance, and Lubrication 1. BEFORE EACH USE, inspect the general condition of the Carrier. Check for loose screws, misalignment or binding of moving parts, cracked or broken parts and any other condition that may affect its safe operation. 2. AFTER USE, clean surfaces with clean cloth.
PARTS LIST Part 1 2 3 4 5 6 7 8 9 10 11 12 PARTS LIST Description Qty Platform Ramp 2" Tube w/ Bracket Tie Down Bracket Hitch Pin 5/8" R-Pin 3 R-Pin 4 Wheel Lock Pin Press Plate Wing Nut Bolt M8*65 Bolt M10*70 1 1 1 2 1 3 1 2 1 1 1 2 Part 13 14 15 16 17 18 19 20 21 22 23 Description Qty Nut M10 Spring Washer 10 Nut M8 Adjustment Pin Stabilizer Spring Washer 12 Nut M12 Bolt M12*110 Bolt M6*70 Lock Nut M6 Wheel Clamp 2 2 1 1 2 1 1 1 4 4 2 1 10 8 21 8 9 22 16 2 7 23 18,19 15 6 5 20 13,14