
Product manual


Page 6 For technical questions, please call 1-888-866-5797. Item 60340
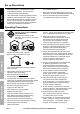
Set Up
Read the ENTIRE IMPORTANT SAFETY INFORMATION section at the beginning of this manual
including all text under subheadings therein before set up or use of this product.
TO PREVENT SERIOUS INJURY:
Operate only with proper spark arrestor installed.
Operation of this equipment may create sparks that can start fires around dry vegetation.
A spark arrestor may be required.
The operator should contact local fire agencies for laws or
regulations relating to fire prevention requirements.
The emission control system for this Engine is warranted for standards set by the U.S. Environmental
Protection Agency. For warranty information, refer to the last pages of this manual.
WARNING! DO NOT INSTALL THIS ENGINE ON A VEHICLE.
NOT FOR HIGHWAY USE. FOLLOW ALL APPLICABLE LAWS FOR INSTALLATION AND USE.
WARNING! If you do not connect a battery to the positive battery cable,
wrap its terminal securely with electrical tape (sold separately).
Battery Setup Instructions
1. Place a fully charged, lead-acid 12 volt,
300 CCA, 36 Ah battery (not included) in
a stable, flat location near the engine.
2. Only use cables sized to match their length
according to the following chart:
Cable Gauge
(lower gauge numbers
mean thicker cables)
Maximum
Cable Length
6 5′
4 7′
2 12′
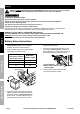
3.
Starting Relay
Motor Starter Assembly
Attach the positive cable from the positive
battery terminal to the Positive Terminal on
the starter solenoid (uncovered terminal),
shown above. Connect cable securely to
prevent disconnection and short circuits.
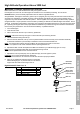
4. Attach the negative cable to the
negative battery terminal.
5. Connect the negative cable securely to one
of the engine mounting bolts, as shown in
the diagram below. Connect cable securely to
prevent disconnection and short circuits.
Connect Negative
Battery Cable to a
Mounting Bolt
6. Coat the terminals and cable ends with
a corrosion-preventive coating.
SAFETY OPERATION MAINTENANCESETUP